General Tso’s Chicken
Plan Z Phase: This is a Z3 (ZReboot) recipe.
I finally looked up how to say this name… it’s pronounced SO.
So, let’s make it. This is a very popular Chinese take out item that you can easily make at home. You can also follow these instructions and make it much lower carb than the one from the restaurant. There are seven grams of carbs in a tablespoon of cornstarch. On the surface that might seem bad, but most of the cornstarch in the recipe will be shaken off and rinsed down your drain. The cornstarch does help give the chicken the trademark crispiness.
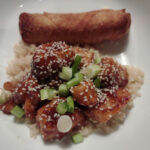
Servings: Serves up to 4 depending on hunger levels. I serve with just a half cup of cooked rice per person. You don’t need a big pile of rice to get the “experience.” Serve it with a colorful vegetable, and get more impact for your dish. I recommend steamed or roasted broccoli. I splurged and served mine with one small veggie eggroll.
Ingredients:
- 1 lb of chicken breast cut into bite-sized chunks about 1” in diameter
- 1/4 cup of cornstarch
- Peanut oil for frying (Peanut oil has a higher flashpoint so it won’t burn as easily as other oils.)
- 2 Tbl of minced ginger (Jar ginger can work.)
- Red chili flakes to taste (I use very little and let my husband add more when he goes to eat his portion. That way no one gets too much heat.)
- 2 tsp of minced garlic (Jar garlic can work.)
The sauce:
- 3 Tbl of rice wine vinegar
- 2 Tbl of coconut aminos, or Braggs aminos, or last choice: soy sauce (The others taste the same and are MUCH healthier for you.)
- 2 tsp of hoisin sauce (This is sugary but you are using very little. Only 7 grams of carbs per Tbl so it’s not bad.)
- 1/4 cup of water
- 1 tsp of cornstarch
Optional:
- garnishes might include a dusting of sesame seeds and diced green onion
Instructions:
I take out a ziplock baggie and place the chicken chunks inside. Put in the cornstarch and toss it around. Set that aside while you make the sauce.
In a small bowl, add the rice wine vinegar, aminos, hoisin sauce, water, and cornstarch. Whisk to blend. Set aside.
In a high-sided saucepan add enough peanut oil to bring it up to achieve a two-inch depth. Heat on medium-high until it’s ready to fry. I check when it’s ready by flinging just a few drops of water off my fingers into the oil. If it spits back, it’s ready. Careful. Maintain oil heat on medium-high for even cooking.
Now you’re ready to fry. I first take out my large sieve (or colander) and position myself with the sieve over the sink. I empty the contents of the baggie with the chicken into the sieve and then shake it over the sink so any excess cornstarch falls into the sink for disposal. (You can also do this over a garbage can if you prefer.)
Fry the chicken in the oil across two batches. If they are not crowded they will get crispier. Cook until brown. Set aside on paper towels to drain while you cook the second batch.
Once the chicken is fried, you’ll drain off all of the peanut oil except one tablespoon. Be careful while doing this. I transfer it to a can and let it cool before I dispose of it. I even let it sit overnight in the can in the sink.
Set the pan back on the heat and add the garlic, chili flakes, and ginger. Heat for about 30 seconds until you can smell the garlic and ginger. Add the chicken and toss. Then add the sauce and toss some more until the sauce thickens. Might take another 30 seconds.
Serve immediately – while the chicken is still crispy. Garnishes get added right before serving.
Cheers!