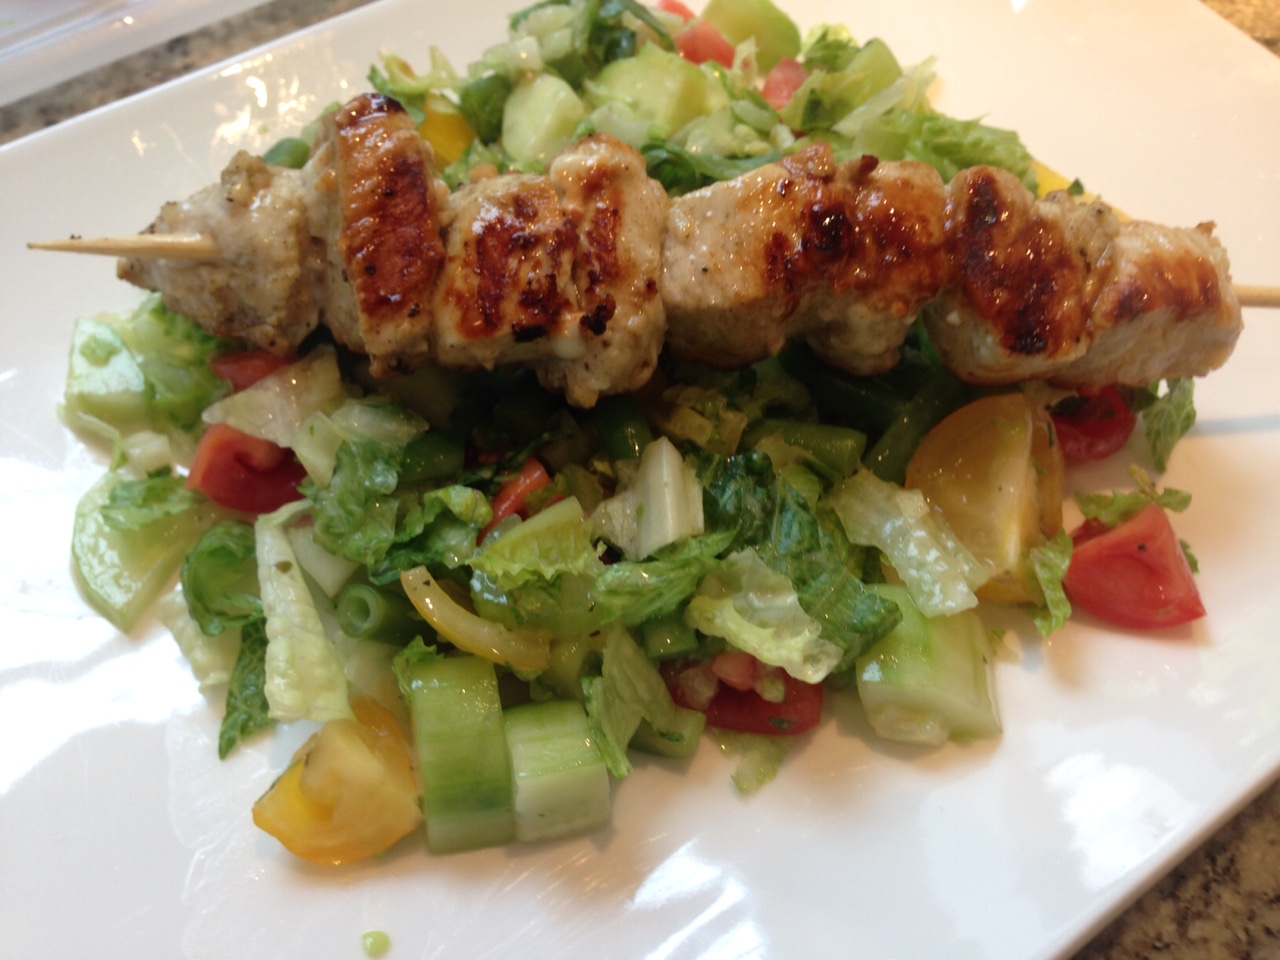
Lemon-Garlic Chicken Kebabs on Top of a Chopped Salad
Plan Z Phase: This is a Z2 (ZReduction) recipe. Grilling makes Plan Z easy and popular. This dish can be served to a whole family or even as part of an outdoor cookout party.
Servings: Serves 2 but can be multiplied for a party or a family
Ingredients:
For the chicken:
- 2 Tbl lemon juice
- 2 tsp of minced garlic (jar garlic will work just fine)
- 1/3 – ½ tsp of ground oregano (or to taste)
- Sea salt and pepper to taste
- 1 lb of skinless, chicken breast cut to bite-sized pieces
For the chopped salad:
- unlimited greens chopped to small, bite-sized pieces. I use predominately romaine. You can use your favorites. I always pick one that is crunchy though…kale will work, too. This leafy green has a lot of crunch.
- 1 cup of allowed veggies
- 1 Tbl of allowed dressing
Instructions:
For the chicken:
In a bowl, place the cut up chicken. Drizzle on the lemon juice and toss in the garlic and sprinkle on the oregano. Stir to combine. Marinate 15 minutes or longer in your refrigerator.
Thread the chicken pieces onto skewers. If using wooden skewers, be sure to soak them first in water for a half hour so they don’t burn on the grill. Season with grated sea salt and pepper.
Preheat grill.
Grill on medium high until no pink remains in the chicken. Turn them to get nice grill marks as they cook. This won’t take long since the chicken pieces are not large.
For the salad:
For my chopped salad I used cooked and chilled green beans cut into bite-sized pieces. I also used red and yellow tomato bits, chopped celery and chopped English cucumber.
You can use any allowed veggies you choose. One cup is your portion.
Drizzle on one tablespoon of an allowed dressing of your choice. Toss thoroughly. If you do toss it well, one tablespoon of dressing will seem like enough.
Top with your chicken.
Enjoy!
Cheers,
Roasted Red Potatoes with Onions and Balsamic Vinegar
Plan Z Phase: This is a Z3.5 (ZReboot) recipe.
Easy and delicious roasted red potatoes, with onions and balsamic vinegar!
Ingredients:
- 2 cups of tiny, frozen pearl onions
- 2 lb of C-size (small) red potatoes cut in half
- 1 Tbl of Italian seasoning
- 1/8 tsp of ground nutmeg
- ¼ cup of good quality balsamic vinegar
- grated sea salt and pepper to taste
Directions:
Preheat oven to 400 degrees (or 375 convection if you have that option).
Spray a 9" x 13” ovenproof pan with olive oil spray. Add all ingredients.
Stir to combine. Roast your potatoes and onion mixture until cooked through. This should be about 30 minutes total. Might be a little less if you use convection. Just check the potatoes for doneness with a sharp knife.
Now, if you want your potatoes to be carb-resistant you’ll totally cool them down in the refrigerator. To save electricity I let mine cool on the counter, and then totally chill them in the fridge. It’s recommended that you leave them in the refrigerator overnight and eat them the next day. Either way, just make sure they have been totally chilled for hours.
When you take them out of the refrigerator, just reheat at 300 degrees until warm and ready to serve.
I don’t serve potatoes often but when I do, it’s much healthier to serve carb resistant. These are great on a buffet served hot or room temp. I use them for cocktail parties, too.
Enjoy in moderation,
Cheers,

Anna's 3 Cheese Italian Chicken
Plan Z Phase: This is a Z3 (ZReboot) recipe.
Dieter Anna sent this fantastic recipe in to us that we would love to share with you! Thank you Anna!
Anna's comments on this recipe:
My husband and 4 year old daughter love this dish - they both go back for seconds when I make it. The ricotta cheese gives it that "lasagna" flavor and you don't even miss the noodles.
You can add more or less spinach and mushrooms according to your family's preferences. I add plenty of mushrooms and spinach to bulk up this meal.
Servings: Serves 6-8
Serving size is 1-1/2 cups
Ingredients:
- 1 pound of chicken breast, thinly sliced
- 2-3 Tbl Italian seasoning
- 24 oz jar of spaghetti sauce (Newman’s Own brand works, and has no added sugar, but feel free to look for others as well)
- 2 cups part-skim mozzarella, shredded
- 1/2 cup feta cheese, crumbled
- 14 oz. ricotta cheese, whole milk
- 3 cups fresh spinach, chopped
- 1 cup fresh mushrooms, sliced
- fresh basil, optional
Directions:
Pre-heat oven to 350 degrees.
Thinly slice the chicken breasts, place on a heated grill pan and sprinkle with Italian seasoning.
Cook until juices run clear. Let the chicken rest five minutes so the juices don't run out when you slice it. After chicken has rested, chop it in to 1" pieces.
Pour a little of the spaghetti sauce in the bottom of a 9" x 13" pan. Place your previously chopped chicken in the pan, then spoon ricotta cheese on top and spread it out over the chicken. Then create an even layer of spinach leaves on top. My family doesn't like big spinach leaves so I tear them in to smaller pieces- you can buy baby spinach if you prefer.
If you have button mushrooms, go ahead and roughly chop and distribute them evenly over the top of the spinach. If you have sliced mushrooms, just skip the chopping step and layer them on the spinach.
Sprinkle crumbled feta cheese evenly across the pan and add fresh basil leaves on top. I grow my own basil so I usually pick the medium sized leaves from my plant. You can chop the basil if you want, I leave mine whole.
Pour the remaining spaghetti sauce on top of everything, making sure to spread it out so that it covers the entire pan of ingredients. Finish by topping with shredded mozzarella.
Bake in oven for 15 minutes, then broil for 4-5 minutes on high to brown the top of your cheese.
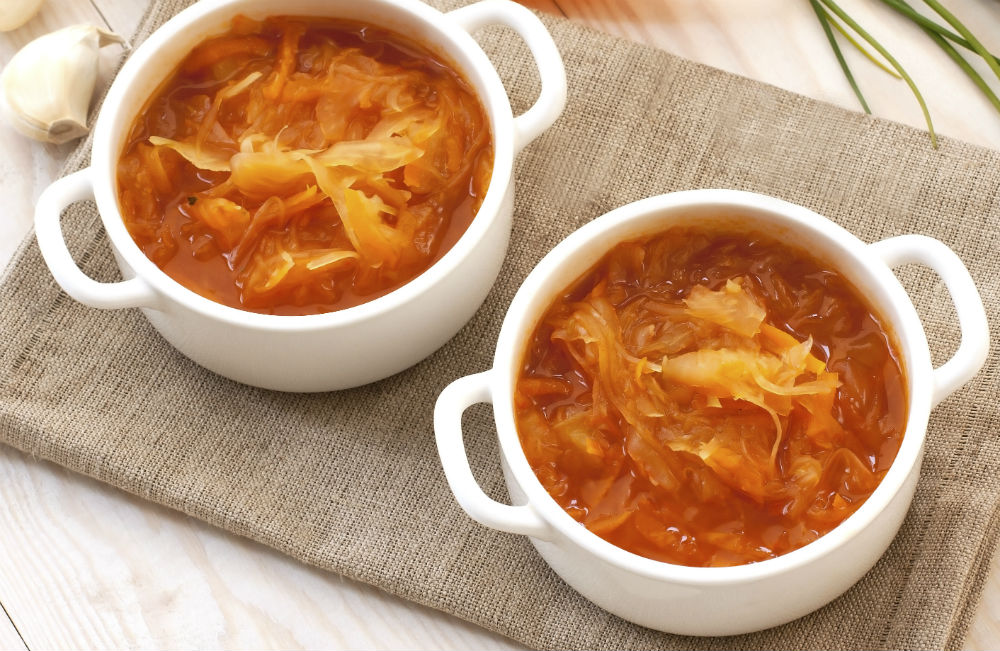
Cabbage Soup
Plan Z Phase: This is a Z2 (ZReduction) recipe. A snap to put together. All the ingredients spend a lot of loving time together in the pot to make an amazingly simple and flavorful soup. This will make a great weeknight meal. You might even have leftovers for lunch the next day! Thanks to one of Plan Z's own, Carolyn, for "testing" this recipe out in her kitchen.
Serving Size: 1-1/2 cups. This will include your veggie portion.
Ingredients:
- 1/2 of 1 large head of cabbage, chopped
- 1 cup chopped celery
- 1 onion chopped
- 2 cups beef broth
- 2 cups chicken broth
- 4 cups water
- 2 pounds ground beef, browned and drained
- a 15-oz can of Hunts (100% natural) tomato sauce
- a 15-oz can of Hunts tomatoes (100% natural), with peppers, celery and onions
- salt and pepper to taste
- 2 tsp Truvia
Instructions:
Add the cabbage, celery, onion, beef broth, chicken broth, and water into a stock pot and cook until the veggies are tender.
Then add the ground beef, Hunt's tomato sauce, Hunt's tomatoes, and salt and pepper to taste.
Bring everything to a boil and simmer for 10 minutes.
At the very end add 2 tsp of Truvia and simmer for 10 more minutes to let the flavors combine.
Enjoy!
Cheers,
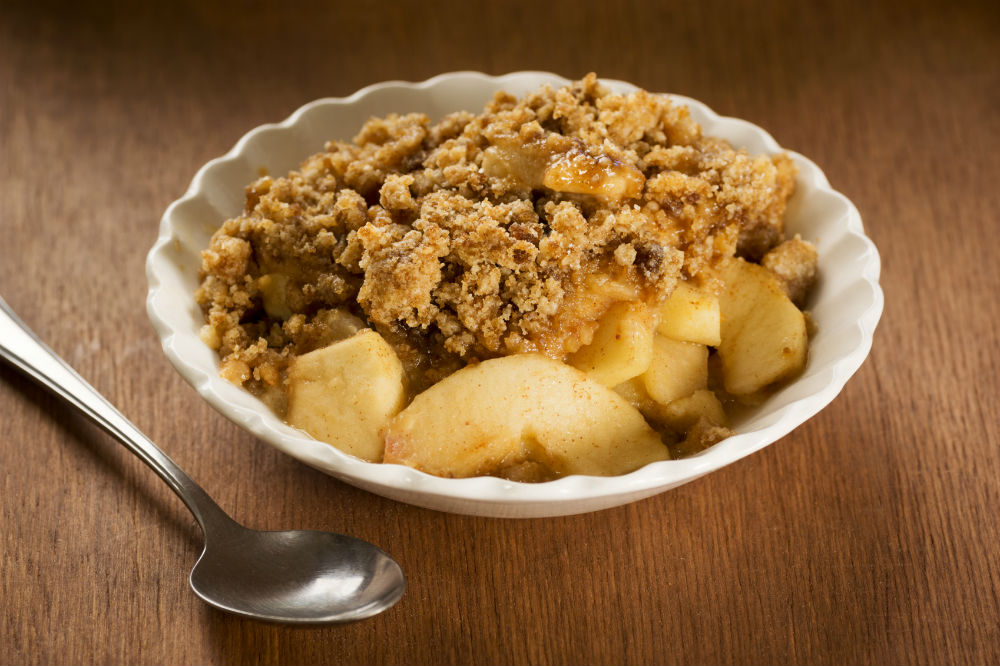
My Mother's Apple Crisp
Plan Z Phase: This is a Z3.5 (ZReboot) and Zola to GO! recipe.
There’s something about the potential of smelling apples baking with cinnamon and nutmeg that conjures up fond memories of my mother in the kitchen. She taught me as a small girl to make apple crisp so I did it often. At one point I converted the recipe using Truvia and some oats as well as almond flour. Technology has changed and we now have Swerve or ZSweet. These sugar substitutes caramelize so it gets the crunchy top I was missing from the original apple crisp recipe. Truvia won’t caramelize. I have used regular flour in this one (hence Z3.5) because per person it’s not much and it’s a treat. Just treat it…as a treat. This also makes a wonderful little breakfast the next day. Just keep your portion small; about a ½ cup.
Servings: Serves 6
Ingredients:
- 3-4 large apples peeled and cut into thin wedges (I used Honeycrisp. Granny Smith works great, too.)
- ½ cup of regular flour (you can also try coconut flour for fewer carbs. If you do use coconut flour please note that your crumble won't crisp up as well
- ½ cup of Swerve or ZSweet sugar substitute (Order this online. These are great, new products but I have not found them in a store yet).
- 1 egg
- Pinch of salt
- ½ tsp of cinnamon (or to taste)
- ½ tsp of nutmeg plus a little more for dusting (or to taste)
- 1/3 cup of butter, melted
Instructions:
Grease the bottom of a 9" x 9" ovenproof pan. Spread in your apple wedges.
In a bowl add the flour, egg, salt, cinnamon and nutmeg. With a fork mix the dry goods and egg to make a crumbly mixture. Pour that over the apples and spread it out to cover the surface.
Drizzle the melted butter over the top. It won’t cover every bit. There will be spaces in-between. Now, I put a whisper of additional nutmeg over the top.
Put in the oven to bake at 375 degrees for 30 minutes or until the top begins to brown a bit.
Serving Suggestions:
You can serve this warm or at room temperature. One of my favorites is actually serving the crisp the next day for a small breakfast. When you store it, I do it on the counter rather than refrigerator. The top will be crispy in most parts. When I cover it, I only cover the cut edge. I find that if I cover the whole top the crispy crust turns moist. Same thing happens when I put it in the refrigerator; hence the counter storage. Most often if you serve this to a group you won’t have any leftovers anyway!
Enjoy!
Cheers,
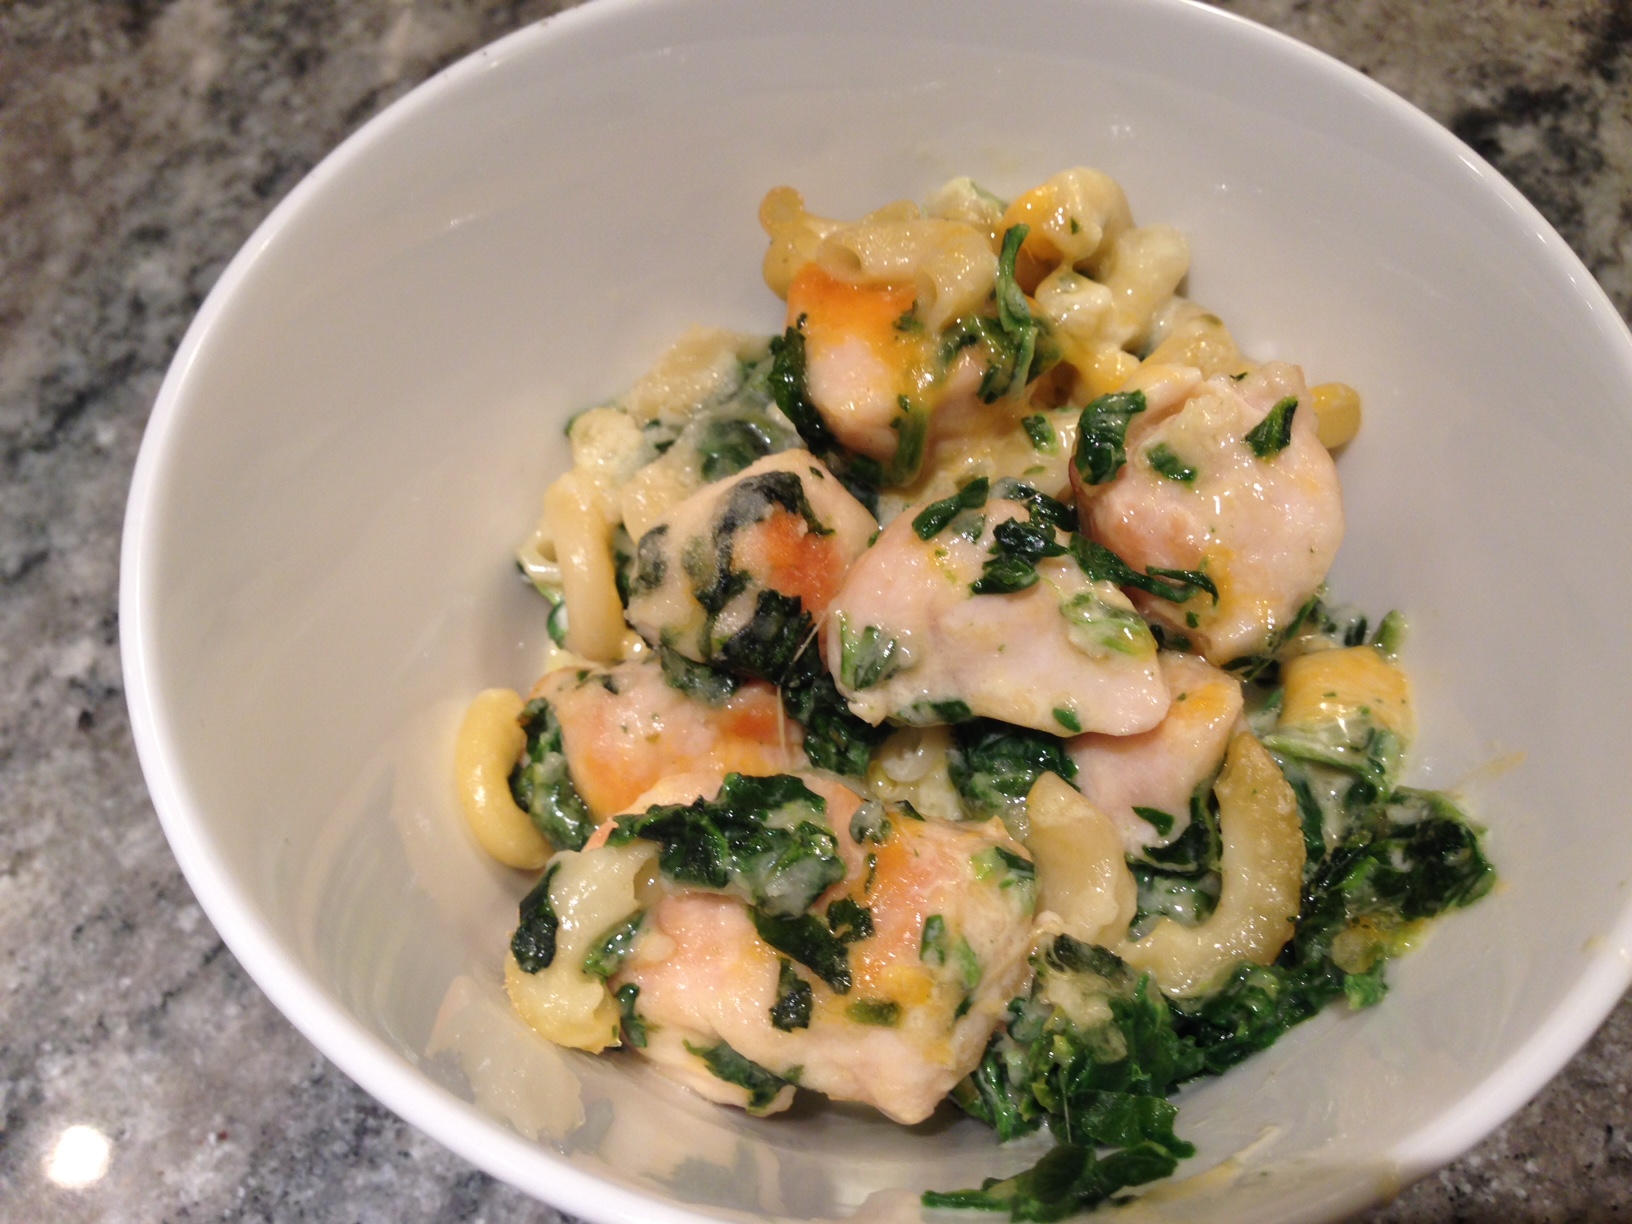
Spicy Spinach Chicken Casserole Bowl
Plan Z Phase: This is a Z3 (ZReboot) recipe.
This dish comes together super-fast. As you transition to Z3.5 you can add a few noodles (see how to do that here!), but honestly, when I make it again I feel the noodles don’t add that much. It will be really tasty without them. You choose. You can also double this recipe and serve it on a buffet or at a potluck.
Servings: Serves 4
Ingredients:
- 8 chicken tenders cut into bite sized (1”) pieces
- 1 cup of shredded pepper jack cheese
- 1 cup of shredded cheddar cheese
- 10 oz of frozen, chopped spinach, thawed and drained (if necessary)
- ¼ cup of grated parmesan cheese
- 3/4 cup of cream
Instructions:
Preheat your oven to 350 degrees.
Spray a saute pan with olive oil spray. Put in your chicken chunks and cook on medium high until they get lightly browned and cooked through. Turn off and set aside.
Spray a 9” square oven-proof pan with your olive oil spray. Put in the spinach, pepper jack, cheddar, noodles and chicken along with the cream. Stir to mix it all up. Sprinkle on the parmesan and put it in your oven to cook 20-25 minutes until hot and bubbly. Let it cool down for 5 – 10 minutes before serving so you don’t burn your mouth.
Serve in a bowl or plate it.
Enjoy!
Cheers,
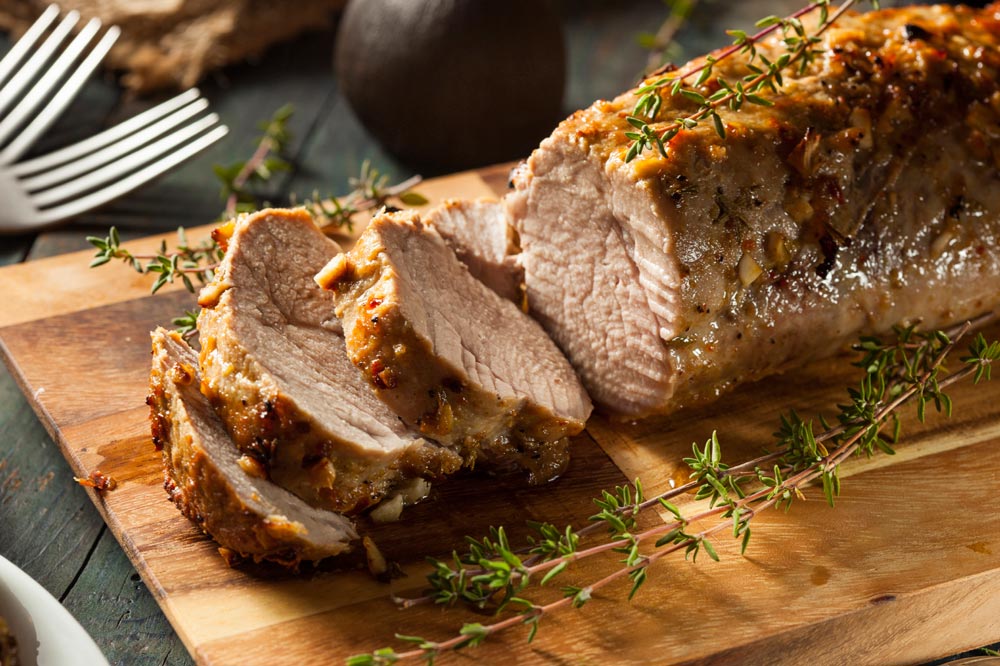
Maple Pork Tenderloin
Plan Z Phase: This is a Z3.5 (ZReboot) recipe.
Once you get your system cleaned out with ZReduction and you stabilize in ZReboot, you can “go a little wild” once in a while and venture out into the world of a bit of sugar. I took a recipe that called for an entire cup of syrup (yep, you read that right) and totally redesigned so it could be eaten in ZReboot 3.5. This is more of a glaze on the pork tenderloin. The mustard and syrup make a really tasty ying/yang taste sensation. You won’t believe it until you bite into it.
I served this with a bunch of stir fried veggies; the lone Asian veggie was baby bok choy. The rest were zucchini, baby patty pan squash, and mushrooms. I didn’t take a picture of this because it was a total experiment and I never intended it to be published, but it was so good I couldn't resist! The picture you see is a glazed pork tenderloin.
Servings: Serves 2 – 3, you can double this easily and not use any more prep dishes.
Ingredients:
- 2 Tbl of Dijon mustard
- 1 tsp of sesame oil
- 1 tsp of garlic powder
- ¼ cup of maple syrup
- grated sea salt and pepper to taste
- 1-1/2 pound of pork tenderloin (1 full tenderloin)
Instructions:
Preheat oven to 400 degrees or 375 degrees in a convection oven.
In a small bowl, combine ingredients up to the pork tenderloin. Stir. Take out a 9" x 13” ovenproof pan. Spray it with olive oil spray. Spray the tenderloin. Then drizzle on the mustard/syrup mixture. Roll the pork tenderloin around until it’s completely covered. Cover and marinate in your refrigerator an hour or more. (You could even prep this in the morning before work and come home to it all set to go in the oven).
Put the prepped tenderloin in the oven to roast. This should take 20 – 30 minutes depending on how big it is. Check it with your meat thermometer to make sure it has reached at least 160 degrees. At 160 the pork will still be slightly pink and juicy. If you are one of those folks who like pork more well-done, you can keep cooking it.
The glaze will be glistening on the pork and some of it will have caramelized in the pan. It will be a sticky clean up, but just soak it and it comes off fairly easily.
Slice the pork tenderloin and serve. Each person will get approximately 3-4 slices. This would be great with mashed cauliflower too.
Enjoy!
Cheers,
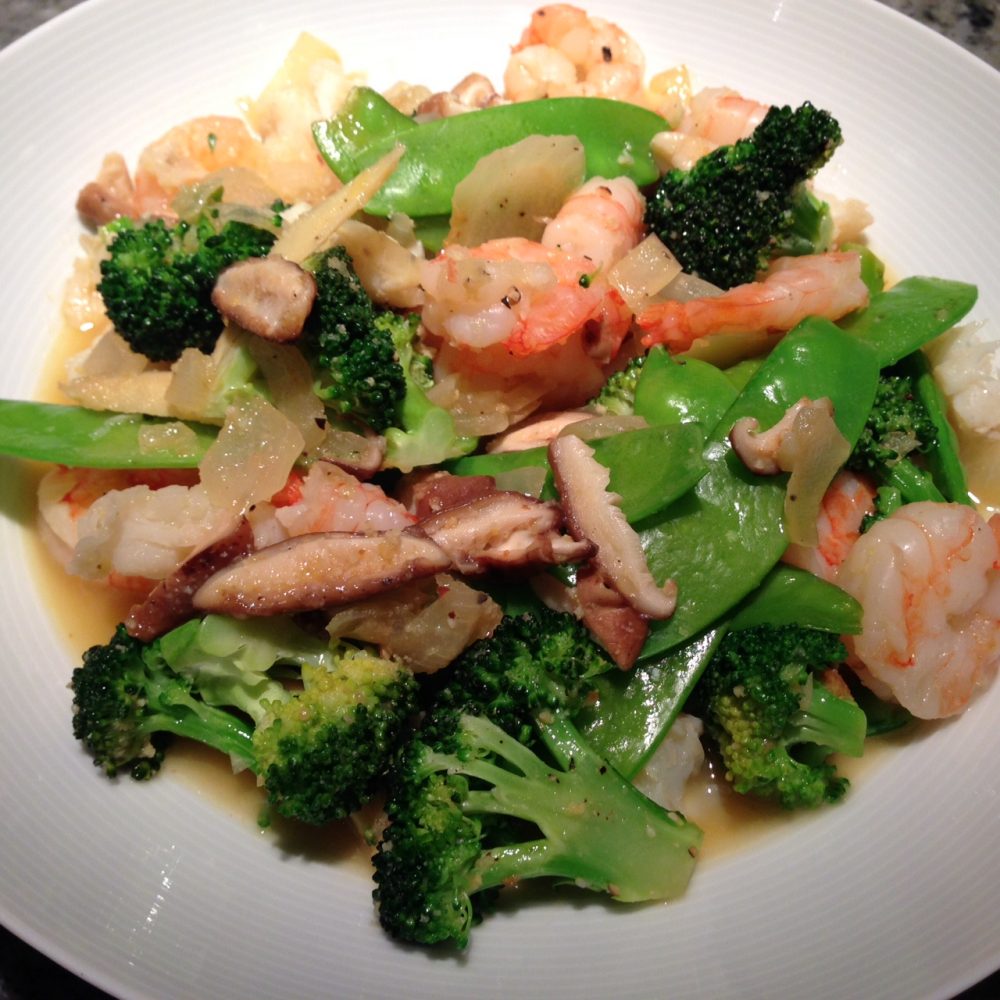
Seafood Stir Fry
Plan Z Phase: This is a Z3 (ZReboot) recipe.
For an Asian flair with plenty of protein try this new stir fry recipe that's sure to add some sizzle to your weeknight.
Servings: Serves 2
Ingredients:
- 2 Tbl of olive oil
- ½ medium yellow onion, chopped
- 2 tsp of garlic, minced
- 1, 1” piece of fresh ginger, peeled and cut into narrow matchstick-shaped pieces
- 4 ounces of shiitake mushrooms. Stems removed, caps cut into strips
- 2 cups of broccoli floret pieces
- 1 tsp of grated orange peel (fresh or dry)
- ½ cup of fresh orange juice
- ¾ lb of cooked shrimp, scallops and lobster. You can choose one or all 3. Using cooked seafood makes this super-fast. You can also use uncooked shrimp and scallops and have great results. Lobster is a little trickier because of the shell. I cooked two little tails and removed the flesh.*
- 1 cup of snow peas, strings removed
- 1 Tbl of sesame oil
- ¼ cup of minced cilantro
Instructions:
In a large saute pan, heat your oil on medium high. Add the yellow onion and cook until loosened. Then add the garlic and the ginger along with the mushrooms and broccoli. Cook just a couple of minutes to warm up the mushrooms and the broccoli.
Next add the grated orange peel and the orange juice. Cook until OJ is hot and bubbling. Just a minute or so more. Stir often to get the broccoli exposed to the heat on all sides. Now, get ready to eat because once you do this last step you’ll want to plate and enjoy immediately. This dish cools off quickly.
For the last step add the snow peas and the seafood. Cover the pan and cook one minute; just to heat the snow peas and seafood.
Serve in bowls and drizzle on a bit of sesame oil and sprinkle on cilantro. You’re ready to eat.
*If you decide to use raw shellfish you’ll need to cook them in the juice mixture for about 3 minutes to make sure they are fully cooked; no opaque parts. In order to do this you might need to add a little more OJ or water to make sure you still have sauce left at the end.
Enjoy!
Cheers,
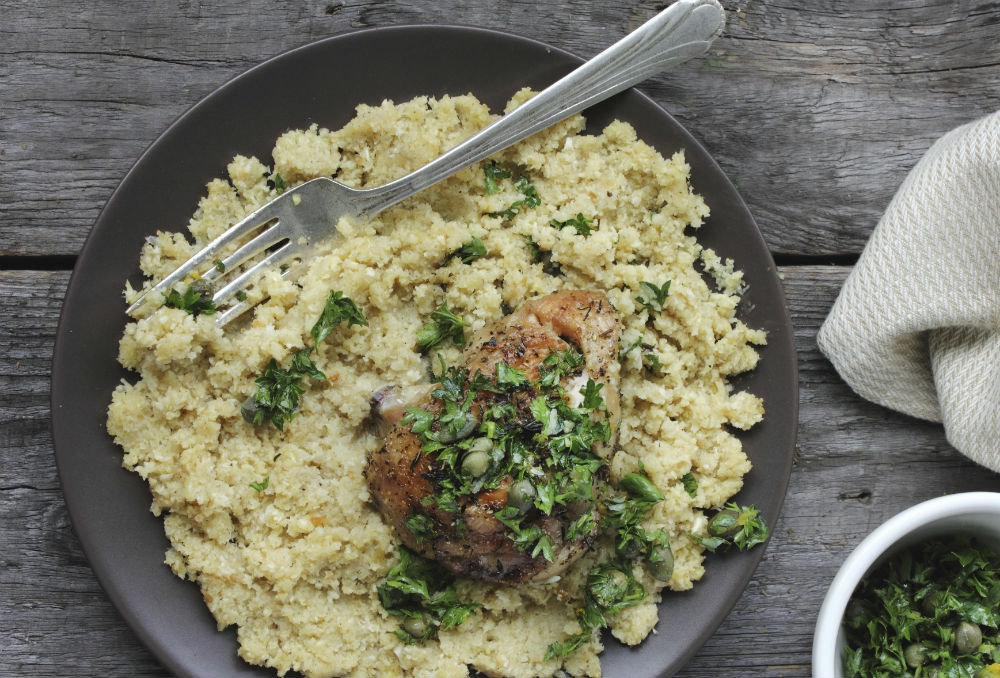
Cauliflower Mash
Plan Z Phase: This is a Z3 (ZReboot) recipe.
The touch of nutmeg in here really makes the dish. Try this as a substitute for mashed potatoes. It’s really quite delightful.
Servings: Serves 4 depending on how big your cauliflower is.
Ingredients:
- 1 medium head of cauliflower
- 5 Tbl of ghee
- ½ tsp of nutmeg
- grated sea salt and pepper to taste
- parsley for garnish (optional)
Instructions:
Put on a pot of water to boil that you can steam over.
Remove the stem and the green leaves from your cauliflower. Cut the rest into chunks. You don’t need to worry about whether the florets stay intact. It won’t matter because you are steaming them and then mashing. Make sure most of the chunks are about the same size. 1 or 1-1/2” will be best. That way they all cook at the same rate.
When the water is boiling, put the cauliflower chunks in the steamer. Cook over steam for about 8 minutes or until they are tender.
Take out your food processor or masher and then add the ghee and the nutmeg. Whiz or mash until fairly smooth. A few small chunks add a nice texture. Then add sea salt and pepper. Stir and taste in case you want to adjust seasonings.
At this time the cauliflower mash can be set aside or refrigerated (covered) and then reheated in the oven later. Just cover the dish with aluminum foil so it doesn’t dry out. Remove from oven and stir before serving. This is convenient for parties because you can make this ahead.
Serve with your favorite protein.
Enjoy!
Cheers,
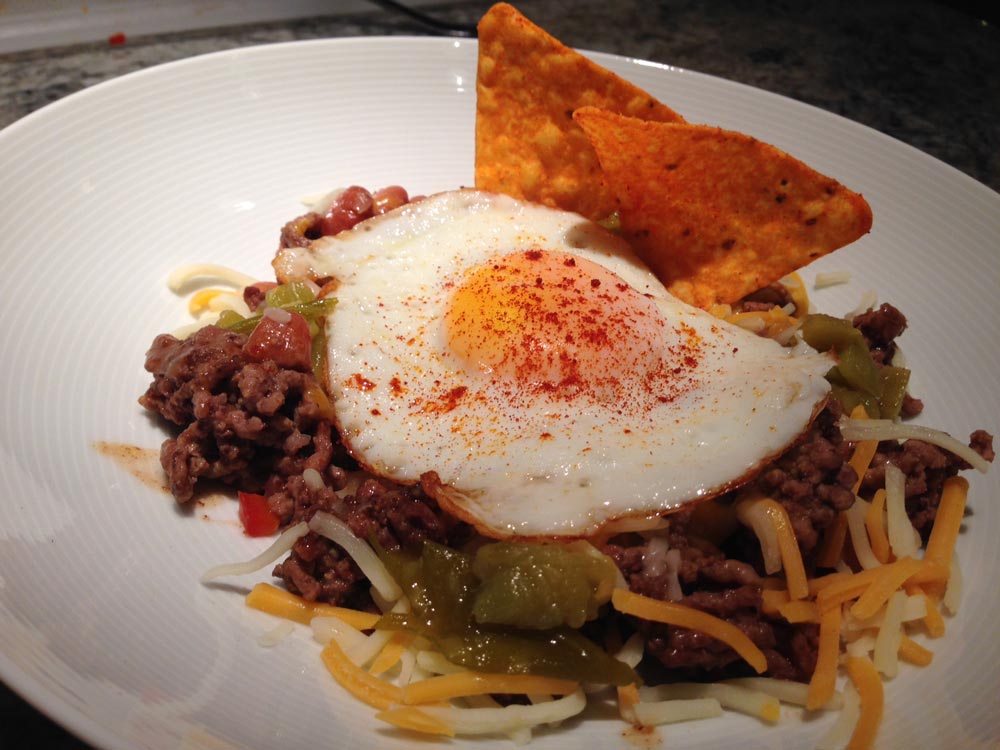
Mexican Hash
Plan Z Phase: This is a Z3.5 (ZReboot 3.5) recipe.
The dish is QUICK. EASY. Brunch for dinner maybe? Or this can be a fun breakfast or lunch, too.
All of these ingredients are available at your local Target. I don’t often recommend buying your groceries there but sometimes you just have to compromise when your schedule is tight.
Servings: Serves 4
Ingredients:
- 1 lb of ground beef, 85/15 is fine
- ½ cup of chopped onion or shallot
- ½ cup of diced veggies of choice. I used red bell pepper, mushrooms and zucchini. You choose your favorites or whatever you find in the fridge.
- 1/3 tsp of ground cumin
- a dusting of cayenne (to taste)
- 15 ounces of canned pinto beans. Bush’s brand are a favorite. They have a new one called Cocina Latina. Very authentic for a Mexican dish. Really great flavor. If you use a different brand of beans add 1 tsp of chili powder to your dish to make up for the flavor that will be missing.
- optional Garnishes: chopped green chilies or jalapenos, grated cheddar or Mexican cheese blend, sour cream, guacamole
- a sunny side up or fried egg
Instructions:
Spray your pan with olive oil spray. Brown the meat until it’s half cooked, breaking it into bite-sized pieces. Add the onion and the other veggies. Continue cooking on medium until it’s browned and no pink remains in the meat. Add the beans along with the juice from the can. Stir. Add the spices and stir again. Heat through and you’re ready to serve.
If you are going to top it with a cooked egg, it’s time to make that. My hubby asked for fried. Most folks in restaurants do sunny side up, but it’s your choice.
Serve your hash in an entrée bowl or on a plate and top with the egg. I splurged and topped it with two taco chips, too.
Enjoy!
Cheers,
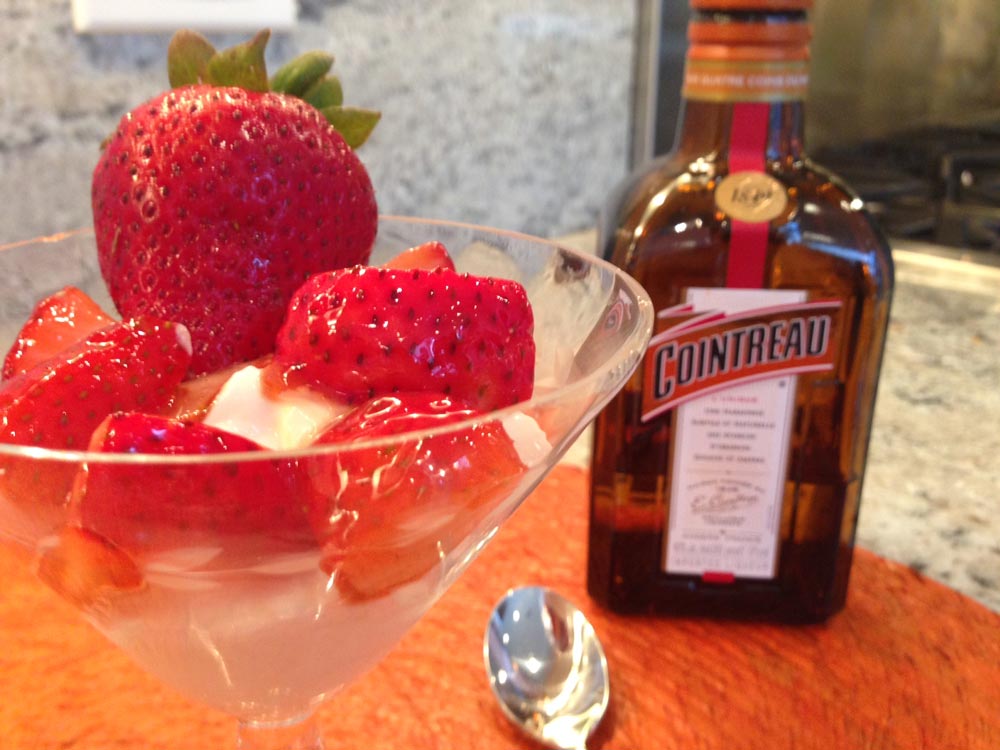
Ricotta Cream with Strawberry Compote
Plan Z Phase: This is a Z3 (ZReboot) recipe.
For anyone wondering if Chris, VP Anger eats cake, the answer is not very often; and never a whole piece. Chris’s favorite flavor is lemon, so for over 30 years now I have made him a new lemon dessert every year for his birthday. Has there ever been a lemon cake? Sure. Has there been one since the inception of Plan Z? Nope.
This super-simple, light and dreamy dessert is easy enough for a weeknight treat and fancy enough to serve to a dinner party. As it’s portioned out here, it’s not a large dessert. People compliment me all the time now on how I serve smaller desserts after a dinner party. They appreciate a nice, light treat instead of a big piece of cake.
Little kids will lap this up like an ice cream sundae!

Servings: Serves 4 or can easily be doubled for larger portions or 8 smaller portions like the one pictured
Ingredients:
- 8 ounces of whole milk ricotta (find it by the cottage cheese)
- 2 – 4 tsp of Swerve or Zsweet sugar substitute. You can also use Truvia but these taste slightly better. You put in the amount based on your tastes so start with less and see if that does it for you and your guests. You can always add more.
- 1 tsp of finely grated citrus zest. You can use lemon or orange. Use your mandolin or rasp to grate it very fine
- 1 quart of ripe strawberries
- 3 Tbl of red jelly or jam. Try to find one with no sugar or that is simply fruit. There is a brand called Simply Fruit or the sugarless ones will be flavored with Splenda (sucralose). I try not to use Splenda but just a bit once in a while is okay. For this dish I used a locally made jam that was just strawberries and guava. No sugar.
- 1 Tbl of orange liqueur (or water if you don’t cook with alcohol) I used Cointreau or you can also use Grand Marnier
Instructions:
In a medium bowl add the ricotta, the sweeteners and the zest. Mix with your electric mixer until fluffy. This will take less than a minute.
Spoon your mixture into serving dishes. I have antique champagne glasses. You can also find cute little bowls at Cost Plus or thrift stores. The whole idea is for a smaller portion but fill the vessel nicely.
If you are not going to serve it right away, my trick is to cover the containers with little zip lock baggies. You can even re-use the baggies later.
When ready to serve, you’ll put on your compote.
To make the compote, clean and chop your strawberries into bite-sized chunks. You can save a few beautiful strawberries for garnish if you’d like. In a small sauce pan add the liqueur and the jam/jelly. Heat until boiling. Stir regularly and just bubble for about 10 seconds to boil off the alcohol. Let it sit until it cools down a bit.
Put the strawberry chunks in a bowl and pour over the sauce. Stir until they are all glazed. You can serve right away by spooning the sauce over the creamy mixture or you can refrigerate the sauce until later for serving. The sauce will still taste good the next day but it will become watery as you leave it in the bowl overnight. That’s because the strawberries will release their juices. Still tastes just great; just not shiny and glistening anymore.
Enjoy!
Cheers,


Why You Got Fat (and It's Not What You Think)
We believe you’ll succeed with support. There is a lot of education that comes with Plan Z. We “feed” information to you in eye-opening tidbits like the one above.
This isn’t the whole story, but I hope it will open your mind to the real reasons why our nation gets fatter every year. And guess what? It has nothing to do with calories in – calories out.
Dr. Robert Lustig is a major player in the fight against obesity. In this 12 minute video, he explains how our obesity problem will never be solved by just eating less and exercising more. I am a big fan of Dr. Lustig and after watching this, I bet you will be, too.

Milk Could Be Killing You!
You’ve probably heard ads saying that milk is extremely good for you, but is there any truth to this?
Trace reveals some evidence that milk might not be all it’s hyped up to be.
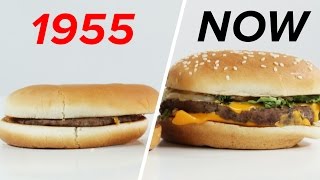
McDonald's: 1955 vs Now
Super-sized or terrified?
This Video on McDonald’s changing portion sizes explains why we’re all getting fatter.
When it comes to supersizing virtually anything, no one does it better than McDonald’s. But flashback to sixty years ago and you’ll find a vastly different fast-food world.
BuzzFeed discovered just how much our McDonald’s hamburgers, fries, and drinks have grown since 1955. What they found was shocking, and it makes you reflect on what our idea of “normal” sized food has become.
Here are three examples of the ever-increasing size of McDonald’s most popular menu items.
HAMBURGER

Starting size: 3.7 oz
Current Size: 9.2 oz
Size Difference: 5.5 oz
FRENCH FRIES
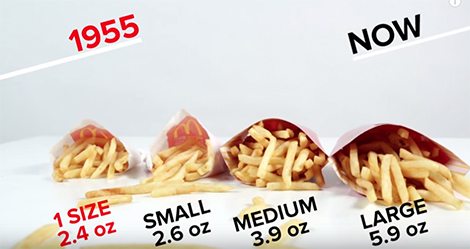
Starting size: 2.4 oz
Current Size: 5.9 oz
Size Difference: 3.5 oz
SODA

Starting size: 7 fl oz
Current Size: 30 fl oz
Size Difference: 23 fl oz
[via BuzzFeed]
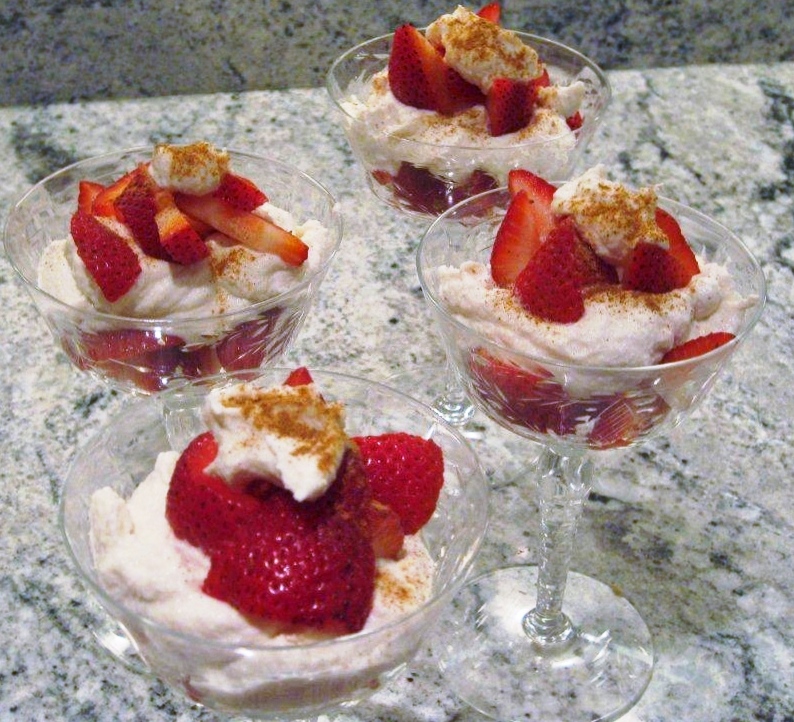
Fruit Parfait
Plan Z Phase: This is a Z2 (ZReduction) recipe. If you want a cold meal and don’t feel like eating meat, cottage cheese is an option as a protein supplement. Ricotta cheese will work, too. Then a salad on the side with veggies makes a perfect compliment. This also makes a wonderfully light and healthy dessert.
This recipe was contributed by Dieter Susan in Chicago. Thank you, Susan!
Servings: Serves 2 as an entrée, 4 as a dessert
Ingredients:
- 2 cups of cottage cheese or ricotta cheese
- 2 tsp of Truvia
- 2 tsp of vanilla
- 2 cups of berries (strawberries, blackberries, raspberries or blueberries)
- sprinkle of nutmeg or pumpkin pie spice
Instructions:
Blend the cheese, Truvia and vanilla in your food processor until smooth and light.
Layer the fruit and the berries in a pretty dish. Sprinkle on spice.
Store in the refrigerator, covered, until ready to serve.
Enjoy!
Cheers,
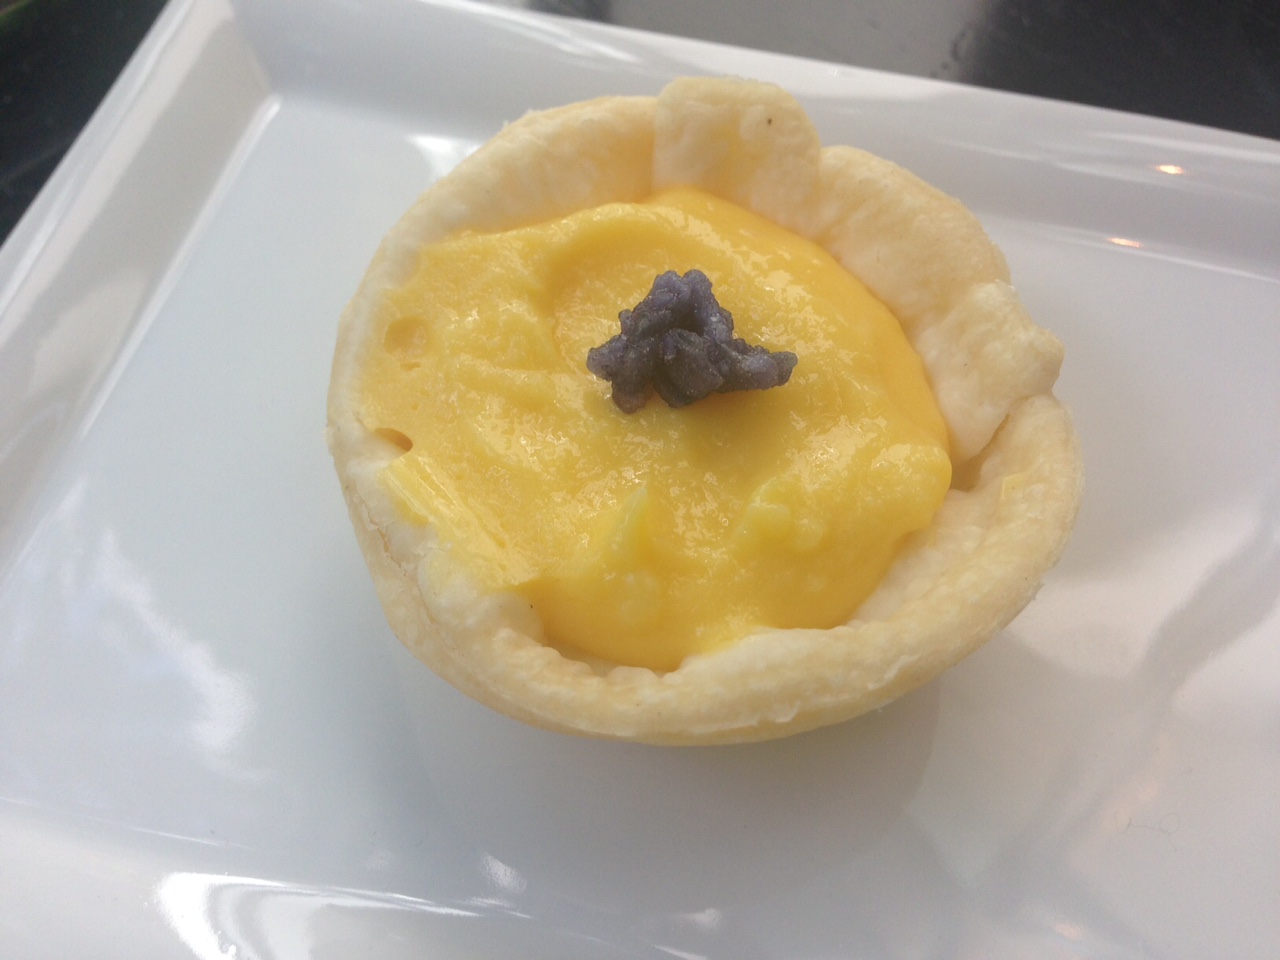
Lemon Curd
Plan Z Phase: This is a Z3 (ZReboot) recipe.
My husband’s favorite flavor is lemon. We have been together 33 years and every year I have made him a different lemon dessert for his birthday. I have had to get pretty creative after all these years!
Lemon curd is easy to make and so versatile. You can even put a dollop of this on pancakes! (Of course you’ll make your pancakes with almond flour…) One of my favorites is to make little lemon tarts with it. The one in the picture were made with crusts I made in cupcake tins so they are very small. I topped them with candied violets. You can order those on line. Or just serve them plain or with sweetened cream on top.
This is a take-off of a recipe I found on line but of course I Zolafied it to take out all the sugar.
This lemon curd is tart but my guests all declared it was sweet enough for them!
Servings: 1 cup
Ingredients:
- 4 Tablespoons butter
- ½ cup FRESH lemon juice
- 1/3 cup of ZSweet or Swerve (They are new sugar substitutes you can order on line. They work great in baking. They don’t give off that tinny taste that Truvia sometimes does).
- 3 eggs
- 1 egg yolk
- 1 small pinch salt
Instructions:
Cut butter up into pieces (around 8 to 10 pieces is good). Put the butter into the freezer.
Blend the rest of the ingredients together in a blender. Pour into a sauce pan.
Heat slowly on medium. Stir frequently. When curd begins to thicken to the point where it coats the spoon or leaves a trail when the bottom of the pan is scraped with a spatula, or is 170 degrees, remove from heat (don't let it boil). I use my insta-read meat thermometer to keep an eye on the temperature. This is the tricky part of this recipe. If you cook it too fast the eggs will scramble in the bottom of the pan. Take your time. This is worth being vigilant. I slowly stir this mixture with my wooden spoon; constantly. It takes 6 – 10 minutes or so on medium. It depends on how powerful your burner is. Turn off.
Stir in the butter. Keep stirring until butter is melted and incorporated.
If you think it's too "sharp," try adding another Tablespoon or two of butter.
Put in airtight container. A piece of plastic wrap on the surface will keep a "skin" from forming. Cool completely before using (it will thicken a bit more).
It can keep in refrigerator up to one week.
Enjoy!
Cheers,
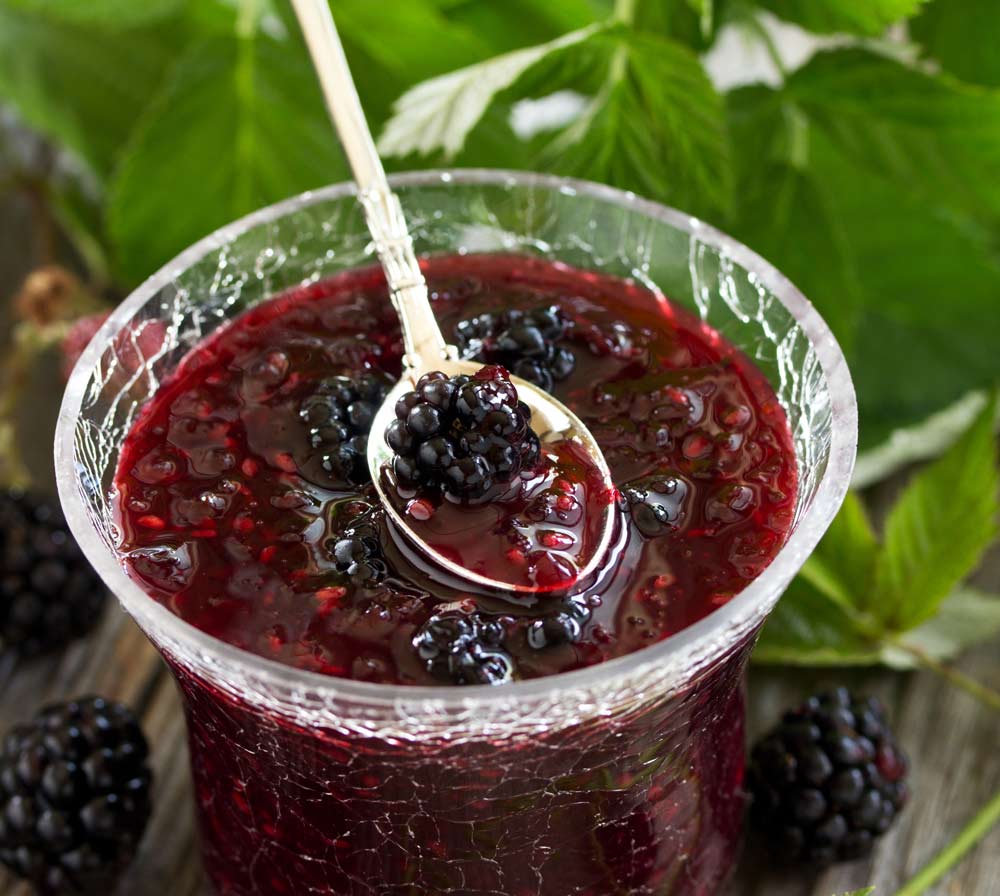
Fresh Berry Pie Filling
Plan Z Phase: This is a Z2 (ZReduction) recipe. This makes a super simple dessert that tastes so authentic. This can work for ZReduction or you can add my almond flour pie crust and make tarts or a pie in ZReboot. This is hometown-feelin’ food. This can also be made with raspberries or a combo that can include blueberries too.
Servings: Serves 4-6. Serving size is 1/2 cup.
Ingredients:
- 4 cups of fresh blackberries
- pinch of salt
- ¾ cup of water
- 4 tsp of corn starch
- 1 Tbl of butter (if on Z3. In Z2 not necessary)
- 1/3 cup of Swere or ZSweet. These are new sugar subs that bake well. Order them online.
Instructions:
In a sauce pan, add half of the water, half of the berries, and salt. Cook on medium high and bring the mixture to a bubbling boil. Cook just 2 or three minutes to soften the berries up. Stir often.
In a separate small bowl whisk the cornstarch into the rest of the water. Add the cornstarch mixture to the berries. Also add the sweetener. Stir for just a couple of minutes until the mixture thickens and all or almost all of the white color from the cornstarch disappears. Add butter and stir.
Take the pan off heat.
Add the rest of the berries and stir so they all get coated. Let cool. This can be done on the counter or in the fridge until later.
If on Z2, eat cold or room temp in a pretty cup or bowl. Z2 serving is a heaping ½ cup of finished berries. In Z2, if you have not used up your cream allotment and you’re having a fancy party and don’t want to feel left out, you can add just a Tbl sized dollop of whipped cream on yours, too. If I am not having a party I skip the whipped cream.
For Z3 you can pour the filling into the baked almond flour pie crust. Serve with sweetened whipped cream. (Sweeten with Truvia or ZSweet and a bit of vanilla). Serve the tarts or pie the same day so the crust stays crunchy and firm.
Enjoy!
Cheers,
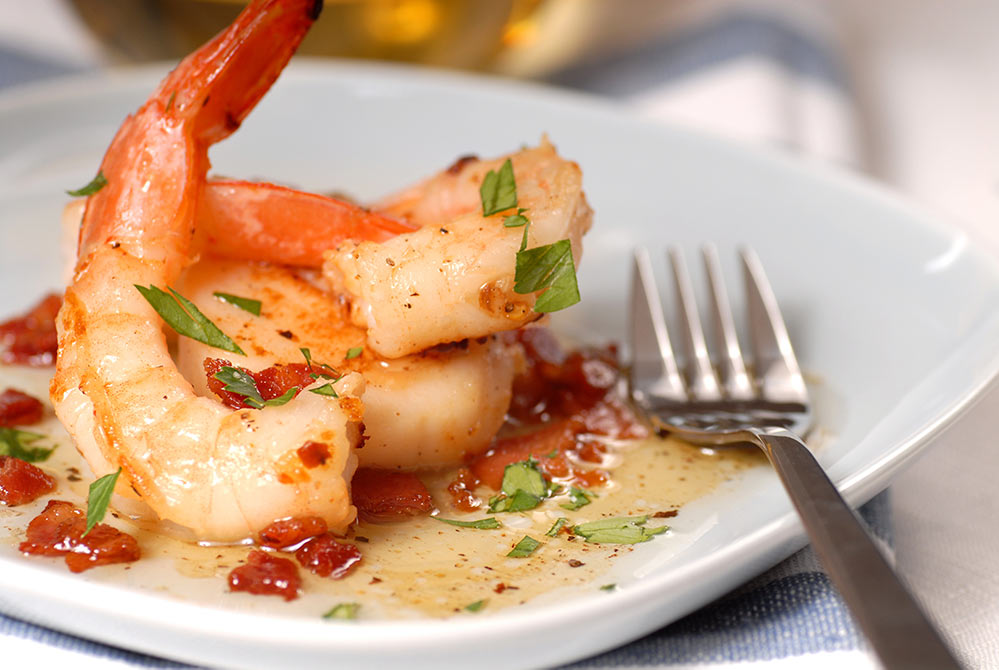
Shrimp with Jalapeno Vinaigrette
Plan Z Phase: This is a Z2 (ZReduction) recipe. This will make a beautiful meal for a hot summer night. Can be served as an intimate dinner for two or multiplied for company. Colorful too!
Servings: Serves 2
Ingredients:
- 1 medium-large jalapeno. Devein and take out seeds. Chop.
- 1/4 cup champagne vinegar or other mild choice; even rice vinegar would work
- ¼ cup of olive oil (This is just like using bottled salad dressing. This will make 4 servings of dressing.)
- 1-1/2 teaspoons Dijon mustard
- sea salt to taste
- olive oil spray
- 1 pound of large shrimp peeled and deveined
- 1 pinch cayenne pepper
- 2 red bell peppers cut into strips. You can use red, yellow or orange. Or a combo.
- 1 small container of mandarin orange segments, no sugar (or drain and rinse if they are canned in juice)
Instructions:
Place jalapeno, vinegar, olive oil, and Dijon mustard in a blender. Puree on high until mixture is completely liquefied. Just 15 seconds or so should do it. Keep turning it on and off or you’ll have some hunks of pepper. Season with salt to taste.
Season shrimp with sea salt and cayenne pepper. Heat pan and spray with oil. Add shrimp and cook until browned on the edges, 2 to 3 minutes per side. Cook through so they are no longer opaque in the middle.
In another saute pan spray with olive oil and saute your peppers to your liking. I like mine a bit stiff but hot throughout.
Garnish with mandarin orange segments and drizzle jalapeno vinaigrette over the top.
Optional: Serve over a bed of raw baby spinach.
This will cover your dressing for one meal (limit yourself to 2 Tbl of this dressing – max) and this is also your fruit portion for the meal.
Limit your portion of pepper strips to one cup. Depending on the size of the peppers this might yield extra.
Enjoy!
Cheers,
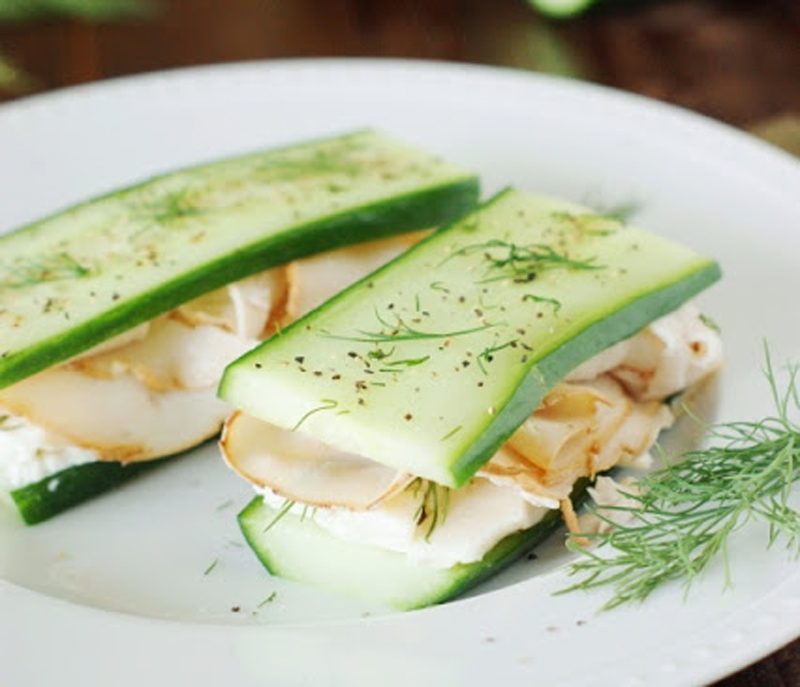
Cucumber "Sandwiches"
Plan Z Phase: This is a Z3 (ZReboot) recipe. You can turn this creative play on a sandwich into a Z2 (ZReduction) recipe by swapping the mayo for a dab of sugar-free mustard. The humble cucumber strongly stands in for bread in this protein packed lunch staple. Thanks to The Kitchen Is My Playground for creating this recipe.
Servings: Serves 1
Ingredients:
- 1 medium cucumber
- Deli meat. Your choice. Turkey, chicken, beef, etc. Just make sure that you get fresh deli meat from the counter instead of the stuff hanging on the wall in packages. Those products will be chock full of additives and fillers
- Smear of mayo (or mustard if you are in ZReduction)
- Condiments: add your own! Go ahead and get playful here. Add your favorite sandwich accompaniments. Try pickles, green onion, jalapenos. Anything to spice up your lunch
Instructions:
Take your cucumber and trim off the ends. Slice the vegetable lengthwise down the middle and hollow out the insides to make room for your sandwich ingredients. Cut each long piece in the middle to make 4 equal halves (just like sandwich bread!). If you want to be fancy, you can slice your cucumber thinly the long way (to make skinnier "bread").
Now, fill your sandwich. I added a smear of mayo to 2 pieces of the cucumber, 4 slices of turkey, and a couple of pickles. This is your time to have fun building your favorite sandwich. Instead of the bread, the vehicle is a cucumber. Crunchy. Wonderful.
And it is so much better for you!
Enjoy!
Cheers,