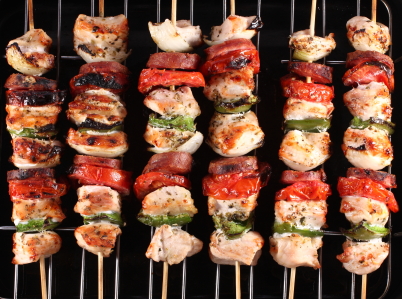
Chicken & Italian Sausage Kabobs
Plan Z Phase: This is a Z3.5 (ZReboot 3.5) recipe. This offering is going to involve two recipes. One for chicken kabobs and one for Italian sausage kabobs. Both use the same glaze. You can make both flavors or choose one. They have a very different flavor from each other and make a good mix if you make both. Super Easy!
Servings:
Chicken kabobs serves 4
Italian sausage kabobs serves 4
Ingredients:
Chicken Kabobs
- 4 skinless, boneless chicken breast halves cut into 1" cubes
- 1 green pepper cut into 1" - 1 1/2" cubes
- 1 red pepper cut into 1" - 1 1/2" cubes
- 1 large onion cut into 1" wedges
- Flavor sprinkles. These can be anything you like. Italian, Southwestern, Asian. I did Southwestern this time.
- olive oil spray
Italian Sausage Kabobs
- 4 pre-cooked Italian sausages cut into 1" chunks
- 12-15 cherry tomatoes
- 15 green onions. Trim the green onions and make 2-3" pieces. You just want a chunk with the white part on the end.
- olive oil spray
- Flavor sprinkles. These can be anything you like. Italian, Southwestern, Asian. I did Southwestern this time.
The glaze
- 3/4 cup of Worcestershire sauce
- 2 Tbl honey
- 1 tsp Truvia
- Cayenne powder to taste. I used about 1/8 tsp.
Instructions:
Pre-heat your grill and prep the shelf by removing old cooking debris and oiling the grill shelf.
For the Chicken Kabobs
Assemble your kabobs by alternating the ingredients on your skewers. If you are using wooden skewers don't forget to soak them in water for 30 minutes before assembly so they don't burn on the grill.
Sprinkle all sides with your herb or spice mix.
Place your kabobs on the grill and roast on a medium heat level for approximately 12-15 minutes until the chicken is done. Rotate the kabobs so all sides get cooked. You can even move them from one side of the grill to the other if you have "hot spots" on your grill. The most important thing is to make sure the chicken is no longer pink in the middle.
While the kabobs are grilling you'll be mixing your glaze in a small bowl. Stir the Worcestershire sauce, honey, truvia & cayenne with a basting brush until the honey gets well incorporated. When it's finally mixed it will appear like, it melts into the Worcestershire and the cayenne gets mixed in. Taste it. You can always add more cayenne to make them as zippy as you'd like but it's truly impossible to take the cayenne back out. The mixing will only take a minute or so and then it can sit until the kabobs are done.
For the Italian Sausage Kabobs
I am recommending that you either buy pre-cooked Italian sausages or that you boil them ahead of putting them on the grill. When they are on the grill my intention is that you are only heating them and getting grill marks on them. The rest of these ingredients are delicate enough that if you had to wait for the sausages to get cooked all the way through the cherry tomatoes would have burst and the onions charred etc.
Assemble your kabobs by alternating the ingredients on your skewers. (If you are using wooden skewers don't forget to soak them in water for 30 minutes before assembly so they don't burn on the grill.)
Sprinkle all sides with your herbs or spice mix.
Place your kabobs on the grill and roast on a medium heat level for approximately 10 - 12 minutes until the ingredients have nice grill marks and are hot. Rotate the kabobs so all sides get cooked and you can even move them from one side of the grill to the other if you have "hot spots" on your grill. While the kabobs are grilling you'll be mixing your glaze in a small bowl. Stir with a basting brush until the honey gets well incorporated. It will be almost like it melts into the Worcestershire and the cayenne gets mixed in. Taste it. You can always add more cayenne to make them as zippy as you'd like but it's truly impossible to take the cayenne back out. The mixing will only take a minute or so and then it can sit until the kabobs are done.
I "baste" my kabobs after they are cooked and off the fire. Because of the honey in the sauce if you baste them sooner you run the risk of drips falling into the bottom of the grill and starting flare ups. I'd rather not have a burnt honey taste on my kabobs so I just wait until the kabobs are cooked and then brush them and even drizzle on extra sauce. You can even pass the extra because the sauce will not have been tainted by under-cooked sausage or chicken juices.
Your entrée is ready in 15 minutes or less.
Enjoy!
Cheers,
Chicken-Spinach Pasta Casserole
Plan Z Phase: This is a Z3.5 (ZReboot 3.5) recipe. This dish can also be made with leftover turkey from a holiday party.
Servings: Serves 8 – 10
Ingredients:
- 6 boneless skinless chicken breasts
- water and white wine
- 1 Tbl of minced garlic (jar garlic is fine)
- 2 Tbl of fresh lemon juice
- 2 tsp of Italian seasoning
- salt and pepper to taste
- 1/4 tsp of pumpkin pie spice
- cayenne to taste (a very light dusting will do it) – optional
- 16 oz of cream cheese
- 1-1/2 cups of grated Parmesan cheese
- 1 cup of penne rigate (measure uncooked)
- 1 lb of baby spinach
Instructions:
In a pasta pot cook your penne until al dente. For my taste that’s 13 minutes at a low boil. Stir to break the pasta periodically.
In a large sauté pan add your chicken breasts. Cover with water and optionally add a ½ cup of white wine for extra flavor. Add the garlic and mix it into the water. Cook on medium high (low boil) for 15 minutes to poach the chicken breasts. Make sure no pink remains in the middle. Remove them from the water. Keep the cooking water. You’ll need some of it later. Now shred the chicken. You can do this easily by using two forks. Hold the breast with one fork while you tug at the meat with the other. You can do a fine shred or a chunkier one. It’s up to you.
In order to make sure I have enough room I now take out a soup kettle. Put the chicken in. Add the lemon juice, Italian seasoning, pumpkin pie spice, salt and pepper, and a very light dusting of cayenne just to give it a teeny zip. Then add the cream cheese (in chunks) along with the grated Parmesan cheese. Add one and a half cups of the cooking liquid (if there isn’t that much left you can supplement with tap water). Cook this on medium to heat the cream cheese so it and the Parmesan melt. When the sauce is all gooey you can add the full pound of baby spinach (If you want you can cut it up a bit to make the pieces smaller but it will shrink and shrivel so if you want you can leave it whole). Add it one handful or two at a time and mix it in and then add the rest. Once this is all stirred together you can assemble your casserole.
For 10 people I use a 9" x 13" pan and a 9" x 9" pan. Divide the pasta between the two pans. You’ll have just a coating of noodles on the bottom. Next pour the chicken concoction on top. Bake for 30 minutes at 350 degrees or just until it gets a very light beginning of a crunchy coating on top.
Serve.
I serve with a simple side salad and garlic bread sticks or flatbread.
Enjoy!
Cheers,
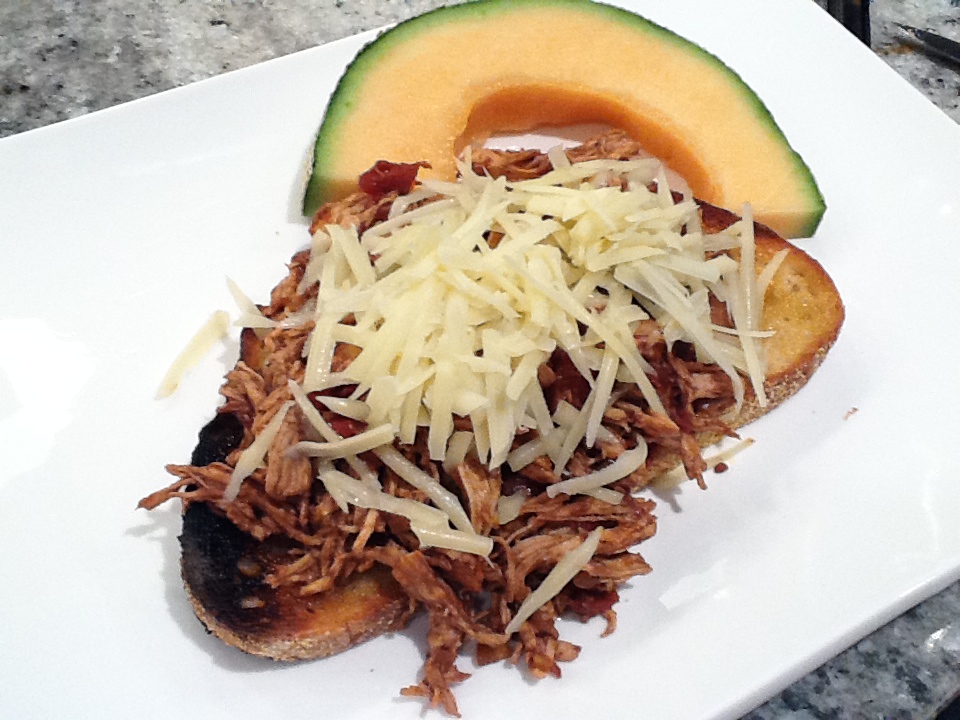
Open-face Chicken Mole Sandwiches
Plan Z Phase: This is a Z3.5 (ZReboot 3.5) recipe.
You can have bread in your life. It’s just a matter of how much. When I order a hamburger I let them bring the bun now. I take off the top. I eat part of the bottom. Sometimes I bit the little crunchy parts of the edges. I NEVER eat the whole bun. So with this sandwich you can do much the same. Eat some of the bread. Use low carb bread if you can find it. Just don’t make a sandwich that you can hold in your hand. No one needs to eat that way. Be civilized and sit with a fork and a knife and eat your food with enjoyment.
This makes a really nice Mexican Mole. It’s authentic. It has a lot of ingredients but don’t let that intimidate you. It’s really very easy to make.
Servings: Serves 4
Ingredients:
- 4 chicken breast halves, cooked. I poach mine in water for 15 minutes or until there is no pink left. Then shred the breasts by pulling the meat apart with two forks. Reserve the meat to add to the sauce later.
- 1 dried ancho chili, seeds removed and minced. This adds the smoky flavor indigenous to Mexican food.
- 3 Tbl of olive oil
- 1 medium yellow onion, minced
- grated sea salt
- 1 chipotle pepper in adobo sauce, minced (Find these in a can in the Mexican section. Reserve the rest for a spicy omelet or other dish.)
- 2-1/2 ounces of 70% cacao chocolate, minced (chocolate is a must in mole)
- ¼ tsp of cinnamon
- 1/8 tsp of cloves
- 2 cloves of garlic (2 tsp). Jar garlic will work fine
- 2-1/2 cups of organic chicken stock or broth
- 15 oz can of diced tomatoes
- 1 tsp of almond flavoring
- ¼ cup of raisins
- 1 Tbl of sesame seeds
- 4 pieces of low carb bread
- butter or ghee
Instructions:
In a large sauté pan or soup pot, add the olive oil, and the onion with a grate of sea salt. Saute until soft. About five minutes. Add the ancho chili bits and the chipotle. Cook until fragrant. Just a minute. Add the chocolate, cinnamon, cloves and garlic. Stir until chocolate is melted and mixed in. Add the stock, tomatoes, almond flavoring, raisins and sesame seeds. Gently simmer for 20 minutes to blend and intensify all the flavors. Stir frequently. At this point, most often the sauce would be blended. I leave it chunky. I like to taste bits of the raisins and tomatoes. We have raisins so seldom they really jump out.
Add your shredded chicken and warm the whole mess.
Take your bread pieces and toast them on both sides. Slather on some butter or ghee. The butter or ghee will slow down the glycemic uptake on the bread and help you digest it in a more healthy manner. Your blood sugar won’t spike this way.
Pile on the meat and eat.
I always serve this with a nice thick slice of cantaloupe. This gives me a counter point to the spicy meat with the cold cantaloupe.
You can also top with some shredded cheese (cheese in the picture) OR
You can also put a bit (a quarter cup max) of a deli coleslaw on top. This is referred to as serving it ‘southern style.’ The cold coleslaw is great on top of the spicy chicken mole mixture.
Enjoy!
Cheers,

Roasted Butternut Squash, Egg and Cheese Casserole
Plan Z Phase: This is a Z3.5 (ZReboot 3.5) recipe. This recipe is for all the vegetarians out there. Thank you dieter Nancy for this photo.
For you non-vegetarians this makes a great side dish to go along with a grilled meat. We had this last night with grilled Andouille sausage and had a lovely meal.
Serves: Serves 4 – 6 as an entrée. Serves 8 – 10 as a side dish
Ingredients:
- 2 Tbl of coconut oil. I prefer coconut oil but if you can’t get it, use olive oil.
- 3 cups of diced butternut squash
- ¾ cup of diced onion
- 7 eggs
- 1/3 cup of cream
- 3 cups of shredded Cheddar, divided
- 2 Tbl of gravy or regular flour
- ¼ tsp of sea salt
- a dusting of cayenne pepper or regular black pepper
Instructions:
Preheat oven to 375 degrees.
In a 9" x 13” ovenproof pan put in your butternut squash pieces. Toss in the oil to coat the pieces and the bottom of the pan. Roast at 375 degrees for up to 30 minutes to caramelize the squash. If you see browning edges that’s fine. That’s good. It makes the squash sweeter.
When that’s done pull it out of the oven, sprinkle in the onion pieces and set it aside for the moment.
In a large bowl put in the eggs and the cream. Beat with a mixer or vigorously by hand for about 15 seconds to get them well mixed. Then add 1 cup of the cheddar cheese and the flour. Stir. Season with salt and pepper. Then pour the mixture over the squash and onions. Sprinkle on the rest of the cheese. Put back in the oven and bake for 30 – 40 minutes or until the top has a nice orange and lightly browning crust.
The surface will be poofed up, much like a soufflé. If you want to eat it fluffy, eat it right away. If you want you can also let it rest and it will sink but it will taste great either way.
Enjoy!
Cheers,
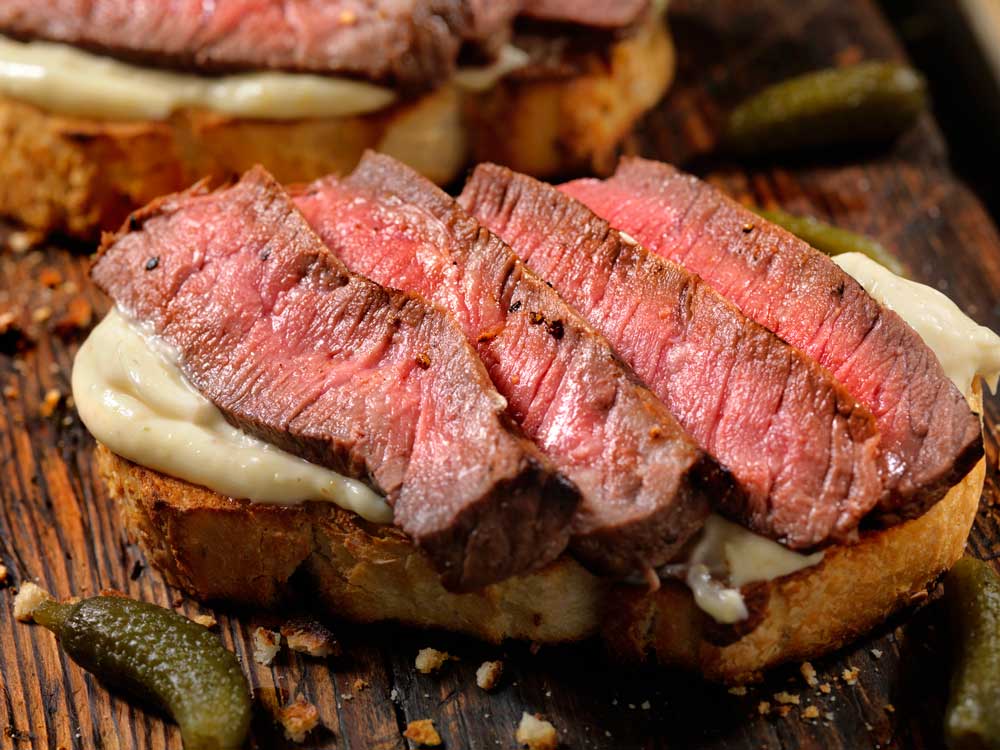
Barbecued Tenderloin Open-Face Sandwiches
Plan Z Phase: This is a Z3.5 (ZReboot 3.5) recipe.
Servings: Serves 4
Ingredients:
- 4 filet mignon cuts of beef tenderloin (4 to 8 oz. each)
- 3/4 cup of zola's barbecue sauce
- 3 Vidalia onions peeled and cut into half-inch slices
- 1-1/2 cups of shredded white cheddar
- 1 loaf of low carb bread (If you can find it.)
- Olive oil
- 1 bag of organic greens prepared for salad
- Salt and pepper
Instructions:
Oil the grill so your steaks don't stick. Grill the tenderloins to your liking. (Approximately 4 minutes per side for medium on a grill heated at medium level. It depends on your grill.) During the last 3 minutes of grilling, baste the tenderloins with your barbecue sauce. Do the same for the onions. Put them on the grill at the same time as the steaks. Grill them alongside the steaks and baste with sauce.
Take out 4 pieces of bread and baste one side with your favorite olive oil. You can use flavored olive oil if you want; basil or pepper-infused olive oils work great. Grill or broil the cut side until it's lightly browned.
Put the bread face up on a cookie sheet. Cut the tenderloins into 1/4-inch strips. Lay the strips, overlapping, side by side on the bread. Pile the onions on top. Put the grated cheese on top of the pile and put it under the broiler for just a minute to melt the cheese. While the cheese is melting, lightly dress your salad greens with olive oil and grate salt and pepper on the salad to taste.
Take the sandwiches out of the broiler. Use a spatula to transfer them to your plates. Pile the "salad" on top of the sandwiches and let it cascade down the sides.
Enjoy!
Cheers,
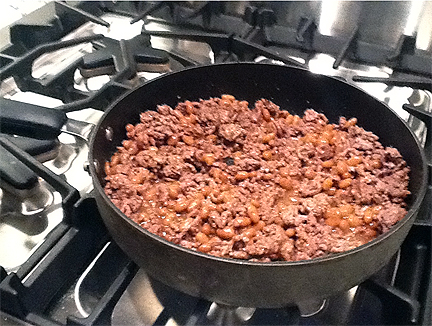
Bean Hash
Plan Z Phase: This is a Z3.5 (ZReboot 3.5) recipe. This is one of the simplest recipes you can make. I almost hesitate to offer it because it is so simple. I haven’t made this in years; I dare say since I was a single. I made it this week. I have been craving comfort food. This recipe harkens back to my childhood. When my father traveled for work, sometimes my mother would let us make a more simple meal than my father would allow. For instance, when Dad was out of town she might let us make French toast for dinner. Dad would never allow that. In the summer when it was hot she might let us just make do with a simple BLT sandwich so she didn’t have to turn on the oven. Dad would have wanted more. And this bean hash was something she’d let us make on occasion, too. I loved it and still do to this day.
My guess is this recipe comes from tough times. When all you have is beef and beans this can make a meal in a bowl. I suspect when it was developed there were a lot more beans than beef in the recipe. In my case, to keep down the carbohydrates, I use a lot more beef than beans but the feeling I get eating it is the same. It just feels comfy. I curled up on the sofa and ate it out of a bowl.
You can jazz it up lots of ways if you don’t want the simple version. I can see my husband putting in hot sauce. You can put in herbs or spices. I can see someone tossing in a can of diced tomatoes too. I just like mine plain.
Servings: Serves 8
Ingredients:
- 2 pounds of ground beef. Out of habit I still use lean ground beef but you can use whatever your budget and taste allows.
- 15 oz of baked beans. I use the Campbell's version that’s very simple. You can use your favorite.
Instructions:
In a large sauté pan lightly spray with olive oil. Add the ground beef. Brown until no pink remains. I regularly cut it up with my spatula so I have just small bites of beef. When the beef is brown add the beans and stir to heat. I love mine with a good grate of sea salt to zip it up. That’s all the spice I need for this dish. Serve in a bowl with a fork and you’re set.
Enjoy!
Cheers,
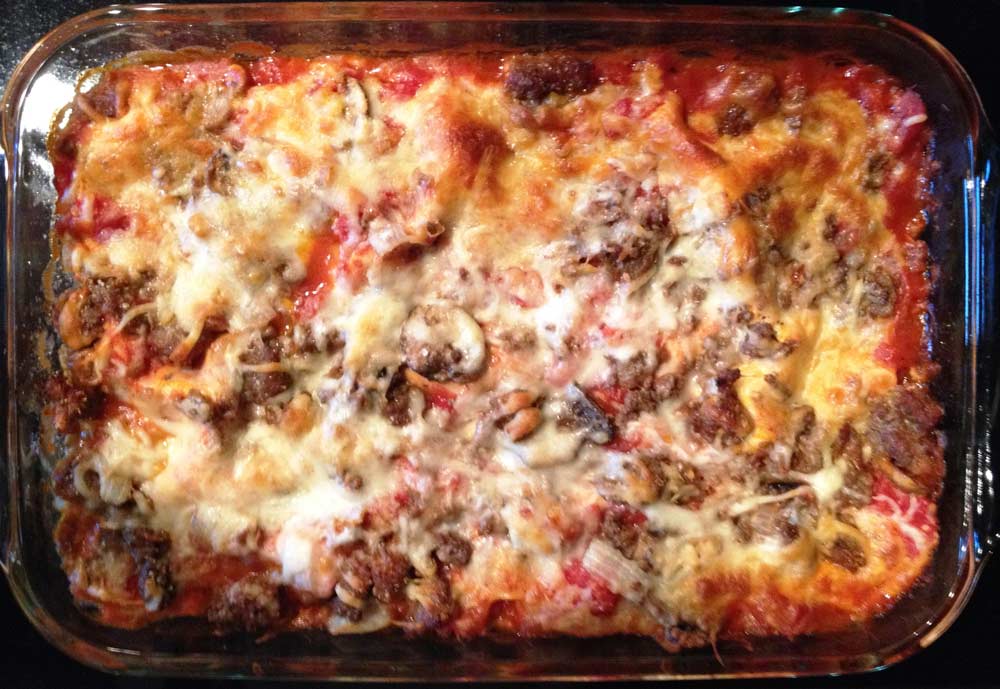
Zola Lasagna
Plan Z Phase: This is a Z3.5 (ZReboot 3.5) recipe. Photo submitted by dieter Misty.
What makes this Zola Lasagna is a reasonable amount of pasta. Most lasagna recipes run at least 3 or 4 layers of noodles. This one has 2. And I promise, you won’t miss the other two layers.
Servings: Keep the portions reasonable and you can eat pasta without guilt. If you gain a pound, just eat lighter the next day and you’ll be fine.
Ingredients:
- 4 large servings or 6 regular servings
- 4 Barilla pasta lasagna sheets. The no-cook version. I use Barilla because it tastes the BEST. I have used other, more flimsy, rippled, no-cook pasta versions but this one is far and away the most authentic-tasting. The mouth-feel (or creaminess) you’ll feel on your tongue when you eat it is the best. Look for the blue box in your store.
- 1 Tbl of olive oil
- 3 Italian sausages, you can use mild or spicy. Slice the casings open horizontally and take out the meat. Throw away the casings. Or you can buy loose Italian sausage.
- ½ of an onion, diced
- 8 oz of sliced mushrooms
- 1 tsp (or to taste) of Italian seasoning
- 15 oz of diced tomatoes (you can get the one flavored with garlic/basil/oregano)
- 15 oz of tomato sauce (you can use a flavored one or plain)
- 8 oz of mozzarella, shredded
- 8 oz of parmesan, shredded
Instructions:
Preheat your oven to 350 degrees.
In a large sauté pan add the olive oil and sausage. Continually break up the sausage into bite-sized chunks as the meat cooks. You can assign this job to a novice cook while you chop the other ingredients to speed up the cooking process. When the sausage is about 1/3 of the way cooked you can add the onion and the mushrooms and cook all 3 at the same time. Add the Italian seasoning blend then, too. Cook all until the sausage has no more pink and the onion and mushrooms are soft.
Now for assembly: Take out a 9” x 9” oven-proof pan. Pour about 3 Tbl of tomato sauce in the bottom of the pan and spread it around to make it moist. Then put two of the pasta sheets on the bottom. They don’t need to overlap. Just lay them in there.
Now add half of the sausage mixture. On top of that add 1/2 of the tomatoes right from the can. Add 1/3 of the tomato sauce and spread it across the top. Add ½ of the mozzarella and ½ of the Parmesan. Now add another layer of pasta. Sort of squish it down. Repeat the process with the meat, tomatoes, sauce and cheese. Lastly drizzle the final amount of the tomato sauce across the top.
Bake at 350 degrees for 40 minutes. Take it out of the oven and let it sit for 10 minutes before cutting. This way the lasagna firms up so it will slice more evenly and you won’t burn your tongue while you eat it.
Options: if you want, you could add some diced red bell pepper or other veggies for variety. You could also use shredded, cooked chicken instead of sausage or even a layer of pepperoni. You can add a few dollops of ricotta cheese too if you want. Many don’t like ricotta so I left it out. I just did this recipe in a straightforward manner so you can add your own creativity. This looks and tastes like regular lasagna without all the extra carbs, so enjoy!
Enjoy!
Cheers,
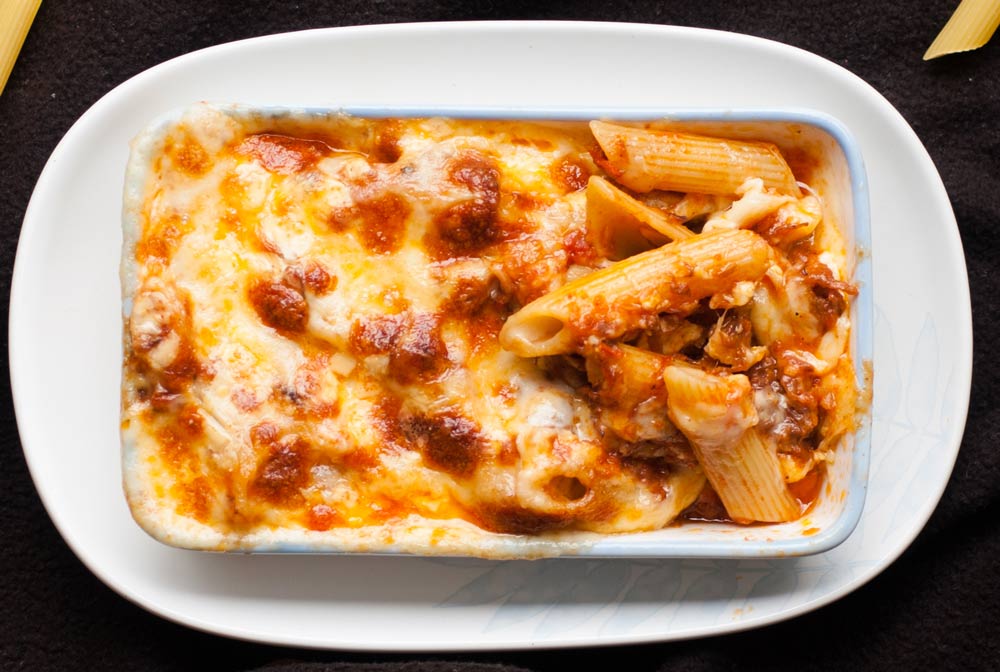
Beefy Pasta Casserole
Plan Z Phase: This is a Z3.5 (ZReboot 3.5) recipe. Yep, I said "pasta." A "p" word. Like potatoes. Another "p" word.
On one of our 2nd Tuesday Calls with dieters from all over the world, a question came up from a woman in Iowa. She wanted to know what us Midwesterners should do about casseroles. My first answer was cook the pasta or noodles separately and serve them separately so you can eat fewer noodles.
I never quit thinking about that though. I know she wasn’t totally satisfied with my answer. Last night I came up with this dish for those Midwestern casserole parties.
Frankly, when I ate it I realized I would have been happy with HALF as much pasta as I used. I didn’t think it looked like a lot when I spread it in the casserole dish but when I was eating it I realized I could have gotten away with less.
This dish is made with Dreamfields pasta. Get it if you can. Order it online if you have to. This stuff tastes like regular pasta. Most low carb pasta tastes like the cardboard box it came in. This does not. This is good. I can’t tell the difference anymore! Look for the black box on store shelves.
This whole recipe contains about 80 grams of carbohydrate from the pasta. Now 80 grams is about as much as any human needs in an entire day. But you’re not going to eat the whole casserole, are you? This casserole serves 6 – 8. Make a big, beautiful Caesar salad to go with it.
So each serving is about 8 grams of carbs. That’s reasonable. Very reasonable. And because this is a low glycemic pasta, it makes it even better. Try it. I think you will convert like I did.
Pasta doesn’t have to be banned from ZLife. You just need to limit it and monitor how you use it. If you keep in mind that a FULL portion is a half cup cooked you’re on the right track. And just eat it on a special occasion. Then just watch that scale. If you are up the next day then cut back the amount of pasta the next time. I told myself that pasta would be a 4 times a year thing for me. I’ve been holding pretty close to that. Last night I ate this and woke up .6 pounds lighter. All is good.
Servings: Serves 6 – 9
Ingredients
- 1 cup of penne rigate uncooked pasta (Dreamfields brand)
- 2 Tbl of olive oil
- ½ medium Vidalia onion, diced
- 1-1/2 pounds of ground sirloin (93% is fine or even lower). Even ground beef will work.
- 8 oz of mushrooms, sliced
- 2 tsp of garlic, minced
- 2 tsp of Italian seasoning blend
- 28 oz of crushed tomatoes (get a brand with no sugar in the ingredient list)
- ¼ tsp of crushed red pepper flakes (or to taste)
- 8 oz of shredded mozzarella
- 5 oz of shredded parmesan
Instructions:
Cook the pasta in boiling water for 13 minutes. Drain.
While the pasta is cooking you can make your meat sauce. In a large sauté pan add the olive oil. Heat on medium high. Add the beef and the onion. Break up the beef while it’s cooking so it is bite-sized chunks. When it’s half way cooked add the mushrooms. Cook until beef shows no pink and the onions and mushrooms are softened. Add the garlic, Italian seasoning and the crushed tomatoes. Also add the pepper flakes. Cook to meld the flavors. You are really just getting this good and hot (bubbling).
When the pasta is done take out a 9" x 13" casserole. Spread the pasta in the bottom. Spread the mozzarella on top of the pasta. Then add the meat sauce. When the meat sauce is spread across the bottom gently stir it a bit just to move the mozzarella around and get some of it up into the meat. Don’t feel like you have to stir it. That’s overkill. Now spread the Parmesan across the top.
Pop this into your oven for 20 minutes at 350 degrees to melt the cheese and get the whole thing bubbling.
Easy Peazy. This meal is so easy to make a teenager or a rookie cook can do it. Very quick and easy for a weeknight. This can be made in quantity for a larger buffet party and will be a big hit at the Midwestern casserole gathering.
Enjoy!
Cheers,
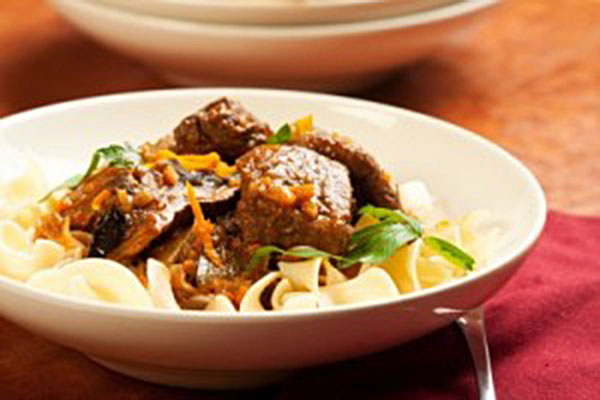
Beef Over Noodles
Plan Z Phase: This is a Z3.5 (ZReboot 3.5) recipe. Our Plan Z “cafeteria” smelled just like Grandma’s house today. This beef over noodles recipe is a hit. Serve this when you have family around at holidays or other times when there’s a crowd. You can cook this a day ahead and then just reheat when you go to serve it. Or you can put the beef in a crock pot on a buffet. I serve the noodles separately in order to keep down the number of noodles per serving.
When you read this description don’t get the idea that this is an Asian dish. It will not taste Asian when it’s done.
Servings: Serves 6-8
Ingredients:
For prepping the beef:
- 3 lbs of beef round roast cut into 1” cubes
- 2 Tbl of olive oil
- 1 Tbl of Bragg’s Aminos
- 4 Tbl of port wine (This is a sweet red wine. You can use any red wine and it will be fine)
- 3 cups of thinly sliced onions
For coating the meat
- 2 more Tbl of Bragg’s Aminos
- 2 tsp of corn starch
- 2 more Tbl of port
- 2 tsp of minced garlic
- 1 tsp of salt
- ½ cup of water
- 1 lb of sliced mushrooms
For the noodles:
- thick egg noodles
Instructions:
For the Beef:
Heat the oil in a skillet or Dutch oven. Carefully add the Bragg’s Aminos and the port wine. It will sputter for a bit because you are adding a water-based liquid to oil. Careful. Then add the onions and begin to sauté them. Just stir fairly often as they turn purple and cook. About 10 minutes. Just loosen, don’t brown them.
While that’s cooking, in a small bowl combine the cornstarch, port, and Bragg’s Aminos. Stir until the cornstarch is dissolved.
In a large bowl, place the meat chunks. Douse them in the cornstarch/liquid mixture. Just pour it on and toss with your hands until the meat gets coated.
Add the meat to the onions in the large pot. Begin to brown the meat. Add the garlic and salt. Keep stirring so the onions don’t stick.
Now you have a decision to make. You can put the Dutch oven in the oven, covered, for 45-50 minutes at 350 degrees or you can cook on the stove in the skillet on medium-low, covered, for the same amount of time. I like the oven method so I don’t have to babysit it as much.
Stir the mixture every 15 minutes. After the 45 minutes are up, add the mushrooms. Stir them in and cook 30 minutes more. The meat should be tender and cut with a fork. If yours is not you may need more cooking time. Then it’s ready to serve.
For the Noodles:
I use a thick egg noodle for this dish. Since I don’t have noodles very often this is a real treat but I actually find myself satisfied with FEWER noodles than one serving.
Keep in MIND: A serving of noodles is ½ cup COOKED. That means you cook them and then ladle them into your bowl or onto the plate using a ½ cup measure. It will surprise you how rich they taste and how you don’t need very many to be satisfied. In the “Old Days,” you probably ate at least twice that many noodles but you don’t need to anymore. When I cook and drain my noodles now I happily put them in a large bowl and add a couple of tablespoons of butter to the noodles and stir it around. This used to make me feel guilty. Not anymore. Now I know adding butter to the noodles cuts down the glycemic index. Amazing.
Enjoy!
Cheers,
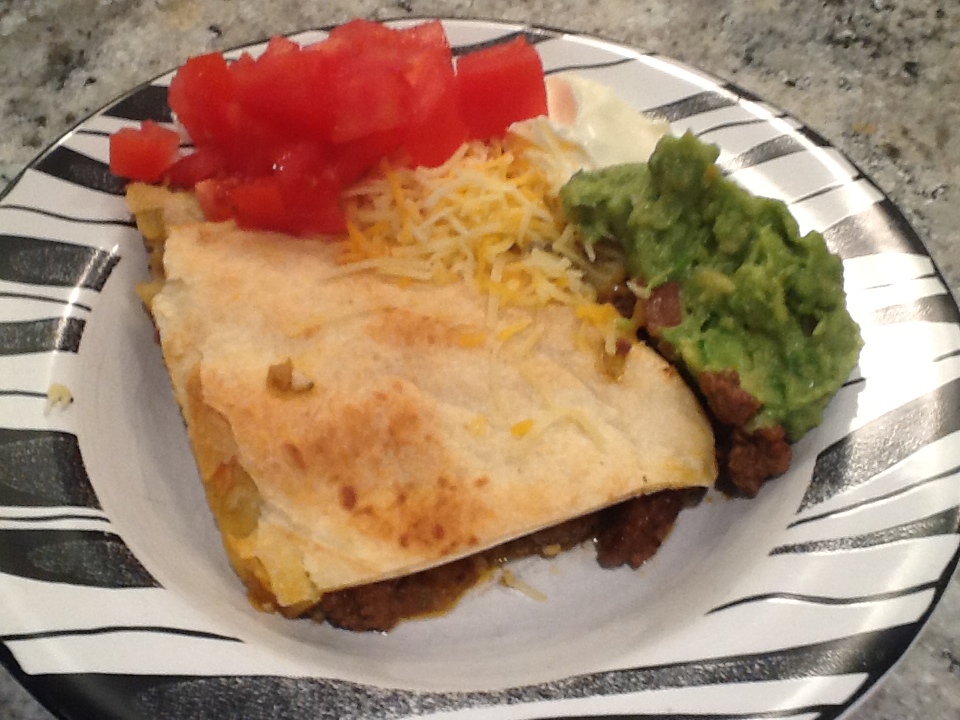
Chimichanga Casserole
Plan Z Phase: This is a Z3.5 (ZReboot 3.5) recipe. When I was young I loved going to Chi Chi’s and ordering the chimichanga. Now that I know all the carbs from the tortilla it was wrapped in are a bad idea I decided to make a lower carb casserole version. This way, 2 tortillas are spread across 6 portions. Now, it’s good for you comfort food.
Servings: Serves 6
Instructions:
- 1-1/2 pound of ground beef
- 1 medium onion, chopped
- 2 tsp of minced garlic (jar garlic will work)
- 1-1/4 cups of salsa. Find one with no sugar, as spicy as you like.
- 2.5 tsp of ground cumin
- 1 tsp of ground oregano
- ½ tsp of grated sea salt
- 2 flour tortillas
- ¼ cup of melted butter
Instructions:
Oven preheated to 475 degrees.
Brown the meat with the onion, breaking the beef into bits. Add the garlic, salsa, cumin, oregano and sea salt. Stir. Simmer for about five minutes or until most of the liquid evaporates.
Pour this mixture into a 9" x 13" casserole. Cover the top middle with one flour tortilla. Then cut the other one so you can piece it along the sides. This might not cover the entire casserole but it will get close. Brush melted butter over the top.
Put in the oven and bake for 10 – 15 minutes until the top begins to brown and crunch up.
Cut into squares and serve in bowl or on a plate. It’s not always pretty when you cut it. The tortilla topping won’t stay stuck together, so just make sure everyone gets some crunchy bits on top.
Side items you can consider: chopped tomato, a sprinkle of shredded cheese, sour cream dollop, guacamole. Mexican comfort food.
Enjoy!
Cheers,
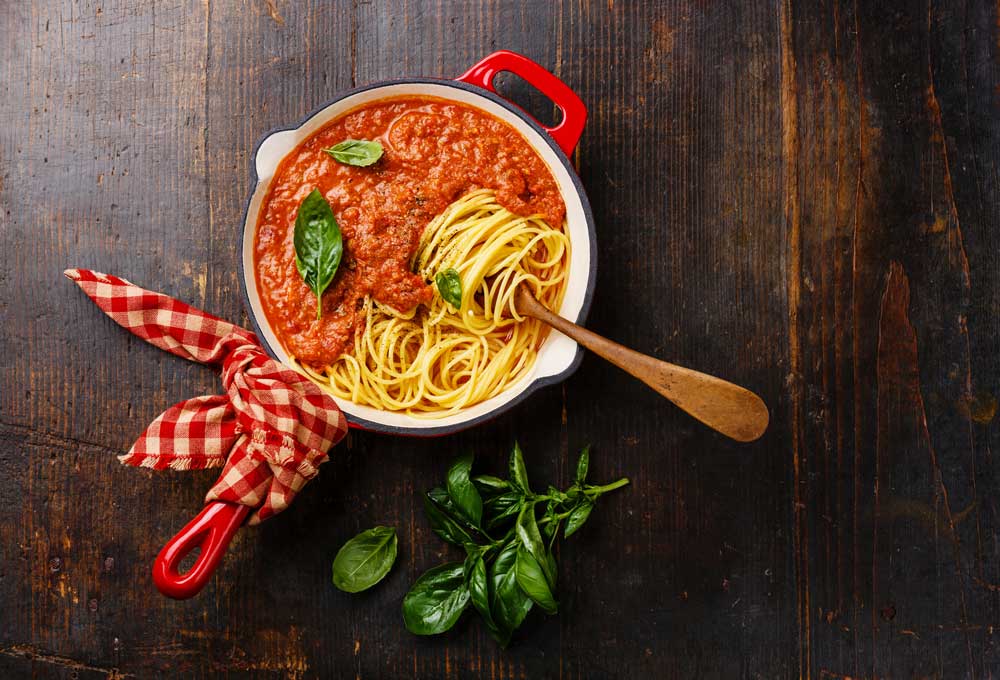
Spaghetti Bolognese
Plan Z Phase: This is a Z3.5 (ZReboot 3.5) recipe. Spaghetti bolognese is just a simple meat sauce to serve with spaghetti. Yep, those of you who know how I feel about too many carbohydrates might be scoffing about now. Spaghetti? Yes, I say. If you serve it in the right portion. 1 cup cooked. That’s an amazingly SMALL order of spaghetti compared to what you get at an Italian chain restaurant. But there you have it. ONE cup maximum.
What I do is concentrate on the sauce. I don’t limit myself on sauce. And by the time I eat the sauce off the top there’s plenty of spaghetti on the bottom and I’m no longer hungry. I have stopped that thing where I stir the sauce all into the spaghetti before I begin eating. I just put the spaghetti in the bottom of the bowl. Add the sauce on top. Put Parmesan cheese on top of that and begin to eat. It’s amazing how quickly I become full. I hope you do too.
Servings: Serves 2 - 4
Ingredients:
- 1 lb of ground sirloin
- 3 Tbl of olive oil (divided)
- ½ cup of chopped red onion
- 3 cloves of minced garlic (Jar garlic can work for this one)
- 28 oz of crushed tomatoes
- 15 oz of tomato sauce
- 1 cup of red wine (or if you don’t cook with alcohol, use water)
- 2 tsp of Italian seasoning blend
- A dash of cayenne (optional)
- 1 cup of cooked spaghetti per person. Or if you want to be even lower carb you can serve this over cooked zucchini.
- Parmesan cheese for sprinkling on top
Instructions:
Put 1-1/2 Tbl of olive oil in a large sauté pan. Add the meat. Begin to break it up as it browns on medium. My feeling is the secret to a true Bolognese is to break the meat up really fine so there are no lumps. Cook the meat until no pink is left.
While this is happening you can put the other 1-1/2 Tbl of olive oil in a large sauce pan. Add the onion and cook it on medium until it begins to loosen. Add the garlic. Stir. Add the tomatoes, sauce, red wine, Italian seasoning, cayenne (if you want it), and the cooked meat. I like my spaghetti sauce to have just a teeny bit of zing. That’s why I add the cayenne.
Now, many an Italian grandmother will tell you this sauce has to cook for up to 10 hours on very low heat to develop the flavor. I say humbug. I’m hungry. So I cook this for about 45 minutes on medium – medium-low and get the flavors to meld. Stir often. This is enough time to get the taste of spaghetti without having to suffer while you smell it all day waiting for the final satisfaction of getting to eat it.
Enjoy!
Cheers,
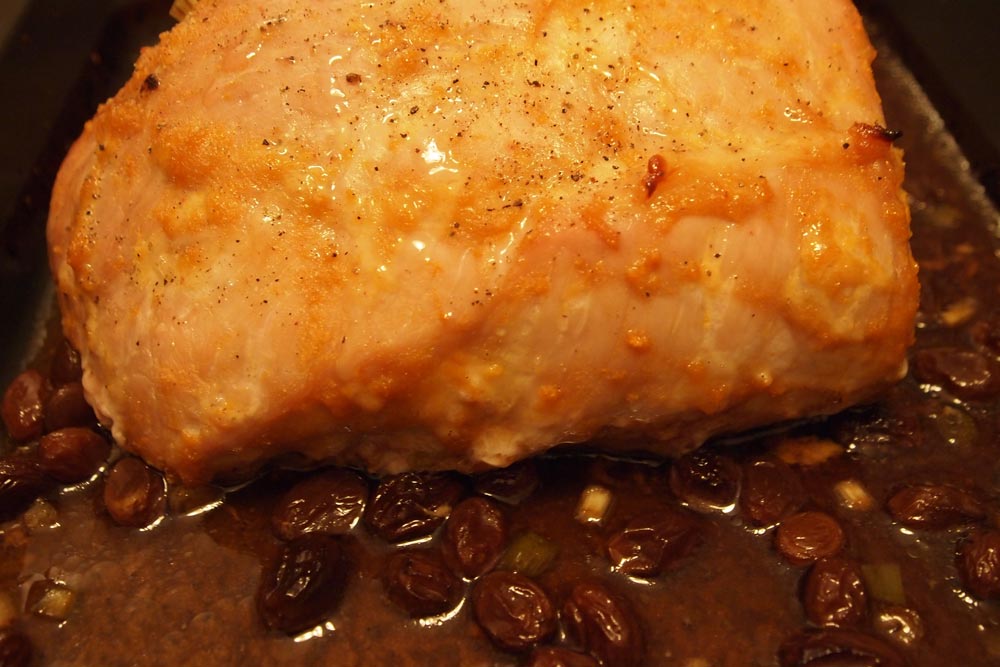
Orange Maple Pork Roast
Plan Z Phase: This is a Z3.5 (ZReboot 3.5) recipe. This is a super-simple dish to make. You will be happy with this on a weeknight but you can also serve it to guests. The taste is fancy enough for company. You’ll be amazed at how you can taste the maple with even just one tablespoon of syrup. That little bit goes a long way. Photo submitted by Plan Z dieter Nancy.
Servings: Serves 4
Ingredients:
- 2 lb pork loin roast
- 12 green onions chopped (white and light green parts only)
- 2 Tbl of Dijon mustard
- 1 Tbl of maple syrup
- 1 tsp of Truvia
- 2 tsp of grated orange peel
- salt and pepper to taste
- 2 cups of beef broth
- 6 cloves of peeled, whole garlic cloves
- ¼ cup of raisins
Instructions:
Chop the green onions and put them in the bottom of an oven proof pan large enough to hold the pork roast.
In a small bowl add the mustard, syrup, Truvia and grated orange peel. Mix into a paste. Rub this paste across the top of your pork roast. Gently transfer the paste-covered pork to the oven proof pan.
Scatter the raisins and the garlic cloves around the pork. Pour the beef broth around the roast.
Roast at 325 degrees. 30 minutes per pound. So for a 2 pound roast it will take an hour. I roast pork to 160 degrees. That way it’s still ever so slightly pink but still completely ready to eat.
Slice the pork and serve some of the sauce to each person. Feel free to eat the whole cloves of garlic. After they’ve been swimming in the broth for an hour they will be juicy and flavorful without tasting harsh.
Enjoy!
Cheers,
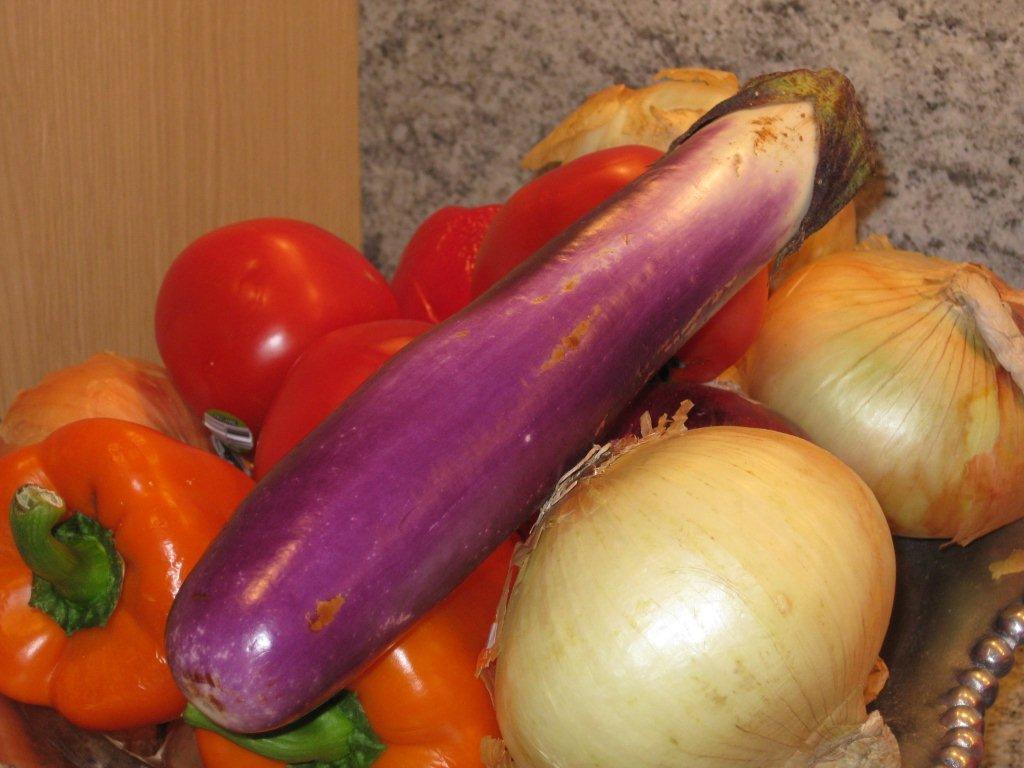
Eggplant Lasagna
Plan Z Phase: This is a Z3 (ZReboot) recipe. Debbie K. created this fabulous recipe. Thanks Debbie!
Servings: Serves 4
Ingredients:
- 3 Japanese eggplants (also known as Chinese eggplants)
- 1/2 cup of marinara sauce, no sugar added
- 1/4 cup of cottage cheese
- Italian seasoning
- olive oil cooking spray
Instructions:
Slice the eggplants lengthwise and spray them lightly with the olive oil cooking spray. Season them with Italian seasoning and cook them in a non-stick skillet on a medium heat, turning them every five minutes. When the slices of eggplant are golden brown, sprinkle the cottage cheese on top of the eggplant. Add the sauce. Serve immediately.
Enjoy!
Cheers,

Italian Crock Pot Stew
Plan Z Phase: This is a Z3 (ZReboot) recipe. This dish is very easy to make. It better be or it doesn't deserve to be a crock pot meal! All you have to do is brown the meat and then time adding the mushrooms. Walk away from your crock pot and dinner will cook itself.
A note on the Italian sausage: I like my sausage "loose"; not in a casing like a wiener. I slice the casing and take out the meat and break it up into once inch blobs. You don't need to make little meatballs; just break up the meat into chunks like you'd find on a pizza. Sweet Italian sausage is not sugary it's just not as spicy as hot sausage. You make this dish with all sweet sausage if you don't like too much spice. I love hot food but I would not recommend you make this with all hot or it will be very VERY spicy.
Servings: Serves 4
Each serving is 1-1/2 cups
Ingredients:
- 2 Tbl olive oil
- 3/4 pound sweet Italian sausage, broken into bites
- 3/4 pound hot Italian sausage, broken into bites
- 2 small, six inch zucchini cut into one half inch rings
- 1 red, yellow or orange bell pepper cut into one-inch chunks
- 1/2 a medium onion cut into chunks (it will fall apart later)
- 1 tsp garlic (jar garlic is fine)
- 28 oz chopped Italian tomatoes. I use canned organic with the juice.
- 2 tsp Italian spice blend
- 8 oz thickly sliced large button mushrooms; or small button mushrooms cut in half
- 1-1/2 cups Italian cheese blend
- 4 Tbl of fresh basil cut into thin slices (a.k.a chiffonade)
Instructions:
Put the broken up sausage and the olive oil in a large sauté pan. Toss. Cook on medium high until both sides of the sausage are browned. You don't need to cook the sausage all the way through. It will finish in the crock pot. The reason to sauté it ahead is to get a nice brown crust on it so it will be visually appealing. My secret is to leave it alone while it gets the crust on it. Don't toss it around too much. This will take about 3 minutes per side.
When the meat is browning you can cut up all of your veggies. You'll have plenty of time. When the sausage is done put half of it in the crock pot. Layer in the zucchini, pepper onion and garlic. Then add the other half of the sausage. Top it all with the tomatoes. Just open the can and pour it on juice and all. Add the Italian spices and stir to get it all mixed up.
Put the top on the crock pot and cook on high heat for one and a half hours. When that time is up add the mushrooms and stir again. The crock pot will be rather full so be careful when you are stirring. Just poke the mushrooms into the hot liquid if you need to. The reason not to put the mushrooms in too soon is you don't want them to over-cook and get mushy. Put the top back on and let it cook another one and a half hours on high. Most crock pot recipes say cook 8 hours on low or 4 hours on high. My theory is if you cook 3 hours on high...maybe a few minutes more, your veggies will still have some bite to them. That's a good idea when zucchini is involved. Another secret to crock pot cooking. Don't peak. The more you open the top, the longer it will take to cook. Some say you add 15 minutes to the cooking time every time you open to peek or stir. At the three hour point pull out a piece of your veggies. If you like them then your meal is done. If they are a little too crunchy, cook for up to 30 minutes more.
If you need to cook this while you are at work I would best suggest you plan on 7 hours on low. Or start it on your lunch hour if your commute is short. And keep in mind mushy is not all bad. If you can't get home the meal will still taste great. It will just be softer. The stew will be great served in large soup bowls. When you put your stew in the bowl you'll be topping it with the cheese and then the fresh basil.
Serve with a quick salad and you have a gourmet meal.
Enjoy,
Cheers!
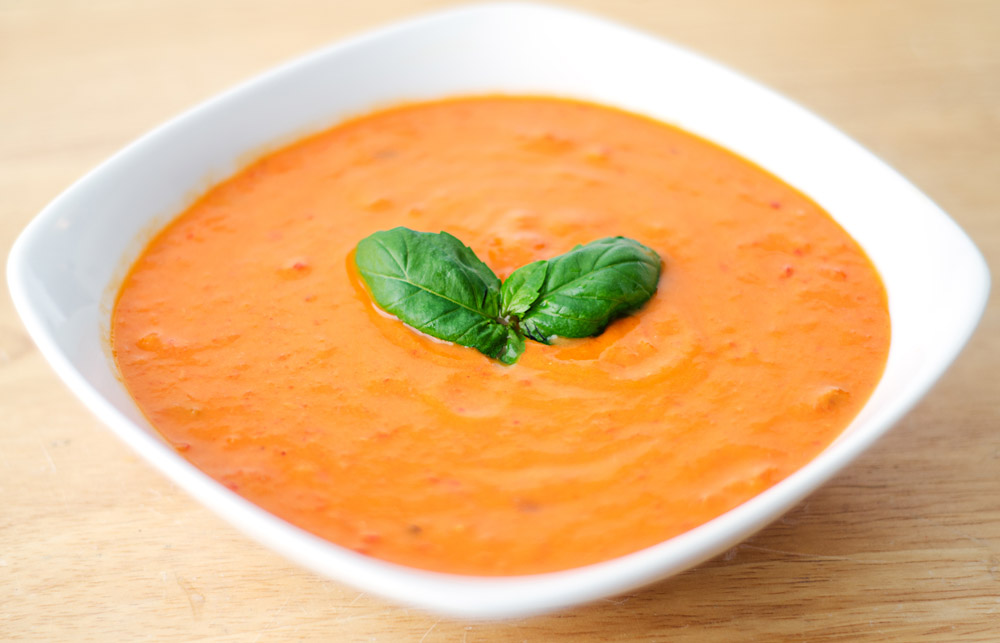
Tomato Bisque the Simple Way
Plan Z Phase: This is a Z3 (ZReboot) recipe.
Servings: Serves 8 (cups) or 6 (bowls)
Each serving is 1-1/2 cups
Ingredients:
- 28 oz of crushed canned tomatoes
- 15 oz of canned diced tomatoes with garlic and herbs included
- 1 bunch of green onions, minced. White part and light green parts only.
- 2 Tbl of butter
- 1 tsp of Italian herb mix
- 1 Tbl of balsamic vinegar (this is optional)
- 2 cups of organic chicken or vegetable broth
- 1 cup of cream
Instructions:
Put the butter in a large sauce pot and add the onions and Italian herbs. Mix and cook on medium until the onions are loose and coated in butter. Add the tomatoes. Cook on medium high until it begins to bubble. Add the balsamic vinegar and the broth. Cook in medium high for 20 – 30 minutes. You want not only to get it real hot, but it will cook down some during this process. Stir fairly often. Add your cream and cook until it thickens. Stir some more. This will only take about 7 minutes more.
I like my bisque with a few chunks. If you want yours completely smooth all you have to do is carefully load this in batches into your blender and whiz it and then re-heat it. I don’t recommend loading HOT liquid into a blender for a beginner cook. This is “be careful business” but I’m adding this to your notes in case you have a smooth preference.
Enjoy,
Cheers!
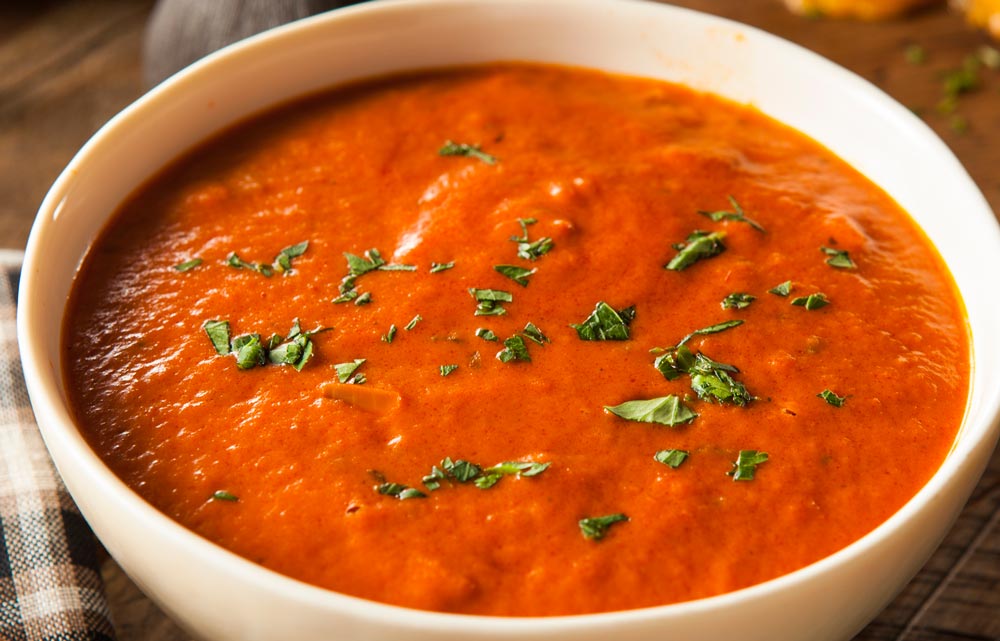
Hearty Italian Tomato-Mushroom Soup
Plan Z Phase: This is a Z3 (ZReboot) recipe. From the refrigerator and my cupboard comes a simple Italian soup. Robust as it is, it can stand alone as a light meal with a small salad.
This is a very thick soup. If you like your soup thinner you can add tomato juice to thin it out. I'd say a couple of cups of juice would be plenty.
Serving Size: Each serving is 1-1/2 cups
Instructions:
- 1/2 large onion, diced
- 8 oz of mushrooms, chopped
- 1 Tbl olive oil
- 3, 15-oz cans diced tomatoes (organic if you can find them)
- 1/2 cup prepared basil pesto
- salt and pepper to taste
- tomato juice (optional)
Instructions:
Put the onions, mushrooms and olive oil in the bottom of a medium-sized soup pot. Cook on medium until the onions soften and the mushrooms give off their liquid and just start to brown on the edges. This will take 7 to 10 minutes.
Add the cans of tomatoes and the pesto. Heat on medium heat until the soup starts to bubble; then turn it down to a low simmer. Take out half of the soup and whiz it in a blender. Be careful, it will be hot! Then add it back to your simmering pot. This will give it a smoother texture and meld the flavors more. Total cooking time for the soup will be about 15 minutes until good and hot. If it is too thick, you can thin it out with tomato juice. Season with salt and pepper.
Enjoy!
Cheers,
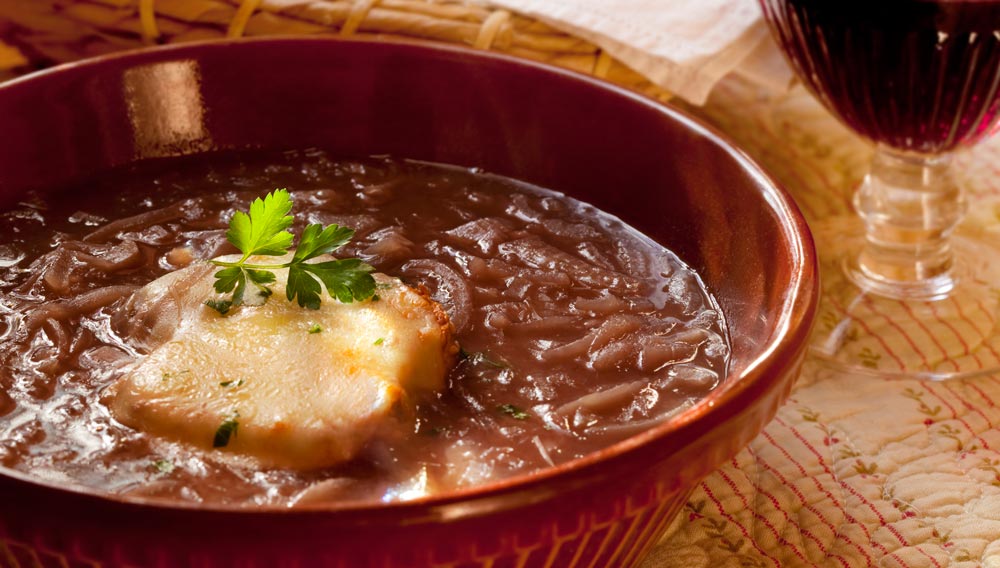
French Onion Soup
Plan Z Phase: This is a Z3 (ZReboot) recipe. Note: This French onion soup recipe is for the ZReboot phase because of its expanded ingredients list.
Serves: Serves 4
Each serving is 1-1/2 cups
Ingredients:
- 2 medium onions, sliced thinly. I used my mandolin to slice.
- 2 Tbl of butter
- 1 Tbl of olive oil
- 4 cups of organic beef broth
- 1 cup of organic chicken broth
- 2 Tbl of white wine
- 1 Tbl of Worcestershire sauce
- a sprinkle of nutmeg
- pepper to taste
- 2 oz of grated Parmesan cheese
- up to 3 Melba toast rounds per serving
- ¼ cup of shredded mozzarella cheese
Instructions:
Heat the olive oil and butter in a pan. Add onions and sauté in a soup pot on medium until they are translucent. Stir often. This will take about 7 minutes.
Add the broths, Worcestershire sauce, wine, nutmeg and some pepper and raise the heat to high.
Bring it to a low boil and turn back to medium and simmer for 3 minutes, just to heat it through completely. Add the Parmesan cheese and stir.
When ready to serve put the soup in your bowl. Float the Melba toast rounds on top and the top that with the shredded mozzarella.
This will taste pretty darn official!
Enjoy!
Cheers,

Cajun Peanuts
Plan Z Phase: This is a Z3 (ZReboot) recipe contributed by Plan Z dieter Darlene. Great idea! Super easy.
Ingredients:
- 1/2 cup unsalted butter
- 2 tsp cayenne pepper
- 1 tsp paprika
- 1-1/2 Tbl of garlic salt
- 2 tsp of Tabasco Sauce
- 4 cups of unsalted peanuts
Instructions:
Preheat your oven to 300 degrees.
Meanwhile, melt the butter, then stir in the spices and pour over the unsalted peanuts. Bake at 300 degrees for 30 minutes. Stir every 10 minutes.
After cooking place on paper towels to absorb the excess butter and allow to cool. I let mine set overnight before placing in a container.
At Christmas, I really missed Chex Party Mix! So, I stirred up the seasoning and poured it over a gallon can of mixed nuts. Followed the instructions on cooking in the oven, cooled on paper towels. It did take a little longer for the nuts to absorb the seasoning, but it was worth it. I had the taste of the party mix without the carbs!
Enjoy!
Cheers,
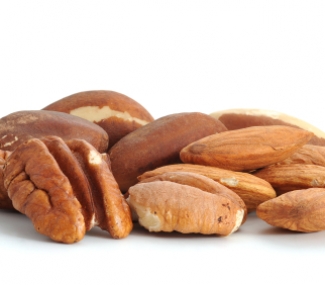
Coffee and Cinnamon Roasted Nuts
Plan Z Phase: This is a Z3 (ZReboot) recipe submitted by Plan Z dieter Debbie. Debbie says, "I made some roasted nuts last night for an election party, they were so good I had to share them. These were amazing and so yummy."
Servings: Serves up to 20 people
Ingredients:
- 3 c of whole pecans & almonds
- 1 Tbl of instant coffee
- 1 tsp cinnamon
- 1/4 cup water
- 3 packets of stevia
- pinch of salt
Instructions:
Preheat your oven to 300 degrees.
Set out a baking pan covered with parchment.
Mix coffee, water, salt, and stevia together in a glass container and shake vigorously.
Microwave this mixture for one minute to heat the glaze. Then pour glaze over nuts (or drop them into the container with your heated mixture and shake vigorously again).
Mix well to coat and bake on parchment for 15 minutes.
Let cool and serve.
Enjoy!
Cheers,
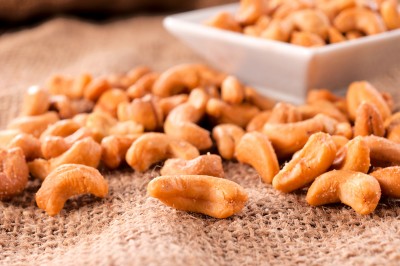
Low-Carb Nuts Snack Mix
Plan Z Phase: This is a Z3 (ZReboot) recipe.
Ingredients:
- 1 can whole cashews
- olive oil spray
- 3 tsp Worcestershire sauce (or more to taste)
- 1/2 tsp salt
- 1/2 tsp onion powder
- 1/2 tsp cayenne (or to taste)
Instructions:
Pour the nuts into an ovenproof pan. Spray nuts with oil and toss. Sprinkle on the seasonings and toss thoroughly. Roast in your oven at 375 degrees for 10 - 12 minutes. When you start smelling the wonderful aroma, or when you spy a little browning on the edges, take them out of the oven. Now toss one more time. Cool on paper towels. You can even eat them warm and really savor the coating.
Enjoy!
Cheers,