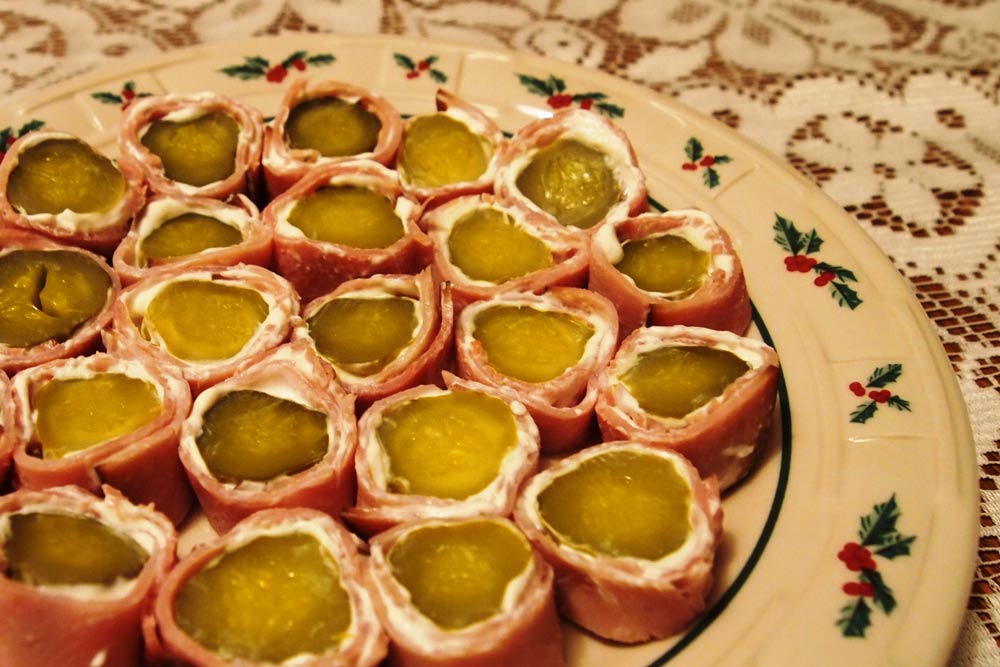
Pigs in a Poke
Plan Z Phase: This is a Z3 (ZReboot) recipe that is SUPER EASY to make. This recipe comes from veteran Plan Z dieter Amy. This is adapted from an old recipe from the 1970’s. Even then some people knew how to eat. Photo submitted by Plan Z dieter Nancy.
Servings: Serving size depends on how much ham or prosciutto you buy
Ingredients:
- sliced deli ham or prosciutto
- pickles
- cream cheese, softened (or use whipped cream cheese – plain)
Notes about the ingredients:
Get good deli ham that doesn’t have a lot of sugar in it. Avoid that stuff in the packages hanging along the wall. Go to the deli and ask for the good stuff, thinly sliced. Prosciutto (Italian ham) will be on the wall, sealed or you can sometimes get that in the deli too.
You can use dill or I’d use big gherkins. I’m just one of those crazy people who hates dill pickles. Dill will be lower carb. You can get the fresh pickles in the deli section that have no sugar in them.
Instructions:
Spread the ham with cream cheese. Lay the pickle on the edge and roll up. Slice into rings.
Put on a platter and serve.
Enjoy!
Cheers
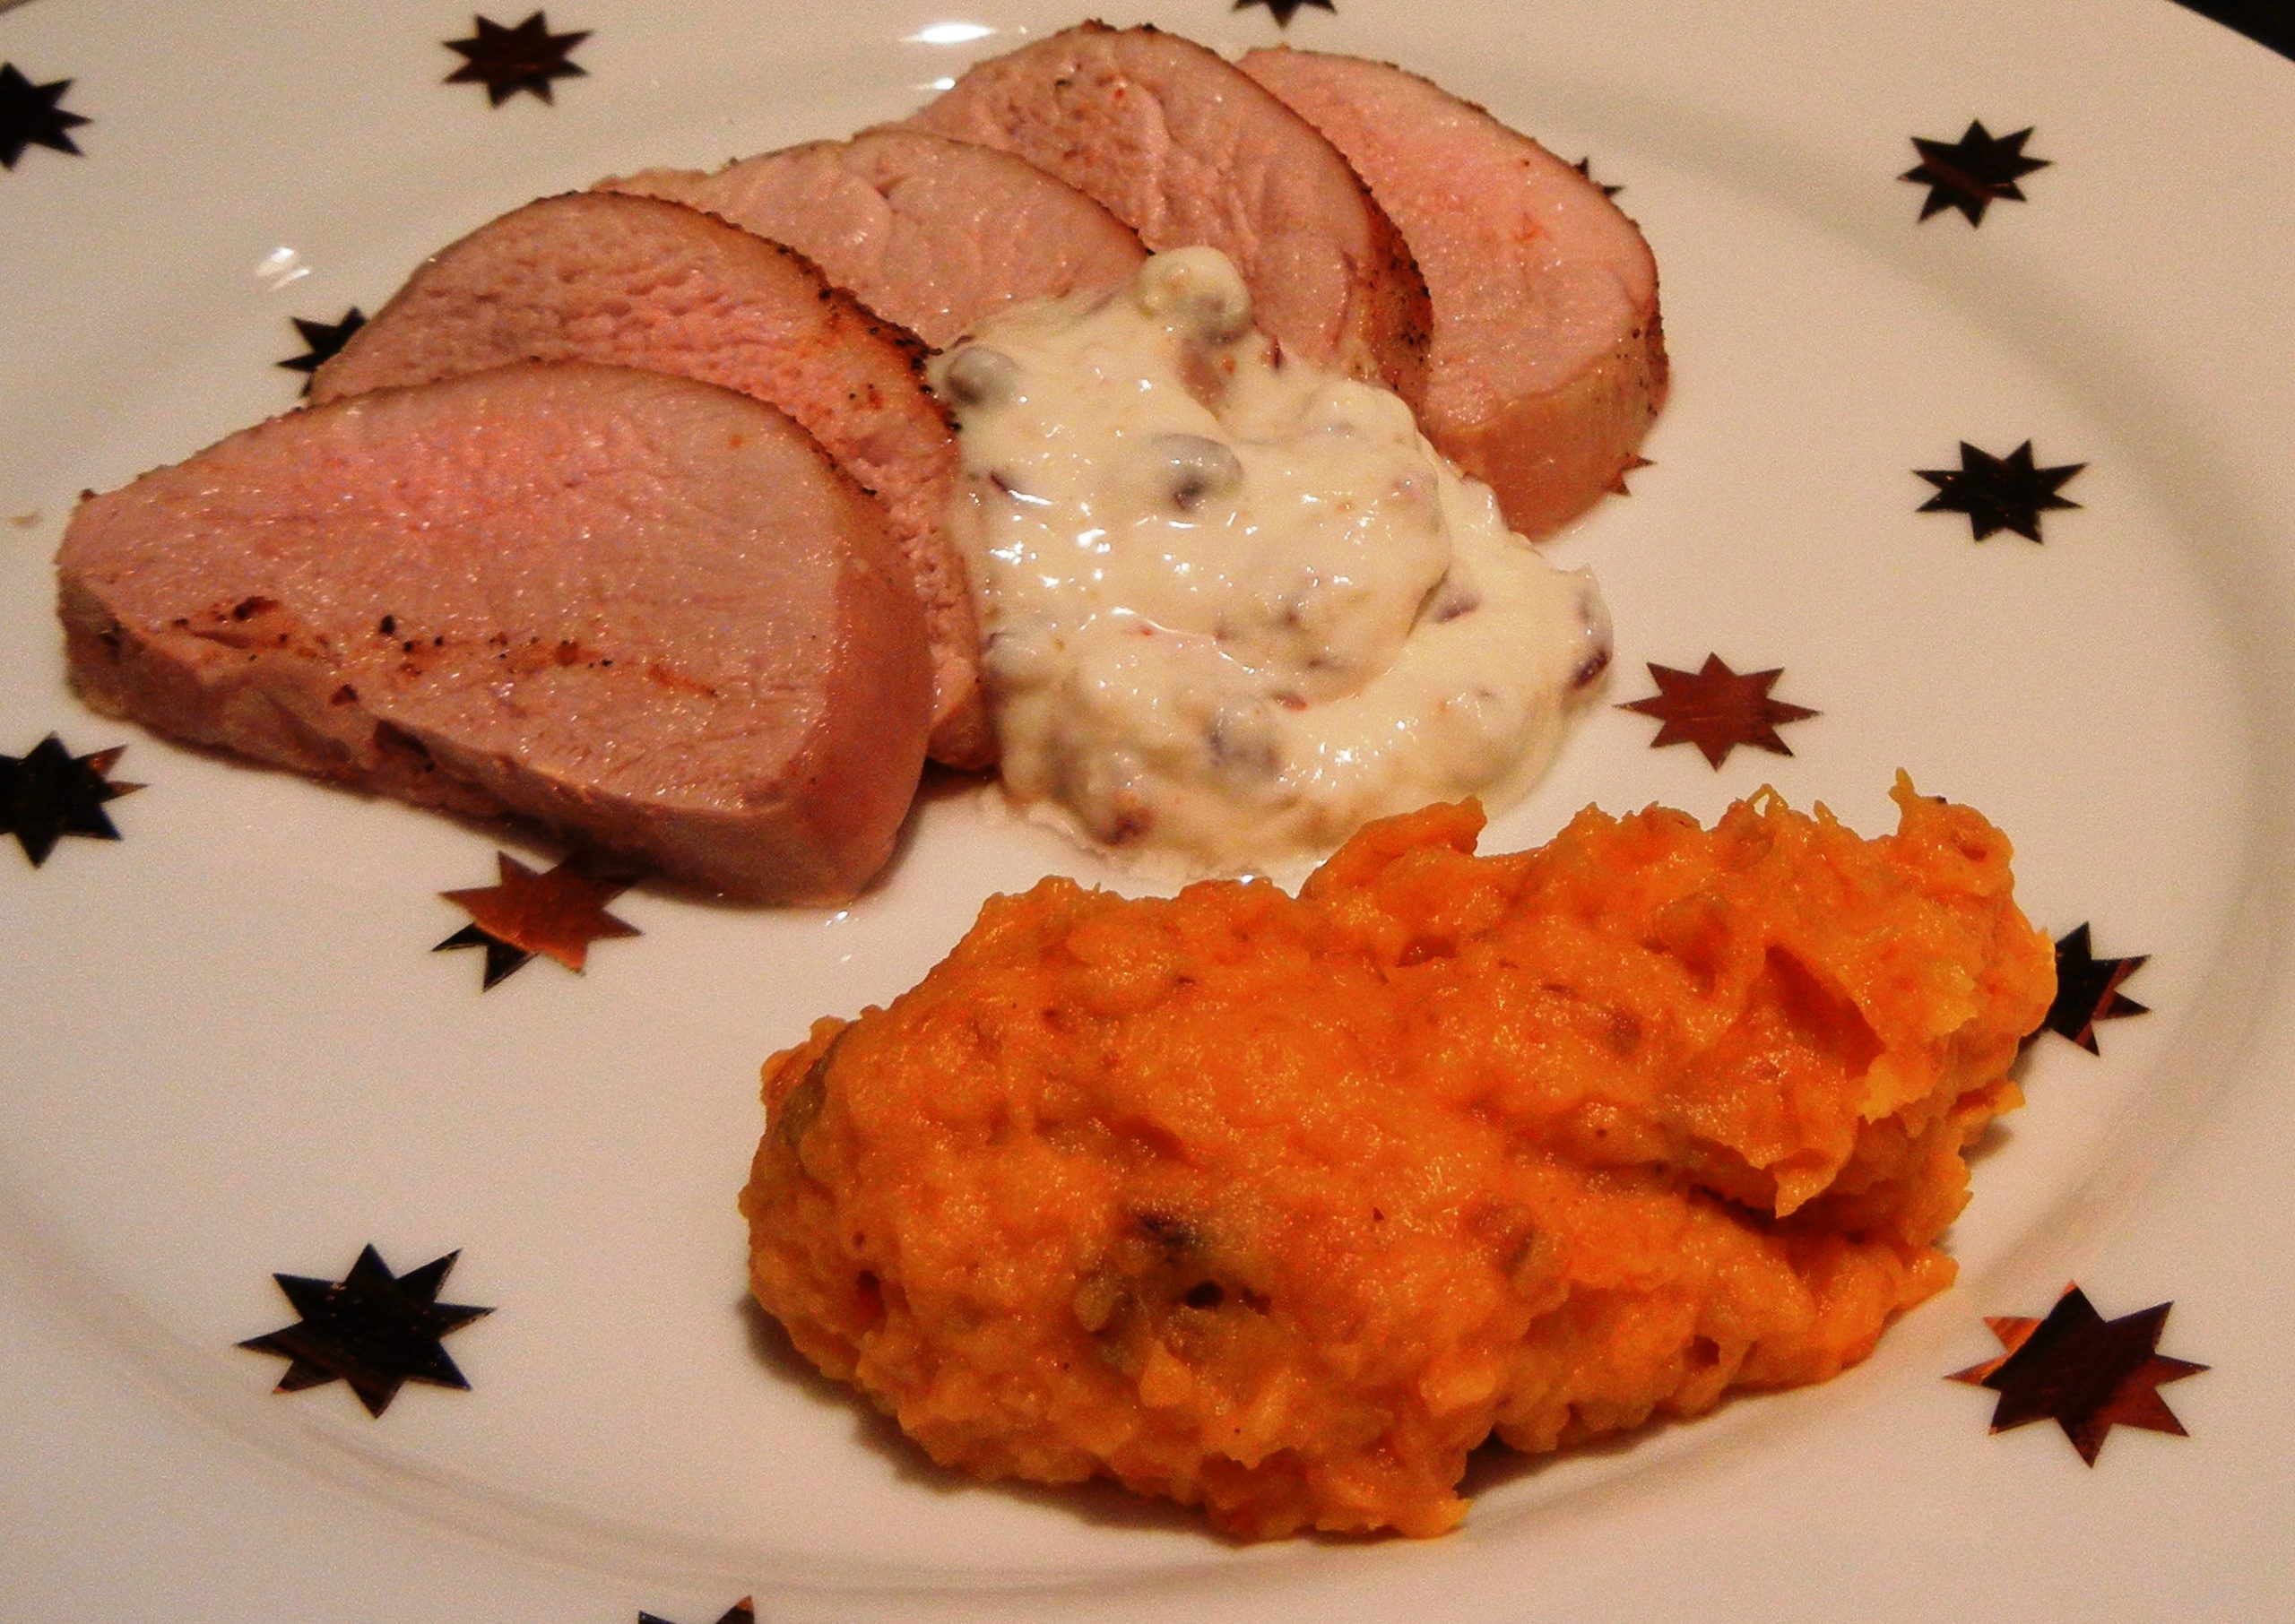
Pork Tenderloin with Horseradish-Cranberry Sauce
Plan Z Phase: This is a Z3 (ZReboot) recipe. This is a delightful meal. This would be perfect at the holidays too. It’s very easy to make and can be multiplied to serve a larger party. Each pork tenderloin will usually serve 3 people.
Servings: Serves 6
Ingredients:
- 2 large pork tenderloins
- your favorite meat rub
- 4 Tbl of mayonnaise
- 4 Tbl of crème fraiche or sour cream
- 2 tsp of prepared horseradish
- ¼ tsp of grated lemon peel
- ¼ cup of minced dried cranberries. Soak the cranberries in a small bowl of hot water for 10 minutes to soften them before you make the sauce.
- sea salt and pepper to taste
Instructions:
Preheat oven to 375 degrees.
In a large ovenproof pan (9" x 13") spray a bit of olive oil spray and put in the tenderloins. Spray the tops of the tenderloins and season with your favorite meat rub. I use a brand called Special Sh*t. I know it’s a vulgar name but it’s amazingly good! Any meat rub will go with the sauce.
Put the tenderloins in the oven and roast them for approximately 30 minutes or until they measure 160 degrees in the center. This time will vary depending on the thickness of your tenderloins.
While the tenderloins are roasting you can make your sauce. In a bowl add the mayo, crème fraiche, horseradish, lemon peel and minced cranberries. Stir. Taste and season with salt and pepper. Let the sauce sit until the tenderloin is ready to serve. You can drizzle the sauce over or just serve a puddle of it on the side.
This can be served hot or room temperature. Will work great on a buffet.
Enjoy!
Cheers,
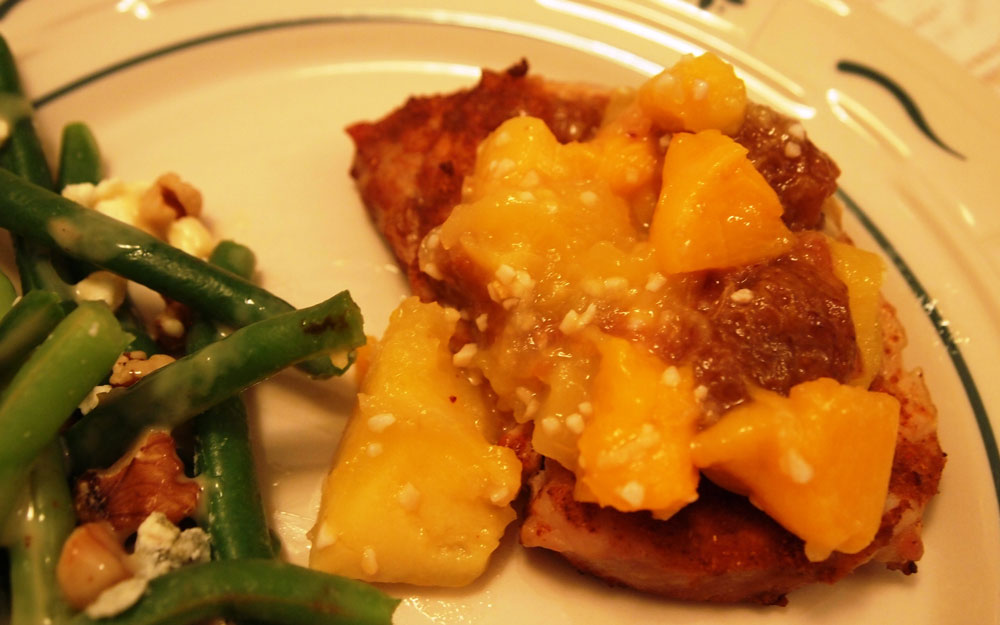
Caribbean Pork Tenderloin with Fresh, Chunky Summer Fruit Sauce
Plan Z Phase: This is a Z3 (ZReboot) recipe. This recipe was more than a success. My husband proved that he could really cook. Photo submitted by Plan Z dieter Nancy.
My husband could take a few hints called down from my Second-Floor-Cooking-Consulting position and put them into culinary action with no visual supervision. I could not see a thing he was doing. I had to trust him and he had to trust himself. I think you’ll find this dish easy to make, fun to eat and particularly satisfying when sharing the confidence you gain when you make it. Even if you’ve never cooked dinner-go for it! As my mother used to say, “If you can read you can cook;” and I guarantee it’s “right on” this time.
Servings: Serves 4 - 6
Ingredients:
Caribbean Pork Tenderloin
- 2 pork tenderloins. They are about 1 pound each and usually come ready to use two to a package.
- 2 Tbl ground coriander
- 2 Tbl ground cumin
- 2 Tbl paprika (I use Hungarian)
- 2 Tbl ground ginger
- 1 Tbl turmeric
- 1 Tbl curry powder
- 1 Tbl chili powder
- 1½ tsp ground cinnamon
Fresh, Chunky Summer Fruit Sauce
- 3 fresh ripe peaches chopped (don’t even bother to peel. Toss away the pit though.)
- 3 fresh plums diced. No peeling needed.
- 2 fresh mangoes peeled and chopped (or you can buy peeled mango. Use 4 long slices and chop them up.)
- 5 tsp minced garlic (Jar garlic is fine)
- 1” piece of fresh ginger minced
Instructions:
Preheat your oven to 400 degrees.
For the pork
In a small bowl mix all of the spices together to make your rub. Frankly, if you are missing one or two of these ingredients don’t fret. It won’t taste much different and just won’t really matter. The one I’d say to try to have for sure is the chili powder or you’ll lose the heat but if you want less spice you can leave that out anyway.
Rub the mixture all over your tenderloins. Make sure every surface is covered. Then put them in a 9" x 13" pan so they have room to cook, uncovered, without touching each other. Put this in your 400-degree oven to roast to 160 degrees on your meat thermometer. This should take 20 – 30 minutes. If you don’t want ANY pink in your pork, roast to 170 degrees.
For the sauce
Put all ingredients in a large saucepan. Turn on medium and cook until the fruit starts to break down (cooked but not mushy). You don’t want mush when you are done. This should take no longer than the pork.
Turn off the sauce and allow it to set.
Take the pork out of the oven and let it sit for 5 minutes so the juices are reabsorbed. Cut the pork diagonally in half inch slices and serve with the sauce.
Enjoy,
Cheers!
Grilled Pork Loin with Garlic-Honey Mustard Aioli
Plan Z Phase: This is a Z3 (ZReboot) recipe. Aioli is a big hit this year. About a decade ago when I began making aioli it seemed imperative that you start your aioli by making homemade mayonnaise. This year that’s all gone. Doctoring up commercially made mayonnaise is the new aioli base. Sure makes it faster and easier to make! And it makes it safer for parties, without the fear of food poisoning. And on that note, enjoy your roast, your party and the rest of your summer.
Servings: Serves 6 – 8 (double or triple for a party)
Ingredients:
- one pork loin roast, approx 8” long and 4” in diameter”
- olive oil spray
- Italian herb mix, 1 – 2 tsp
- 1 cup of mayonnaise
- 1 Tbl of minced garlic (jar garlic is fine)
- 3 Tbl of horseradish-mustard (or any other mustard you prefer)
Instructions:
In a 9" x 13" pan set your roast. Spray the whole roast liberally with olive oil spray. Sprinkle the Italian herbs over the top of the roast (the fatty side up). Let sit in a cold refrigerator for up to 4 hours. Then prepare to grill. Heat grill on high to 500 degrees. Oil the grill and put the roast on the grill grate fatty side down. Sear the roast at 500 degrees for 5 minutes. You’ll have beautiful grill marks and a good crust on the top. Turn the roast over. Turn the grill down to 325 degrees and grill until the loin roast reaches 155 degrees. Use a meat thermometer to check. This may take 20 – 30 minutes depending on how your grill behaves. Try not to open the grill too often so you don’t let the heat out. Let the roast sit for at least 10 minutes before cutting. One nice thing about this roast is you can stop here, wrap the roast in foil and put it in your refrigerator until the next day. This is a great way to prepare for a party in advance. The roast can be served hot, cold or room temperature. For the party, I took the roast out of the refrigerator and sliced it very thinly. Then I put it back in a 9" x 13" pan and heated it at 300 degrees. While the roast was heating I poured a cup of white wine over the top to give it more moisture. You can use wine, water or even orange juice. Choice is yours.
To make the aioli: Mix the mayo, the garlic and the mustard in a nice serving bowl. That’s it! You can also make this a day ahead and just pull it out of the refrigerator a bit ahead of serving it so it’s not completely refrigerator cold.
When the roast was warm I served it with the rolls and the aioli. People could make little sandwiches using the aioli as a spread or just have pork and use the aioli as a dip. This will even make a fun dinner in front of the fireplace in the winter so don’t hold back.
Enjoy!
Cheers,
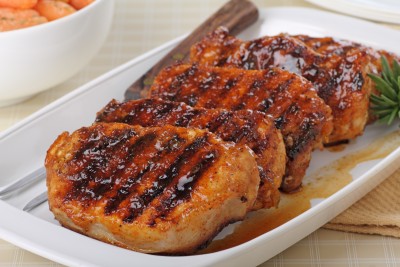
Pork Chops with Chunky Cajun Peach Sauce
Plan Z Phase: This is a Z3 (ZReboot) recipe.
Servings: Serves 4
Ingredients:
For the sauce
- 30 oz of frozen peach slices, thawed. If you have to use canned slices, drain and rinse them.
- 2 Tbl of maple syrup
- 2 tsp of Cajun seasoning (no sugar)
- a grating of sea salt
- 1 roasted red pepper, chopped (You can buy these in a jar. Just rinse well and cut it up.)
- ½ of a Vidalia onion, sliced
- 3 Tbl of fresh basil chopped
For the chops
- 4 bone-in thick cut pork loin chops
- olive oil spray
- sea salt and pepper
Instructions:
Spray your grill pan (or a sauté pan if you don’t have a grill pan) with olive oil spray. Heat. In a bowl add the peach slices, maple syrup, Cajun season and the sea salt. Toss to coat the peaches. When the pan is hot put in the peaches and grill them until you start to get grill marks and they are all heated. This won’t take more than a couple of minutes. Don’t move them around too much or they will all fall apart. Don’t fret is some do fall apart.
Remove peaches to a medium bowl.
Spray the pan again and add the Vidalia onion slices. Pour in a little water just to loosen the bits of Cajun seasoning on the bottom. Stir that all up so the onions get coated and just cooked through. Add the onions and the red pepper bits to the peaches reserved in the bowl. Stir in the basil. You now have your sauce. You can reheat this to serve or you can serve it room temp or cold. Just depends on the time of year you make it. In the summer it would be great cold.
For the chops
Clean the grill pan or fire up your outdoor grill. You have options here for cooking. You can cook the chops totally through on the grill or you can do what I do. Spray the chops with olive oil. Dust with sea salt and pepper. I sear one side of the chops (3 minutes on medium high) and then put them in an oven-proof pan and roast them at 375 degrees for 20 minutes or until the meat thermometer says 160 degrees. This temp will offer them up slightly pink and still juicy.
Serve with the peach sauce piled on top. The peach sauce recipe makes quite a bit so you might end up with a bit of leftovers. I had plenty for five people.
Enjoy!
Cheers,
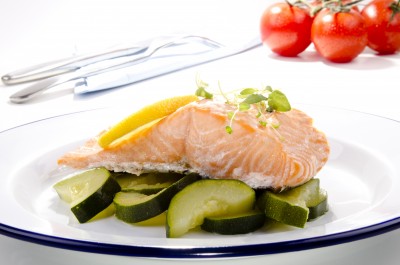
Norwegian Salmon Fillets with Zucchini, Pine Nuts & Spinach
Plan Z Phase: This is a Z3 (ZReboot) recipe.
Servings: Serves 2. Can be doubled.
Ingredients:
For the Salmon
- 2 pieces wild Norwegian salmon (approx 6-8 oz each)
- butter spray
- Italian grinder spices or Italian spice mix
- 1 tsp butter
For the Veggies
- 3 small zucchini washed and cut
- 1 Tbl olive oil 4 Tbl pine nuts, toasted*
- 16 oz can organic tomatoes with garlic and onions
- two handfuls organic baby spinach, cleaned
- cayenne pepper (optional)
Instructions:
Preheat your oven to 400 degrees.
* To toast pine nuts you just need a clean, dry sauté pan. Put the pine nuts in and turn your burner on medium high. Toast the nuts in the pan by swishing them around once in awhile until they are slightly browned and fragrant. This does not take long. Just a minute or two. Remove them from the pan and let them cool.
To cook the salmon:
You'll need an ovenproof sauté pan (cast iron works well). Spray the pan with butter spray. Spray the pink side of the salmon, too. Sprinkle on the spice mixture to your taste. If you are using the Italian grinder you are getting some cracked red pepper into the mixture so it will be a bit spicier. Put the salmon in the pan pink side down (the wrong side is the skin side). Heat on medium high and cook the salmon until a crust has formed and the pink side of the salmon is now browned, less than five minutes. Flip the salmon over and put it in your oven set at 400 degrees. You are going to roast the salmon, uncovered, to finish it. This will take approximately 12 - 15 minutes depending on how "done" you like your salmon. My husband prefers his with no rare parts; less pink. By roasting it, the salmon stays moist even though it's been cooked longer.
While the salmon is roasting you can make your vegetables.
Put the olive oil and the zucchini in a large sauté pan. Cook until the zucchini is just getting browned bits on the edges. Add the can of organic tomatoes and cook down until some of the liquid has evaporated. How long you cook this down is really dependent on how runny you want your sauce. I cook about half of the liquid down on medium high. This takes about 5 minutes. Add a sprinkle of cayenne if you want this sauce to be spicier.
At the last minute grab your spinach and toss it in. Cook just until the spinach is wilted. Stir constantly. This will only take about 30 seconds. Add the pine nuts and mix
Sauce is ready. You are now ready to serve.
Remove the salmon from the oven. Pour the sauce on the plates and place the salmon on top. Take that last teaspoon of butter and divide it equally on top of the salmon. It will melt, run down the salmon and give it an extra-elegant taste.
Enjoy your healthy meal,
Cheers!
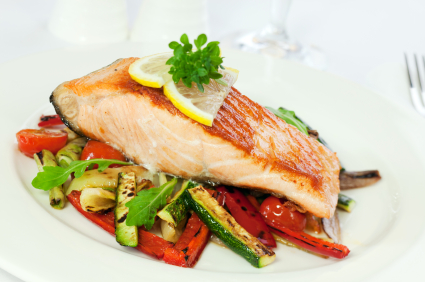
Cajun Salmon with Tomato-Zucchini Medley
Plan Z Phase: This is a Z3 (ZReboot) recipe. A couple notes on the recipe: A news bulletin came out to say that farm-raised salmon is not particularly good for you, especially for your cholesterol levels. All this time we thought it was the miracle fish. They are recommending wild sockeye salmon instead. The problem with that is availability and cost. Wild salmon will run you about $14 a pound depending on where you live so, for many, that's a major budget splurge. Keep an eye out for more research and, in the meantime, make up your own mind on that one.
I am also recommending you use a Cajun rub on this salmon. If you don't want to buy a pre-made rub or don't have access to one, you can make your own. Just combine one-eighth teaspoon of each of these: Hungarian paprika, sea salt, garlic powder, onion powder, black pepper, cayenne pepper and curry powder. Shake all of these dry spices in a jar and you're set for a few recipes of Cajun salmon.
Servings: Serves 2
Ingredients:
Cajun Salmon
- two 6-8 oz pieces of salmon filet (skin on one side)
- Cajun spices (see remarks above)
- olive oil spray
Tomato-Zucchini Medley
- 5 medium tomatoes (ripe)
- 12 inch long zucchini or two shorter ones, cut into quarter-inch coins
- 1 tsp chopped garlic (jar garlic is fine)
- olive oil spray
- salt and pepper to taste
Instructions:
For the Salmon:
Heat your oven to 400 degrees. Get out an ovenproof pan. I use the old-fashioned cast iron one. Spray your pan bottom and heat it on medium high. Dust the flesh side of your salmon with the Cajun rub. How much you put on is up to your taste. When the pan is heated, put your Cajun salmon in the pan flesh and spice side down. Cook the salmon for a minute or two just to brown the top of it. Turn over and cook one more minute. Then take the whole pan and put it in your oven. The salmon will now cook by roasting it. It will be moister this way. If you like your salmon medium rare, roasting will only take about 10 minutes. Cook longer if you want it all light pink in the middle instead of dark and light pink.
While the salmon is roasting...
Tomato-Zucchini Medley:
Dice 4 of the 5 tomatoes. Add to a saucepan after you have sprayed it with olive oil. Then add the garlic. Cook the tomatoes on medium high until they cook down and some of the liquid starts to evaporate. This should take about 10 to 15 minutes.
While this is happening, you are going to grill, sauté or broil your zucchini. Spray the grill pan or cookie sheet or sauté pan with oil. Place the zucchini coins in your pan and cook on medium high until slightly browned. Spray the tops of the zucchini and turn them over so they get slightly browned on the other side. If you only have one oven and want to broil the zucchini, turn the oven up to 500 degrees and leave your salmon on a lower shelf while the cookie sheet of zucchini is above it. The salmon won't be in direct heat so it will be okay. It will just roast a little faster.
Take the zucchini out and, if the salmon is done, take it out too; otherwise put the oven back to 400 degrees.
When the tomatoes are cooked down, dice up the last of the tomatoes and add the bits to the saucepan. This gives more texture to the mixture. Add the zucchini just before you want to serve it and warm the tomatoes and zucchini just a tad.
When you serve this dish, place the salmon on the plate and then spread the tomatoes and zucchini around it for color. (It also pretty much covers the plate this way so you won't notice that there's no starch on the side.)
Enjoy!
Cheers,
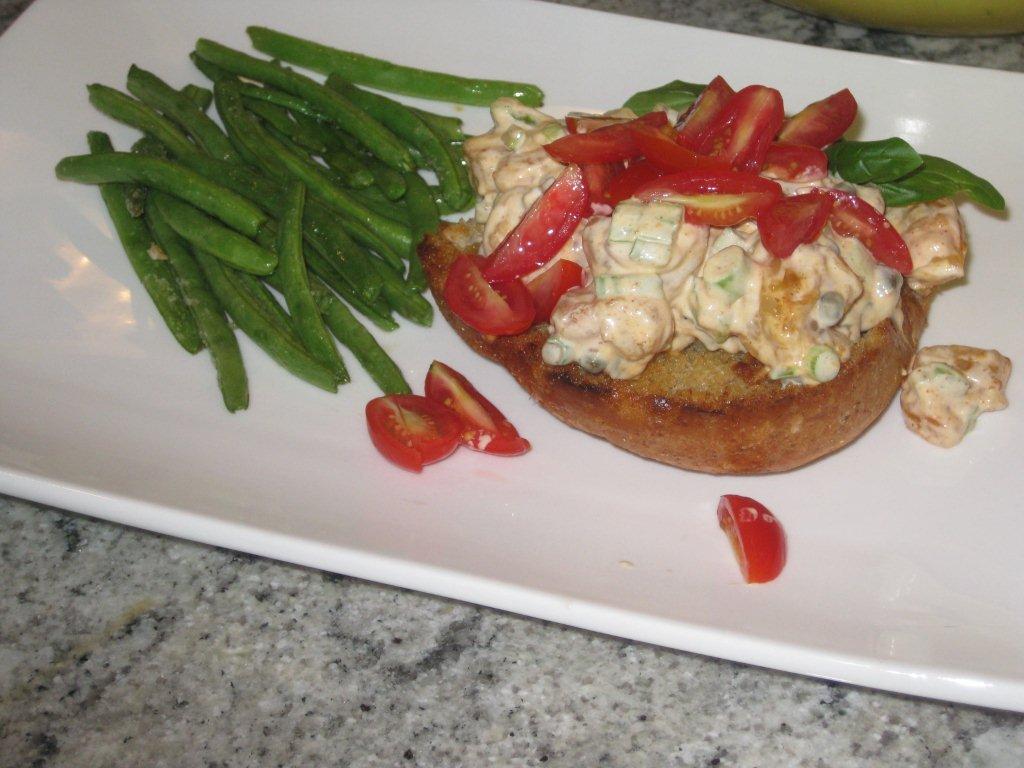
Shrimp Salad "Sandwich"
Plan Z Phase: This is a Z3 (ZReboot) recipe. Traditional shrimp po-boys are big in the South. The problem is they are breaded, fried and served in a big hoagie roll. Lobster rolls are big in the East. Problem is lobster is expensive as soon as it leaves the dock, and the lobster rolls are eating in a fluffy, buttered and grilled bun that resembles a hot dog bun.
So what’s a girl to do?
Invent your own low carb “sandwich” that is a combination of both traditions. This is how a sandwich looks in ZLife. You can also serve this over greens and eat it anytime in ZReboot.
Servings: Serves 3-4
Ingredients:
- 1 lb of shrimp, cooked and tails cut off. You can use any size of shrimp. I used the medium-small ones.
- 3 Tbl of butter or ghee
- 1-2 tsp of Cajun seasoning (to taste)
- 1 cup of chopped celery
- 1 Tbl of capers, rinsed
- 1/3 cup of minced scallions
- ¾ cup of mayo
- a sprinkle of cayenne (optional)
- ½ cup of cherry tomatoes, quartered
AND
- greens of your choice (if you're in ZReboot)
OR
- 1 piece of wheat bread or half of a wheat roll (if you're in ZLife!) – splurge and get a good organic roll for this sandwich – buttered on one side.
Instructions:
Melt the butter in a medium sauté pan. Add the shrimp and the Cajun seasoning. Warm the shrimp thoroughly and stir the seasoning in really well. Turn off heat. Let the mixture sit for a few minutes so it soaks up the seasoning really well.
In a large bowl add your celery, capers, scallions and mayo. Stir. Add the shrimp. Taste. If you want your mixture to have more zip, add the cayenne to taste.
Pile the shrimp mixture on top of the greens or the bread. Top with tomato bits.
I suggest serving salted, roasted green beans on the side. These are better than potato chips!
Enjoy!
Cheers,
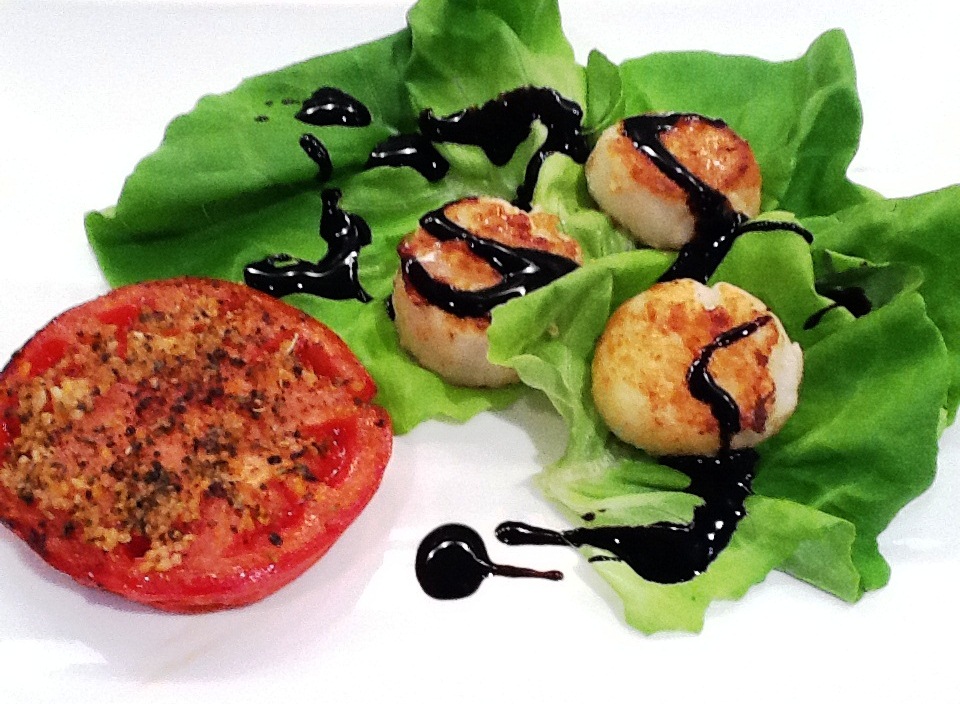
Seared Sea Scallops
Plan Z Phase: This is a Z3 (ZReboot) recipe. There are a few secrets to perfectly seared sea scallops. I’ll show you the tricks the professional chefs have shared with me. This dish is simple but taste fancy.
Serving Size: Serves 4
Ingredients:
- 2 Tbl of regular flour
- ½ tsp of grated sea salt
- ½ tsp of Italian seasoning or any seasoning. You can use cumin for an Indian feel. They can be done with cayenne for some zip. You can just do them plain or sprinkle on any favorite meat or seafood rub.
- 24 oz of sea scallops
- olive oil spray
- balsamic reduction (optional). Specialty stores carry balsamic reduction. If you don’t have balsamic reduction you can also use something like tomato sauce or even a salsa on the side.
Instructions:
First secret: Wash and rinse your scallops. Then lay them out on a cloth towel. Dab lightly at the top with paper towels and let them sit for about 15 minutes. Don’t leave them out too long or you risk food poisoning. I leave them out for just the 15 minutes. The secret is you want to have dry scallops before you fry them. If you don’t they will be mushy. You also want them to be closer to room temp rather than refrigerator cold.
Secret #2. Preheat your pan on medium high. You want the pan HOT before you put in the scallops to get a good sear.
While the pan is heating, put the flour, salt and seasoning in a large Ziplock baggie. Toss half of the scallops in the flour and take them out. Toss the other half. This is a very small portion of flour so the carbs won’t add up to much.
When the pan is HOT take it off the heat for a second and spray with olive oil. This is for safety. Then place it back on the heat and add each scallop by hand. Secret #3 is to make sure none of the scallops touch each other. If they do that will produce moisture and they’ll be mushy. You want a nicely seared scallop.
I cook them for 3 minutes and then turn over. That gives me a nice firmness to the outside and the inside stays moist. You can cook them longer or shorter as you choose. I like mine cooked all the way through but not to the rubbery point. 3 minutes on the other side does the trick. Use the rule of thumb of 7 minutes per inch of thickness for any fish and it will be done if the heat is high enough.
The last secret? Serve right away. If you don’t, they will get soft and they cool off quickly.
In the picture you’ll notice I served them on butter lettuce leaves with the balsamic drizzle.
Enjoy!
Cheers,

Grilled Cajun Tuna Steaks with a Mustard Smear and Tomato Salad
Plan Z Phase: This is a Z3 (ZReboot) recipe. See how you can be “gourmet” and still be on a diet. My mission is always to make diet food that tastes good.
Servings: Serves 4
Ingredients:
- 4 tuna steaks or any grillable fish, 3/4" - 1” thick
- cajun seasoning for meat or fish (I use either one)
- olive oil spray
- 2 tsp of mustard (choose your favorite. Grey Poupon, horseradish mustard, or my favorite - hot mustard, or other)
- 4 handfuls of salad greens
- 2 large, ripe tomatoes cut into slices
- olive oil for drizzling
- 1 Tbl of balsamic vinegar
Optional:
- blackberries (or other berries) for color and variety
Instructions:
Spray both sides of the tuna steaks, liberally, with olive oil spray. Dust them with the Cajun seasoning to taste. Set aside so the flavors sink in.
While the flavors meld, take out your dinner plates. In a medium bowl, toss your greens with a light drizzle of olive oil and just a hint of salt. The salt actually enhances the flavor of the olive oil and greens. Place a portion of greens in the middle of each plate. Divide your tomato slices into 4 portions and fan them around one side of the greens. Spread them wide to cover half of the plate edge. Drizzle with olive oil. Season with pepper and drizzle bits of balsamic vinegar on the tomatoes.
Heat your grill or grill pan. Place the tuna steaks on the grate and grill on medium for 3 minutes. Don’t move them. This will give you nice grill marks. Carefully flip them over and grill 3 more minutes. This will finish the fish at medium. If you like your tuna more rare in the middle cut back the cooking time when you flip the fish over. The gauge I use is 7 minutes per inch of thickness to grill fish to medium. Just keep in mind that it keeps cooking after you take it off the heat. Tuna is very forgiving. Done to any temperature it still tastes good so if you are not a regular fish griller this is a good place to start. Tuna has a meaty taste and texture too, so if you grilling for non-fish eaters they’ll likely change their tune when they taste this.
Remove the fish from the grill and place the fish steaks in the middle of the greens. The hot fish will “wilt” the greens and make a nice warm salad. While the fish is still very warm smear a half teaspoon of mustard across the top of each piece. The mustard will melt and make a sort of glaze. Now you’re eating French-Cajun.
Scatter your berries around the greens and you’re ready to eat. For another side, spray olive oil on asparagus spears and grill them along with your fish. You’ll have a gourmet meal fit for company.
Enjoy!
Cheers,
Seafood Curry Thermidor
Plan Z Phase: This is a Z3 (ZReboot) recipe. Lobster thermidor is a classic. I took all the fuss out of the lobster dish and made an easy seafood version that you can whip up in your kitchen. Make this for company or for an evening when you feel fancy. This dish goes perfectly on ZReboot phase of Plan Z.
Serves: Serves 4 - 6. Each serving is 1-1/2 cups.
Ingredients:
- 1 large shallot, minced
- 4 Tbl of butter
- 8 oz of sliced button mushrooms
- 1 Tbl of flour
- 1 cup of whole milk
- 1 – 2 cups of heavy whipping cream
- a pinch of cayenne
- ½ tsp of dried tarragon
- 1 tsp of curry powder or to taste
- 1 Tbl of olive oil
- 1 lb of cooked shrimp, tails removed. I use 30-40 count – the size of my little finger.
- 1 lb of sea scallops cut into quarters or the same of bay scallops
- grated Parmesan cheese to garnish (optional)
Instructions:
In a large sauté pan add the shallot, butter and mushrooms. Saute until the mushrooms just begin to brown on the edges. Add the flour and stir to mix well. Then add the milk and a cup of the cream. Stir in the cayenne, the tarragon and the curry powder. The sauce will thicken as you cook it. You get to decide if you want your sauce thick or thin. You can add more cream to make it thinner or let it continue to thicken. Season with optional grated sea salt.
While the sauce is cooking take out another large sauté pan and add the olive oil. Heat it and then add the shrimp and scallops. Cook on medium to heat the shrimp and cook the scallops. This should only take about 4-6 minutes. You get to decide if you like your scallops cooked harder or soft. That’s why the time varies.
When it is cooked and hot, transfer the seafood to the sauce pan. Mix them around and make sure it’s all hot before serving.
I serve this dish in bowls with a bit of greens on the side for other color. Garnish with a bit of grated Parmesan if you choose. I also served it this evening with roasted asparagus and cherry tomatoes on a side plate. The sauce will be a beautiful, creamy yellow.
Enjoy!
Cheers,
Salmon Francoise
Plan Z Phase: This is a Z3 (ZReboot) recipe. The famous chef Wolfgang Puck would call this Salmon Francoise. I just call it a BIG YUM. It’s so easy and yet so elegant. You can do this as a romantic dinner for two or for a small dinner party. The only trick to this is to be ready to sit and eat as soon as it’s done. Otherwise it will get cold fast. I promise you gourmet food as well as comfort foods on Plan Z. This one definitely fits the gourmet category.
Servings: Serves 2 or can be easily doubled.
Ingredients:
- 12 oz of salmon. Ask your fish monger to take off all of the skin and remove the bones. Try to get line-caught, wild salmon. Salmon that has been raised in a pen is actually not good for you.
- sea salt and pepper to taste
- 3 Tbl of dry white vermouth
- ½ cup of fish stock. You can buy fish stock in a high end grocery store. It will likely be in the freezer section with the sea food. If you cannot get fish stock you can make this with vegetable broth
- 1 shallot, minced
- ½ cup of heavy cream
- 2 Tbl of butter or ghee
- 1 Tbl of minced, fresh herbs. I used tarragon and thyme
- 2 small tomatoes, diced
Instructions:
Preheat oven to broil.
The first thing to do is to slice the salmon on a diagonal so you get ¼” - 1/3” thin slices. Use a sharp knife and just gently move it along. If you don’t get this exactly right, don’t worry. You can see from the picture that the sauce covers any mistakes. You’ll have several slices. You just want to make sure they are not too thick or they won’t get cooked.
Lightly spray a cookie sheet with sides (I used a small one) or oven proof 9" x 13" pan. Spread the salmon pieces across the pan. Lightly grate on sea salt and pepper and set aside.
In a heavy sauce pan, add the vermouth, fish stock and shallots. Reduce on a medium boil until it becomes syrupy. Reducing it by half will just about do it. Only takes a few minutes. Then add the cream and reduce again until the cream begins to thicken. This is pretty fast too.
Add the herbs and the tomatoes and bring just to a boil.
Turn off heat, add the butter and stir. Then pour the sauce over the salmon. Put in the oven near the broiler element and cook under the broiler just until the sauce begins to lightly brown. This will only take a couple of minutes. The salmon should be done but it will also continue to cook in as you transfer it to your plates.
The only other trick with this is to use a large spatula and carefully transfer the pieces to the plates. You can just layer them on the plate (see picture). Even if it’s not picture perfect, this is so yummy no one will care how it looks.
I served this with simple grilled Japanese eggplant. You can choose any veggie.
Enjoy!
Cheers,
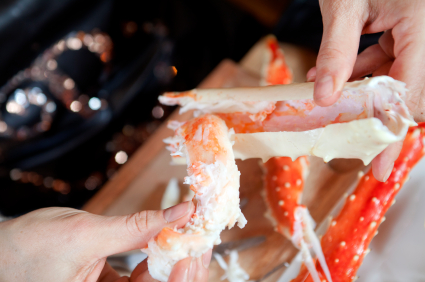
King Crab Legs with Dips
Plan Z Phase: This is a Z3 (ZReboot) recipe. For a party recently, I decided to serve crab legs but wanted my guests to have options for dipping beyond the regular clarified butter. Here are three tasty dips I came up with.
Serving Size: 8 oz of crab leg meat per person the 8 oz is not counting the weight of the shell. When I buy crab legs I plan on one king crab leg per person.
Instructions:
Prepping crab legs:
King crab legs are already cooked when you buy them. Just make sure by confirming with the fish monger. To be nice to your guests the only thing you need to do is cut the crab leg at the thick end with a pair of scissors. That makes it easier to get the meat out. Boning scissors work best, but regular scissors will work too. You can also pass out crab claw crackers if you have them. Getting the meat out is half the fun.
You can re-heat crab legs to serve or serve them cold. When I re-heat them I put them in a large pan and put about a ¼” of water in the bottom. Then cover with aluminum foil and heat at 300 degrees for about 30 minutes. This sort of steams them and keeps them moist.
This is a no-fuss meal because the crab can be hot or cold on the buffet and still taste great. The dips can be made ahead (with the exception of the butter one) and stored in the refrigerator. Just pull them out to serve. Imagine you’re all gathered around the table with the dips in bowls in the middle. Each person pulls out a bite of crab meat and dips it in the dip of their choice. Next bite they can try a different dip.
It’s a fun and slightly messy meal because you are pulling the crabs apart with your hands and a fork.
For the Dipping Sauce:
Sauce1: Mustard Dipping Sauce
- 1-1/2 cups of full fat Greek yogurt
- 2 tsp of Truvia
- ½ cup of prepared Dijon-style mustard
- 1 Tbl of chopped green onion
- 1 nice dash of hot sauce. I use Louisiana but any brand will work.
Instructions:
Put all items in the blender and mix. Then store in the refrigerator until ready to serve.
Sauce 2: HOT, Thai Dipping Sauce
- 6 Thai chili peppers, chopped
- ¼ cup of chopped onion
- 2 cloves of garlic, minced (jar garlic will work)
- ¼ cup of lemon juice
- 1-1/2 cups of Bragg’s aminos
Instructions:
Put all items in the blender and mix. This is a very spicy dipping sauce. If it’s too hot for you, you can remove some of the onion/Thai pepper mixture. Keep in mind too, that the longer this stuff sets the spicier it will get.
Sauce 3: Citrus-Butter Dipping Sauce
- 1 cup of butter
- ¼ cup of lemon juice
- ¼ cup of parsley, minced
- 1 Tbl of mustard (I use French)
- ¼ cup of white wine
- grated sea salt to taste
Instructions:
Melt the butter in a small sauce pan. Add the other ingredients and stir. It’s ready to serve. You can store any leftovers in the refrigerator but you’ll have to heat it again to loosen up the butter if you do.
Enjoy!
Cheers,
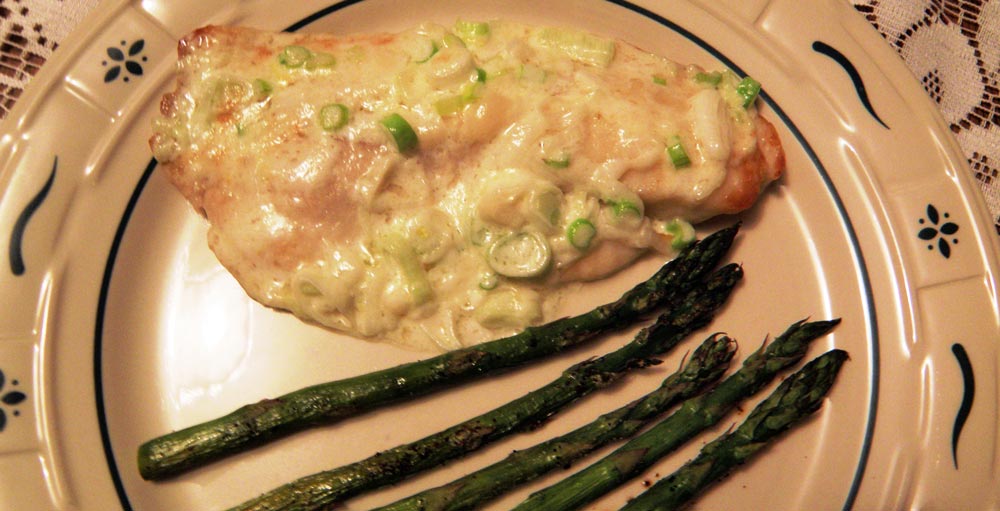
Heavenly Sole
Plan Z Phase: This is a Z3 (ZReboot) recipe. Here’s one of my favorite fish dishes. This dish is from a very old cookbook I have. It’s called The Encyclopedia of Creative Cooking, edited by Charlotte Turgeon. I have adapted it and added a few of my own twists just to “Zola-fy” it. Photo submitted by Plan Z dieter Nancy.
Servings: Serves 4
Ingredients:
- 4 fresh sole fillets
- 2 Tbl lemon juice
- ½ cup of grated Parmesan cheese
- ¼ cup of butter, softened
- 3 Tbl of mayonnaise
- 5 chopped green onions. White section and the tender, light green parts.
- ¼ tsp of salt
- 3 dashes of Tabasco or your favorite hot sauce
Instructions:
Preheat oven broiler to 500 degrees.
Put the sole fillets on a greased cookie sheet. Drizzle on the lemon juice and let them sit for 15 minutes while the juice soaks in. Meanwhile prep the other ingredients. In a small bowl mix the cheese, butter, mayo and the green onions. Stir. Add the salt and hot sauce and stir again.
Broil the fillets about 4” under the broiling element for 6 – 8 minutes. The cook time is dependent on how thick your fillets are. You can check them with a knife or fork. You want them cooked through and flaky. Just be sure to check the thickest part. When they are done, take them out from the broiler. Pile each piece of fish with a portion of the sauce. It should be about a quarter inch thick, maybe a tad more, and mound on the fish. You can spread it toward the edges but leave a border because as it heats, it will spread.
Put the fish, with the topping, back under the broiler and cook 2 – 3 minutes more until the tops are browning; sort of like browning a meringue. Just edges and tips will be browned.
Carefully remove the pieces of fish with a large spatula to the plates. If you are nervous about transferring a piece that large you can cut it into sections and transfer each piece. Be careful not to go too far or you might find it on the floor or your counter.
This recipe also works well with tilapia.
Enjoy!
Cheers,

Lobster Thermidor
Plan Z Phase: iThis is a Z3 (ZReboot) recipe. Lobster Thermidor is a classic dish. It’s decadent because of the cost of the lobster but it also has one of the dreamiest sauces you can possibly imagine. I have made this for special occasions and shared it with friends. I like mine to have a bit of a crust; hence the brownish tinge in the picture. You can follow my lead or keep yours lighter and creamier on top. You can also serve this as a fancy appetizer. It will serve 8 -10 as an appetizer.
Servings: Serves 4
Ingredients:
- Cooked meat from 3 lobster tails. This should measure out to about 1 to 1-1/2 cups per person. In some stores you can buy frozen lobster tail meat so you don’t have to deal with the shells. Make sure the lobster is cooked before you begin assembly. I’m going to give you quick instructions for how to cook the lobster tails in case you have to buy them raw.
- 1 stick of butter
- ½ pound of sliced mushrooms. Regular button mushrooms are just fine in this dish.
- 1 Tbl of flour
- 1 Tbl of Worcestershire sauce
- 1 Tbl of minced, fresh parsley
- 1/3 cup of brandy
- 2 cups of heavy cream
- 3 egg yolks
- salt and pepper to taste (sea salt)
- a whisper of cayenne (or to taste)
- ½ cup of grated Parmesan cheese
Instructions:
To cook lobster tails: Thaw your lobster tails if they are frozen. Fill a large soup pan with water; just enough to cover the lobster tails. Bring the water to a boil. Put in the lobster tails. Cook them on a low boil for 10-12 minutes or until they are bright white. You need to make sure the tails got cooked all the way through and I cannot tell you exactly how long to cook them because I don’t know how big they will be. Mine were about 8” long. When they are cooked, remove them from the water and set them aside to cool. When cool, a trick you can do to remove the meat is to poke a fork in them about 1” from the tail section (hold the tail fins) and pull toward the wider end. If the lobster is cooked, the meat will pull out in one nice piece. Letting them cool on the counter does two things. It keeps you from burning yourself but also if the lobsters were not quite cooked they will likely finish cooking while they cool. Chop the meat into bite-sized chunks. This process can be done even the day before and stored in the refrigerator until ready to cook. That makes this an easy to prepare meal on the day you want to cook it.
If you buy raw lobster chunks they can just be boiled until done. That process won’t take more than 5 or 6 minutes.
Assembly
In a large sauté pan add the butter and melt it. Add the mushrooms and cook them. Add the flour and stir it in. Then add the Worcestershire, parsley, brandy and the cream. Heat until hot. Don’t boil it or it can separate the sauce. Cook it just until small bubbles form along the edge of the pan. Right after that it would start to boil.
In a small bowl add your egg yolks and stir them up with a fork. Get them broken up and mixed. Then take a spoon and add about 3 Tbl of the hot liquid into the egg yolks and blend. Then add the egg mixture to the hot sauce. If you don’t go through this process and decide to put the eggs directly into the hot sauce they will instantly scramble. Big yuk.
Add the cooked lobster meat and heat this mixture well, but again, DO NOT boil it or the sauce will separate. It will still taste good but it will not be pretty. You just want to get the lobster hot.
Taste your sauce and add the whisper of cayenne if you are like me and want a teeny bit of zip to give it a bit more life.
When this process is complete, transfer the whole mess into a 9" x 9" pan and sprinkle on your Parmesan. Heat on BROIL just until the top of the mixture turns a light golden color. Take out and serve immediately. I serve this in low soup bowls. Very French. Some folks serve it in the tails. I just serve it in the bowls because I am serving 4 people with just 3 tails.
You can have a salad or veggie on the side. Or both.
Enjoy!
Cheers,
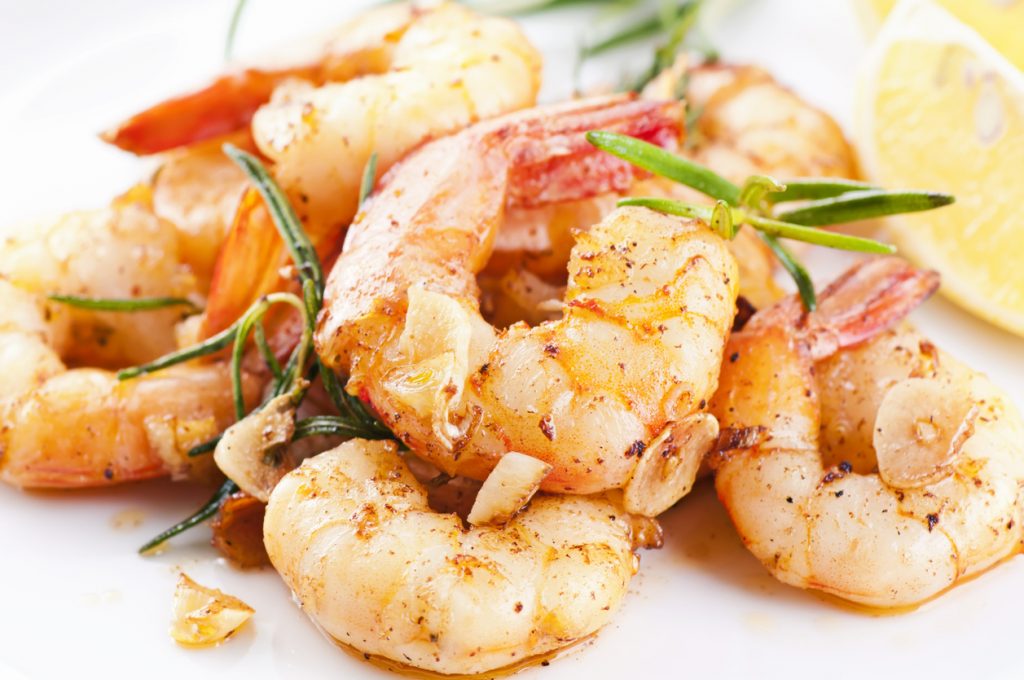
Holiday Shrimp Scampi
Plan Z Phase: This is a Z3 (ZReboot) recipe. This dish can be served anytime, but the red and green elements really play up a Christmas theme. It's simple and elegant and really FAST. You can make this in just a few minutes to really impress your guests.
The cool thing these days with appetizers is to add little tiny salads on the side to round out the appetizer and make a colorful presentation. This way when you serve a rather small dish, you can put it on a large plate and make it look grand. This one will look grand too (see "side salad for holiday shrimp scampi").
Servings: Serves 4
Ingredients:
- 12 jumbo shrimp (peeled and deveined -- leave their tails on if you want to be fancy)
- 1 bunch of green onions, diced thinly, with some of the green parts
- 1 Tbsp garlic (fresh grated or jar garlic)
- 1/2 green pepper, diced
- 1/2 red pepper, diced
- 1/2 cup chopped fresh Italian parsley
- 3/4 cup butter
- 1/2 cup dry white wine
- 2 Tbsp lemon juice
Instructions:
Melt the butter in a large saute pan. At the same time, add the green onions, garlic, the red and green pepper and the parsley. Saute on medium heat until the onions are tender and the green and red peppers have loosened up a bit but still have some bite to them.
Add the shrimp. Cook the large shrimp until they are no longer opaque in the middle. This should take about 3 minutes. They will curl in the process.
Take the shrimp out of the pan with a pair of tongs and set them on the serving plates -- 3 to a plate. Balance the third one up against the other two to give your presentation depth. Add the white wine to the skillet and turn it on medium-high so it boils. Boil down the mixture for 1 full minute and add the lemon juice.
Now spoon this sauce over the shrimp and voilà!
Enjoy!
Cheers,

Tequila-Mango Sauce
Plan Z Phase: This is a Z3 (ZReboot) recipe. This is an amazingly simple dish to make. You can look like a cooking whiz with this one even if you’re not.
Servings: Serves 4
Ingredients:
- 4, 6-8 oz salmon fillets
- 1-1/2 cups of fresh mango. You can use mangos that you peel yourself. That’s the best option but if you are in a hurry or hate to peel mangos as much as I do, you can buy mango in a jar in the produce section. Just be sure to rinse it. The mango is floating in a sugar-water solution to preserve it.
- 1/3 cup of silver (clear) tequila
- 2 Tbl of lime juice (or to taste)
- 4 pieces of wild caught salmon (wild salmon is much healthier than farm-raised salmon)
- 1 Tbl of olive oil
Optional garnishes:
- Cherry tomatoes, chopped green onions and minced cilantro (all of those are shown in the picture)
Instructions:
In your blender add the mango, tequila and lime juice. Whiz it until smooth. Set aside
Sprinkle your salmon with sea salt and pepper to taste. Heat the oil in a sauté pan until warm. Place the salmon flesh-side down into the pan. Cook 2 minutes on medium might to sear the salmon. Turn it over and cook 2 -4 minutes more on medium low to finish the salmon. The cooking time varies because people like their salmon at different degrees of doneness. You decide what is best for you.
Plate your salmon and drizzle on the sauce. Then scatter your garnishes to make the dish look extra special.
I served this with sweet and spicy mashed yams on the side.
Enjoy!
Cheers,
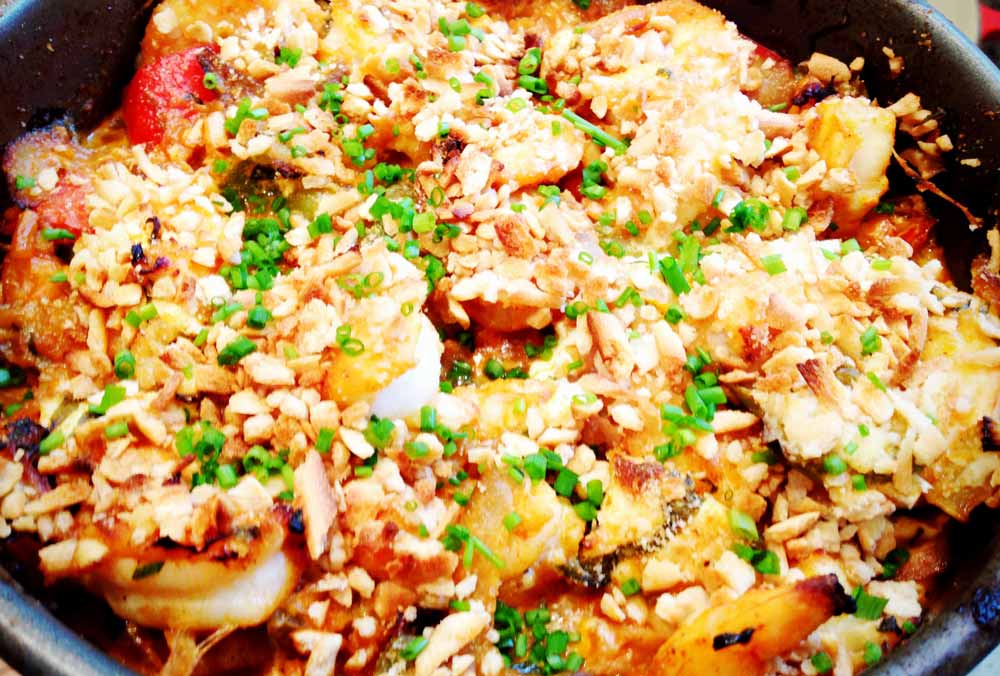
Baked Shrimp Jambalaya by Chef Josh
Plan Z Phase: This is a Z3 (ZReboot) recipe. This dish is super easy once you grab all the ingredients!
Serves: 2-3
Ingredients:
- 1 Tbl olive oil
- 1/2 cup red peppers, diced into medium/large pieces
- 1/2 cup green peppers, diced into medium/large pieces
- 1/2 cup red onion, sliced thin and chopped
- 2 Tbl fresh garlic, minced
- 2 tsp paprika
- 1 tsp cumin
- 1 tsp chili powder
- 1 tsp fresh thyme
- 2 tsp fresh basil, sliced thin
- 2 tsp fresh chives, minced
- 1/4 cup cream cheese, room temperature
- 2 Tbl heavy cream
- 1 lb fresh or thawed, peeled and deveined large shrimp
- 1/4 cup grisini breadsticks, ground (you can whiz them in a food processor or put them in a ziplock bag and flatten them with a rolling pin)
- sea salt and black pepper to taste
Instructions:
Preheat the oven to 375 degrees. Then start chopping. You need to make sure you chop every before you start the sauté. This dish cooks quickly!
In a large saute pan over high heat add the oil. Once it begins to shimmer (which means it is hot!) add the red peppers, green peppers, and red onion. Stir around with a wooden spoon for 2-3 minutes. Season with salt and pepper. They should be sizzling!
Now add the garlic into the same pan as the sizzling peppers and onions. Stir around to incorporate, then add the spices (paprika, cumin, chili powder). The spices will begin to become aromatic and strong smelling. This is key! This is called toasting the spices. After a minute of toasting the spices, turn the heat off.
With the heat turned off add the cream, cream cheese, and fresh herbs. Stir to incorporate until a light sauce consistency is formed. Check to see if it needs more salt and pepper.
Now add the raw shrimp to the peppers and onion mixture. Stir to incorporate. Put the mixture into a 9 inch cake pan and place in the oven.
The jambalaya will cook for about 17 minutes. Once it has been cooking for about 10 minutes, sprinkle the bread crumbs over the top and place back in the oven for another 7 minutes. When it's done, the shrimp will be pink and white all the way through.
When the jambalaya is ready, remove from the oven and top with fresh chives.
This makes a great one-dish-meal, or you can serve it with a red romaine salad and your favorite Zola dressing.
Enjoy!
Chef Josh
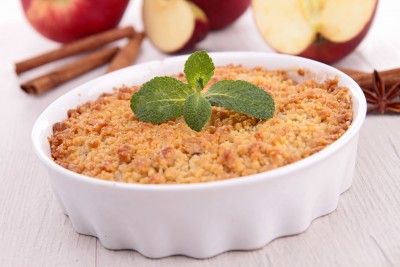
Inside Out Apple Pie
Plan Z Phase: This is a Z3 (ZReboot) recipe. I served this at a fancy dinner party the other night and guests RAVED. No one missed the crust. They swooned over the pie with the dessert sauce.
Serves: Serves 4
Ingredients:
- 5 Granny Smith apples
- 1-1/2 tsp of pumpkin pie spice
- 3 tsp of Truvia divided
- 1 Tbl of corn starch
- 1 Tbl of lemon juice
- 1 Tbl of rum (or use imitation flavoring if you don’t cook with liquor)
- ½ cup of super fine ground almond flour
- ¼ cup of cold butter cut into large dice
Instructions:
Take out a 9" x 13” oven proof pan. Spray it with butter flavor spray. Peel the apples in slice them into ¼” slices. Don’t get too picky. Any thickness will really work. Put them in the pan. Sprinkle on the pumpkin pie spice, 3 tsp of the Truvia and the corn starch. Toss them all around so the apples get coated. Drizzle on the lemon juice and the rum.
In a small bowl put in the almond flour, the other three tsp of Truvia and the butter. With a fork or a pastry knife cut the butter into the flour mixture until it resembles large crumbs. Spread that over the apples.
Bake at 400 degrees for 10 minutes and then turn down to 350 degrees and bake for 40 minutes more or until golden brown.
Serve warm, room temperature or cold.
I serve this room temperature topped with warmed creamy dessert sauce.

Stuffed Raspberry Brie
Plan Z Phase: This is a Z3 (ZReboot) recipe. A perfect dessert with a sophisticated flair. 2 minutes to prepare and cook.
Servings: Serves 6
Ingredients:
- 8 oz wheel of brie cheese, unwrapped and cut in half horizontally. You are making two round halves.
- 12 almonds, chopped coursely
- 1 Tbl of sugar free raspberry jam (raspberry preserves)
- 12 raspberries (or enough to cover one side of the cheese)
- 1/4 of a stevia packet (optional)
Instructions:
When you have cut your brie in half, set each piece brie side up. On one half sprinkle your almonds and press them down gently so they stick to the brie.
Spread the other brie side with the jam and then balance the raspbarries on top of the jam. Sprinkle the stevia on the raspberries for a bit sweeter experience.
Bring the almond side over and set it on top of the brie so the almonds are sitting on top of the raspberries.
Put on a plate in your microwave and cook on high for one minute. This will get the inside melty and leave the wheel intact so you can use a spatula to bring it to a lovely plate.
Serve with apple wedges. Cut in small wedges to serve.
Enjoy!
Cheers,