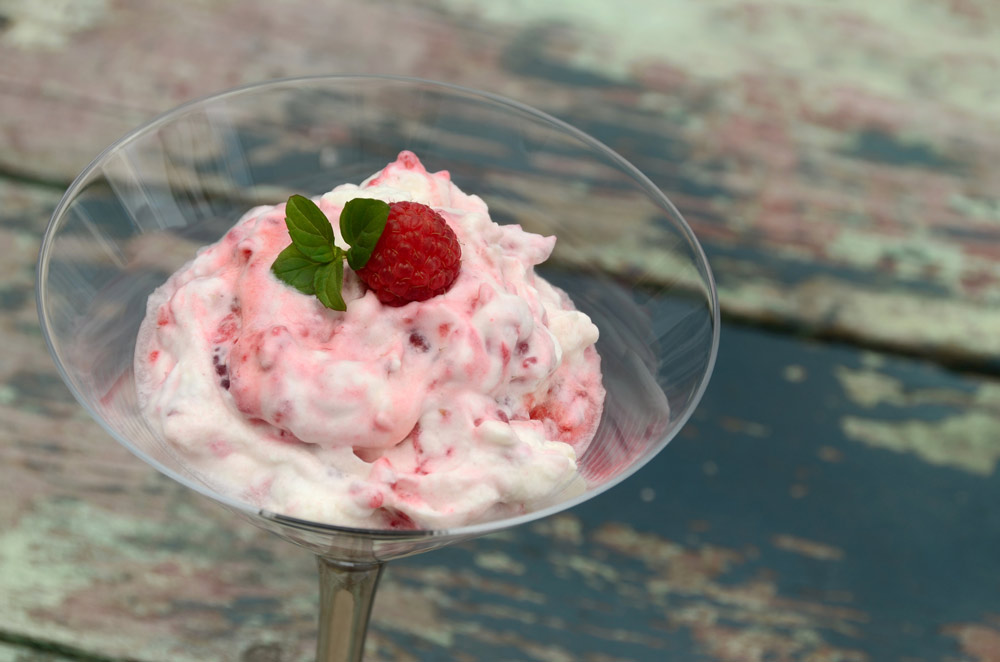
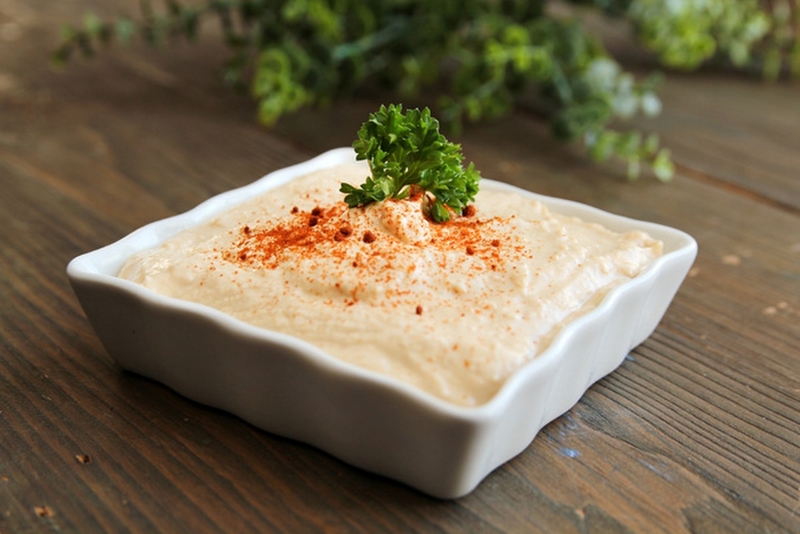
Raspberry Fool
Plan Z Phase: This is a Z3 (ZReboot) recipe. This is one of my favorite, QUICK recipes for an impromptu dinner party.
Servings: 6 servings
Ingredients:
- 2 pints of fresh raspberries (or you can use frozen, thawed raspberries)
- 1 cup of heavy cream
- 1 tsp of organic vanilla
- 1 tsp of Truvia sweetener
Instructions:
Put most of the raspberries in a blender or food processor (save at least one per serving for decoration). Whiz until broken up and pureed.
Whip the cream with the vanilla and Truvia until stiff peaks form.
Put a bit of the raspberry puree in the bottom of each dessert dish. Then take the rest and fold it into the whipped cream. You don’t want to full mix this. You want striped whipped cream, not a pink mass.
Portion out the whipped fool into the dessert dishes on top of the puree. Top with individual raspberries for decoration. Store in the refrigerator until just before serving. If you will be storing it for several hours, lightly cover the dishes with plastic wrap so they stay fresh. Alternatively you can whip the cream and assemble this at the last minute. It comes together in a flash.
This can also be made with other fruits. Strawberry, blackberry, mango, papaya and kiwi come to mind.
Enjoy!
Cheers,
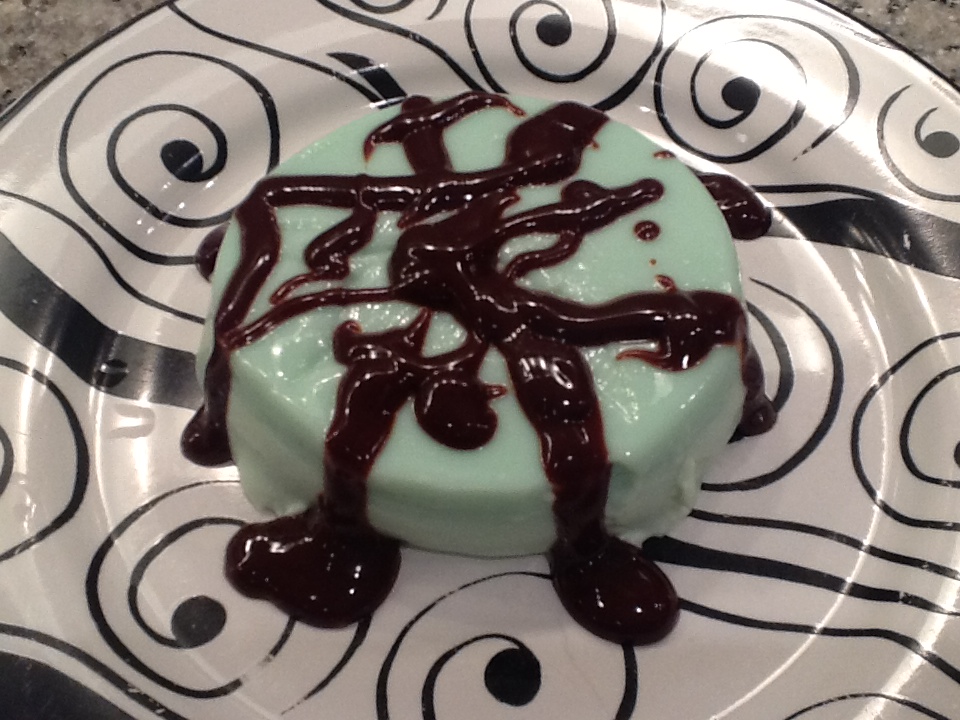
Panna Cotta and Sauce
Plan Z Phase: This is a Z3 (ZReboot) recipe.
Serving Size: Serves 6 but can easily be doubled for a party
Ingredients:
- 1-1/2 cups of whole milk
- one envelope of powdered gelatin (1/4 oz)
- 1-1/2 cups of whipping cream (heavy cream)
- 4 tsp of Truvia
- 3 tsp of vanilla *
Instructions:
In a medium bowl, pour in the whole milk. Sprinkle the gelatin over the milk and let set for 5 minutes.
Over medium heat, in a small saucepan, add the cream and the Truvia, stirring constantly to dissolve the Truvia. Slowly add the gelatin and milk mixture to the saucepan. Stir until the gelatin is completely dissolved. Cook for about 3 minutes on medium, stirring constantly. Take off heat and add your flavoring.*
*To make other flavors: you can use organic flavorings or use flavored stevia drops. I go for the organics if possible. I can easily see coconut, lemon, orange flavors. They would all be refreshing. If you do flavor them, put in one tsp of vanilla and make the other 2 tsp the varied flavor. I did coconut flavor and drizzled just a bit of melted chocolate over the top, and it tastes a lot like a Mounds bar!
Pour the mixture into small ramekins. Each person will get about a ½ cup serving. Cover with plastic wrap touching the surface of the mixture so they don’t get a gooey film forming on top. Chill at least 4 hours. You can make these the day before and they’ll keep just fine. Leftovers can be kept covered for days in the refrigerator, but don’t count on leftovers!
To unmold and serve: Put hot water about 1” deep in a pan (I use a 9" x 13" pan). Place the ramekins in and count to 30, and then take them out. Run a sharp knife around the edge to loosen. Place a serving plate on top of each one. Holding the plate firmly on top of the ramekin, turn both over so that the ramekin is now on top and the plate on the bottom. Shake gently to loosen the panna cotta. You’ll hear a little “thwak” when it comes loose from the ramekin. Don’t expect them all to be perfect. You can cover imperfections with sauce.
Special note: If you don’t own ramekins or don’t want to buy some you can put the custard in a 9" x 13" pan and chill it that way. That means you’ll just scoop it out or slice and scoop it out. It might not be totally uniform, so plan to serve it in a nice dessert dish and fancy it up with the sauce and maybe a sprig of mint.
For sauce:
You can also pair the panna cotta with fruit sauce (aka fruit coulis)
Just take a pint of berries and put them in a blender with 1 tsp of vanilla and 1 or 2 tsp of Truvia. Blend until smooth. If you don’t mind lumps or seeds, you can serve it right from the blender. Just spoon it over the panna cotta. Or if you want to get the seeds and solids out, put the mixture into a strainer over a container and keep stirring it around until all of the liquid drains. Be sure to scrape off the bottom of the strainer too to get the very last bit.
You can also make sauce from tropical fruits like mango and papaya. I took frozen mango, let it thaw and then just blended it up. It didn’t even need sweetener.
For holidays: You can use food coloring to dye your mixture for a festive presentation. Just use 6 – 8 drops and see if you like the color when mixed.
Enjoy!
Cheers,
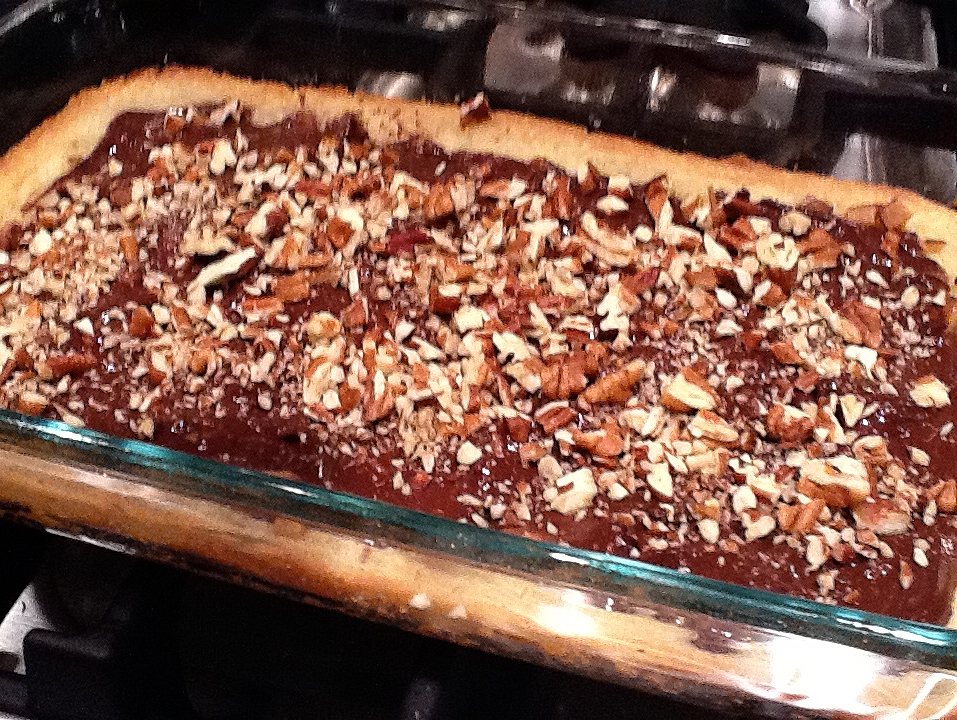
Toffee Bar Dessert
Plan Z Phase: This is a Z3 (ZReboot) recipe.
Servings: Serving size is one 2” x 2” square
Ingredients:
- 1 cup butter, softened
- 3 tsp of Truvia or Splenda
- 2 Tbl of maple syrup
- 1 egg yolk
- 1 tsp of vanilla
- 1-1/2 cups of super fine ground almond flour
- ½ cup of white flour
- ¼ tsp of salt
- 6 oz of dark chocolate (bar, 72% cacao or higher)
- ½ cup of chopped pecans
Instructions:
Preheat oven 350 degrees.
In a large bowl, add the butter, sweetener, syrup, egg yolk and vanilla. Blend with your mixer to fully combine the ingredients. Then add the flours and salt. Mix again. Spray a 6" x 10" ovenproof pan with butter spray. (If you don’t have 6" x 10" you can use 9" x 9". You just might have to bake it a few more minutes.) Pour the batter in and spread it to the edges. Bake at 350 degrees for 17 – 19 minutes. The edges will be a very light gold color and the middle won’t look completely set. It’s like a light cookie texture.
When you remove the pan from the oven break up the chocolate bar and scatter the pieces over the top. Let it sit for a minute while the chocolate softens. Then gently spread with a knife or spatula. Sprinkle on the pecans.
I usually dive in and eat one of these while they are still warm. As they set up they will stiffen some. I am going to throw out a caution. Because this is a much lower carb recipe and you are using almond flour which has no gluten, they might not set up like a stiff bar or cookie. You might need to serve these with a spatula and eat them with a fork. That’s what I did last night and I felt very indulgent.
Enjoy!
Cheers,
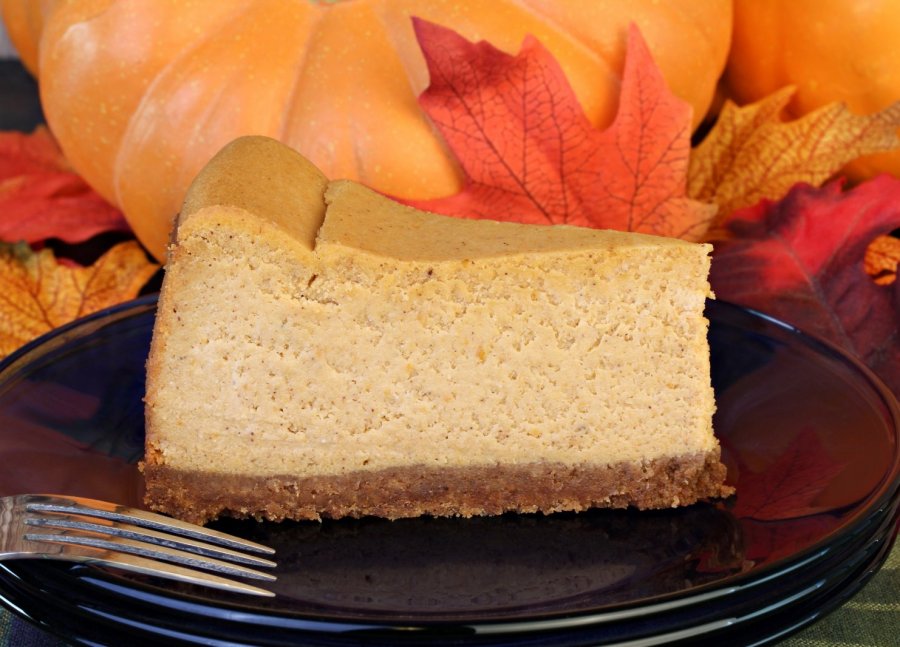
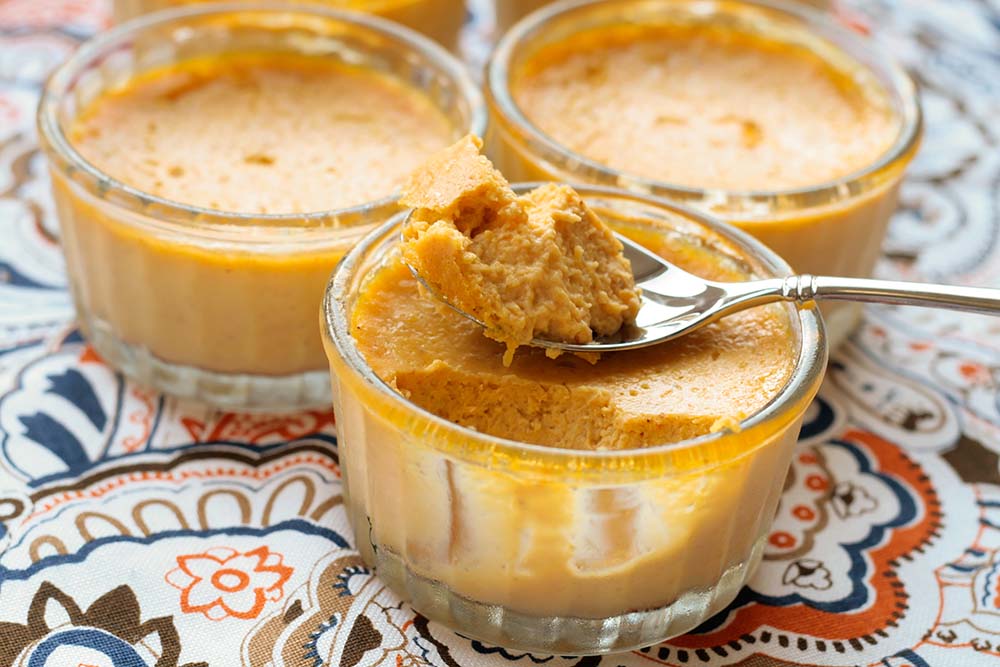
Pumpkin Cheesecake
Plan Z Phase: This is a Z3 (ZReboot) recipe. This recipe was contributed by my friend and fellow Plan Z dieter Amy. She came up with this awhile back because she was planning ahead for Thanksgiving and wanted to make a more healthy meal. She’s lost a bunch of weight, so she’s more conscious now. When she got it done she had leftovers so she drove it over to our house so we could have some.
I could hardly believe my taste buds! This tasted more like a smooth pumpkin pie than a cheesecake to me, but in either case I found it to be a heavenly option for a pumpkin dessert destined for Thanksgiving. I assure you, it will be my featured dessert this year and I plan to have a piece and not just a sliver.
Servings: Serves 8
Ingredients:
For the Crust:
- 1 cup crushed pecans
- 1 cup super fine ground almond flour (Bob's Redmill is the most popular brand)
- 6 Tbl butter, melted
For the Filling:
- 16 oz cream cheese, softened
- 18 tsp Truvia
- 15 oz can pumpkin
- ¾ cup sour cream
- 1 tsp vanilla
- 2 tsp pumpkin pie spice (or 1 tsp cinnamon, ½ tsp ginger and ¼ tsp cloves)
- ½ tsp salt
- 4 large eggs, room temperature
Instructions:
Combine pecans, almond flour and melted butter. Press into bottom and 1 ½ “ up the sides of a large spring form pan. Set aside.
For the filling blend the cream cheese and Truvia (stevia) until creamy. Add the rest of the ingredients except eggs, mix well. Add eggs one at a time until just blended. Pour over crust. Bake at 325 degrees for one hour. Remove from oven and run a knife around the edge of the cheesecake to loosen from the sides. Let cool completely and then refrigerate overnight to set.
Suggestions: You should put a cookie sheet with sides on it one rack down from the cheesecake in case any butter leaks out. Don’t want burned butter and your smoke detector going off. Also, this cheesecake should be ready to eat after about 4 hours of cooling, so if you make it same day it should be fine, but I truly believe cheesecakes always taste better a day later.
And lastly, if you don’t want that tell-tale crack in the top of your cheesecake heed the advice to let the cheesecake cool completely to room temperature before you put it in the refrigerator. This is not a fool proof way not to have a crack but it really ups your odds of a smoother surface.
Enjoy!
Cheers,
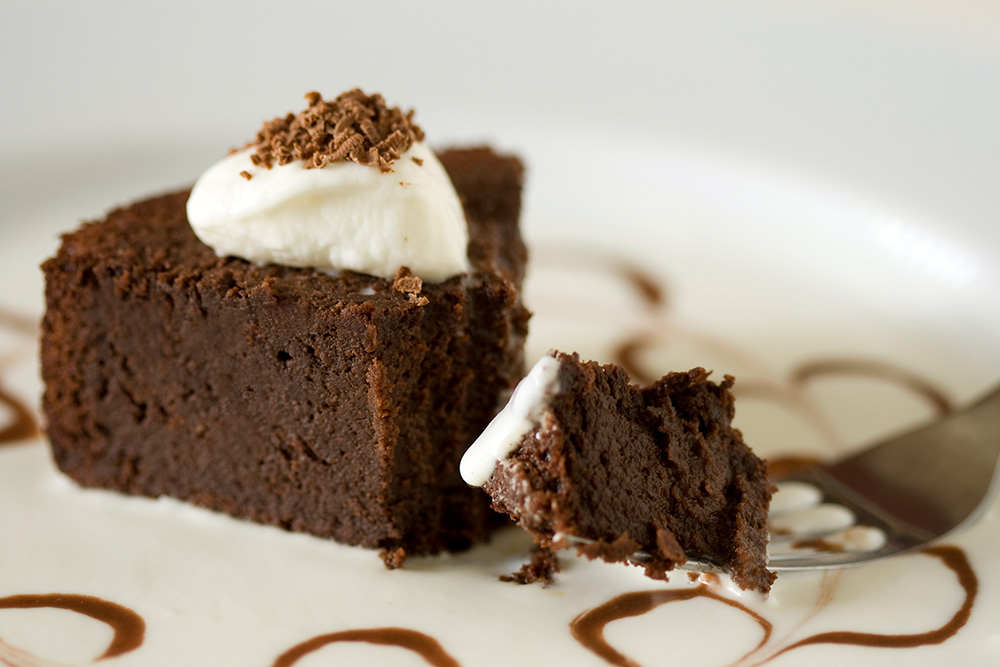
Plan Z Fudge Cake
Plan Z Phase: This is a Z3 (ZReboot) recipe that actually has 3 Tbl of flour in it but by spreading that over 10-12 servings leaves minimal weight gain risk.
This is a dense-tasting cake. Don’t expect it to be overly sweet. 20 years ago a cake like this was all the rage. I used to order it in restaurants. It came with a crème anglaise or maybe a raspberry sauce. You can serve it with either of those or whipped cream or even Truwhip (low carb version of Cool Whip). I’m glad I was able to invent this new recipe for Plan Z!
Servings: 8 to 12 servings
Ingredients:
- 1-3/4 sticks of butter
- 6 oz of bittersweet chocolate. 70% cacao. Chop the chocolate fairly fine.
- 1/4 cup of ZSweet, Swerve or Allulose
- 5 large cold eggs
- 3 Tbl of allpurpose flour
- pinch of salt
Instructions:
Preheat the oven to 400 degrees. Generously butter a 9” spring-form pan and dust lightly with flour.
Melt the butter and chocolate in a heavy sauce pan over very low heat. Then remove from heat and whisk in each egg, one at a time. Or instead of whisking you can add each egg and just put your mixer on low and run it for 3 – 4 seconds per egg addition. Then turn it off and add the next egg and so on.
Put in the Truvia and stir vigorously two or three times about five strokes each, (or run your mixer again about 5 seconds) and then gently fold in the flour and salt. Pour the batter into the pan and then hold the pan about 3” above the kitchen counter and drop it on top of the counter. Thwack. This process breaks up air bubbles in the cake.
Bake about 15 minutes or until a knife inserted in the middle comes out clean. You might want to put a cookie sheet under the pan (next shelf down) in case a bit of butter oozes out. That way it won’t hit the bottom of your oven and burn. Don’t be surprised if you see butter bubbles around the edges or that the cake might be very puffy in places and look uneven. This is fine. The cake will settle as it cools and will have a cross between brownie and fudgy consistency.
After the cake cools on the counter, run your knife along the edges of the cake to loosen it and then unmold. Slide it onto a platter to serve.
You can serve this with a dessert sauce/cream or fresh berries. Or even just dense and straight. Pieces don’t need to be big. About 1-1/2” across the back is probably plenty. Store leftovers in the refrigerator.
Enjoy!
Cheers,
Pumpkin Mousse
Plan Z Phase: This is a Z3 (ZReboot) recipe. Light and dreamy. If you like pumpkin you’ll love this smooth and easy dessert. This is as light as heaven in your mouth and will make a lot of people happier and healthier than when they eat pumpkin pie.
Serves: Serves 4 – 5. Can be doubled for a crowd.
Ingredients:
- 1 cup of heavy cream, whipped
- 3 tsp of vanilla
- 8 oz of full fat cream cheese (softened and cut into chunks)
- 15 oz can of pumpkin
- 2 Tbl of Truvia (a brand of stevia)
- 2 – 3 tsp of pumpkin pie spice
Instructions:
Whip the cream in your mixer. While it’s thickening you can add your vanilla. When the cream forms fairly stiff peaks you can stop the mixer and add the cream cheese, the pumpkin, the Truvia and the pie spice. Turn the mixer back on and whip it some more until it’s well combined and fluffy.
Divide the mixture into pretty glasses or cups and put in the refrigerator until ready to serve. If you are going to make it the day ahead be sure to cover each portion with a light piece of plastic wrap. It’s best served day of but it does keep.
Enjoy!
Cheers,

Southern French Kiss
Plan Z Phase: This is a Z3.5 (ZReboot 3.5) recipe. This is a dessert drink for a splurge. Many order a White Russian for an after dinner drink. This is a different treat I came up with recently. My new favorite.
This drink does carry a kick to it but it’s no stronger than that White Russian. Drink responsibly.
Servings: 1 serving
Ingredients:
- 1 oz of bourbon
- ½ oz of vodka
- ½ oz of Grand Marnier
- 1 – 2 oz of whipping cream
- ice
Instructions:
Pour all in a rocks glass and mix.
Enjoy in small sips.
Enjoy!
Cheers,
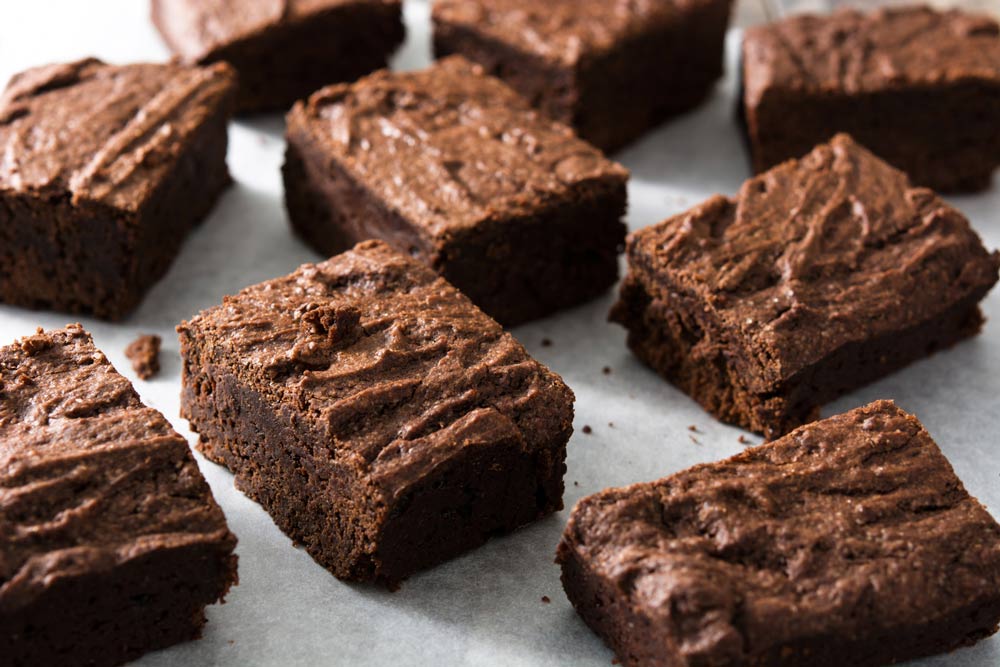
Low Carb Brownies
Plan Z Phase: This is a Z3 (ZReboot) recipe.
Ingredients:
- 5 oz of dark chocolate. Choose 70% cacao or higher. The higher the number the less sweet it will be. Don’t do 100% cacao. That stuff tastes awful.
- 5 oz of butter (1 stick plus 1 Tbl)
- 4 tsp of Truvia
- 1 cup of super fine ground almond flour
- 4 large eggs
- ½ tsp of baking powder
- pinch of grated sea salt
Instructions:
Preheat oven to 350 degrees.
Chop the chocolate into small bits. Cut the butter into bits too. Put in a microwave-proof bowl and melt. I do this by putting the microwave on high for 1 minute and then stirring. Then maybe 15 seconds more. (My chocolate and butter came right from the refrigerator so factor that into the time needed to melt it). Add Truvia and stir thoroughly. Set aside to cool. Don’t burn your chocolate. Be careful.
In another small bowl beat the eggs for a full 2 minutes. Get them nice and frothy, fluffy.
Slowly add your chocolate mixture to the egg mixture but be sure your chocolate is not hot or it will scramble your eggs. Big YUK. Stir it all in. Then add the flour, baking powder and salt. Stir thoroughly. Make sure your baking powder is not just dumped in. Sprinkle it across the top and fold it in.
Spray a 9" x 9" oven-proof pan with butter or olive oil spray. Pour in batter. Bake at 350 for 20 minutes. Then check. They might need a few more minutes. It will depend on your oven. The top of the brownies should be firm but the middle still squishy. If you see the top just starting to crack they are done.
Let cool, cut and serve.
Notes: This is my first attempt at brownies in a low carb setting. Low carb baking is a whole talent I have not mastered yet. These are good but not GREAT. So you bakers out there that want to learn to bake low carb can help perfect this recipe. When you are not using regular flour this is much trickier than what we old-fashioned bakers are accustomed to. Next time I think I will try coconut flour and maybe a bit more chocolate.
These are edible and yummy but as my assistant Jennifer said, “They taste healthy” which means they are not gooey decadent or feel sinful. But they are tasty and healthy! That says something. Maybe we all just need to get used to a different style of brownie. This one.
Enjoy!
Cheers,

The Easiest Chocolate Mousse On The Planet
Plan Z Phase: This is a Z3 (ZReboot) recipe and a Zola To Go! recipe.
Servings: Serves 3. Can be doubled.
Ingredients:
- 1 tub of mascarpone cheese (8 oz). Find mascarpone in the chilled cheese section or near the sour cream. It’s yummy Italian; sort of like cream cheese only smoother
- 1 – 2 Tbl of unsweetened cocoa
- 1 – 2 tsp of Truvia
- 1 tsp of organic vanilla
- 1/3 cup of whipping cream
Instructions:
Remove the mascarpone from the carton and put it in a medium bowl. Add the other ingredients and stir thoroughly. The first look will be slightly soupy but you will put it into your serving dishes and back into the refrigerator to firm up. Even 30 minutes will be enough time back in the refrigerator. The reason I have a variable amount of cocoa and Truvia is because you get to decide how sweet you want it as well as how intense you like your chocolate flavor. Start with one of each and then taste. You can always add the second before you put them in your serving dishes.
This makes a 1/3 cup portion per person. It’s not large but it goes a long way. The one in the picture is also garnished with a deep chocolate crisp with cashews in it. That tidbit I bought at Whole Foods. This recipe would be great with berries or a bit of whipped cream on top too.
Enjoy!
Cheers,
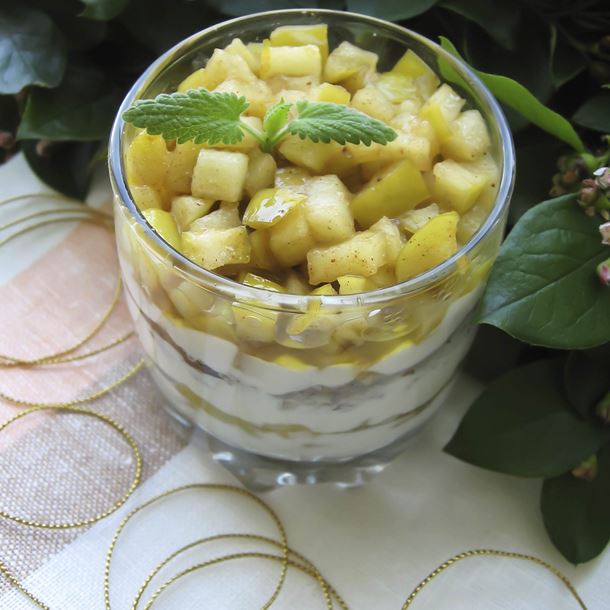
Warm Apple Parfait
Plan Z Phase: This is a Z3 (ZReboot) recipe.
Servings: Serves 2
Ingredients:
For the Apples
- 2 Granny Smith apples cut into chunks (don’t bother to peel them)
- 2 tsp of Truvia
- 2 Tbl of butter
- 1 tsp apple pie spice blend
- ¼ cup of water
For the Dessert Sauce
- ½ cup of crème fraiche (you will find this in the cheese section; probably near the cream cheese)
- ½ tsp of Truvia
- 1 tsp of vanilla
Instructions:
Put the apples, butter, apple pie spice, water and two tsp of Truvia in a sauce pan. Cook until the apples are cooked through and soft. It will look much like pie filling. Set aside.
In a separate bowl, stir the creme fraiche, vanilla and 1/2 tsp of Truvia together. Put a dollop on your dessert.
For a parfait look layer the apples with a bit of sauce, more apples and more sauce.
Enjoy!
Cheers,
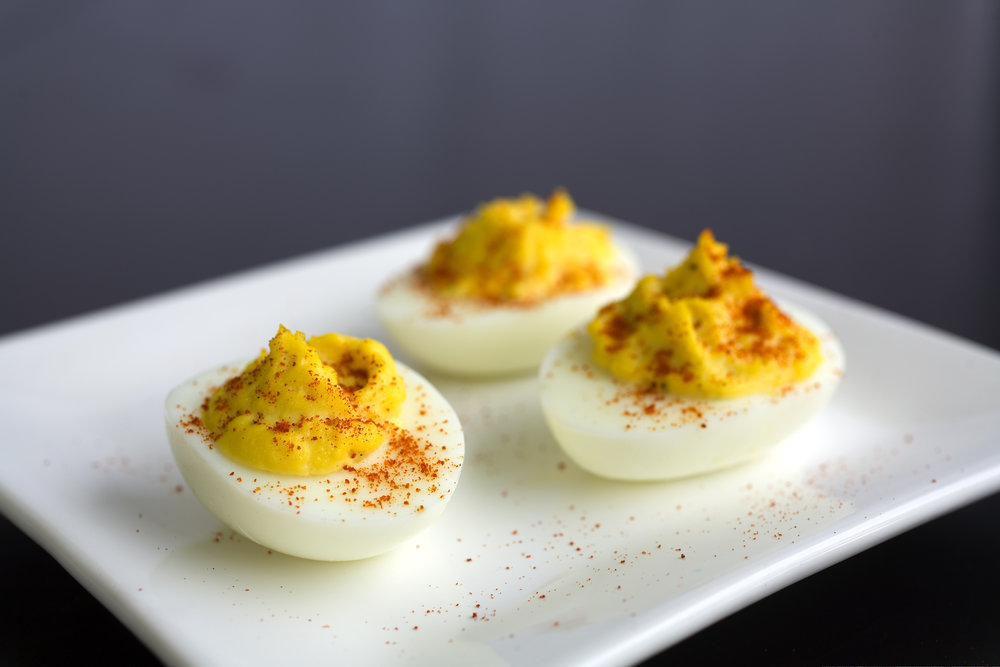
Deviled Eggs
Plan Z Phase: This is a Z3 (ZReboot) recipe. Deviled eggs are great for summer parties. It’s sort of a retro-thing that I’m on a mission to bring back into style. My mother’s deviled eggs were quite simple. Even simpler were the ones my mom would make for my dad. His had no raw onions in them. He knew how he liked his eggs.
Here’s my mom’s recipe for deviled eggs, and some suggested variations to bring them up to 2020.
Servings: Serves 6
Ingredients:
- 6 hard boiled eggs, peeled and cut in half lengthwise
- ½ half tsp sea salt, grated
- ½ half tsp dry mustard
- ¼ cup minced onion
- ¼ cup diced celery
- ¼ tsp pepper (or to taste)
- 3 – 4 Tbl mayonnaise
- paprika
- diced chives
Instructions:
Remove the yolks from all egg halves and put the yolks in a bowl. Set aside the white “boats.” Mash the yolks gently with a fork. Add the other ingredients. Stir. Fill the egg white “boats” using a teaspoon, Be gentle. Mound the mixture. Sprinkle on the paprika and chives and you are ready to serve.
I checked out several sources and found all kinds of ways to jazz up your deviled eggs. You can add any, or an assortment, of these extra ingredients and make your deviled eggs more modern. Experiment. Maybe even divide the filling and make two different flavors.
Here are some examples:
- 2 tsp diced chipotle peppers
- 2 oz salmon roe
- ¼ cup bacon bits
- 1 Tbl horseradish (fresh or sauce)
- Snipped parsley
- 3 tsp capers, chopped
- 3 Tbl diced olives
- or even add in herbs and spices like: tarragon, garam masala, curry powder, cayenne or Italian spice mix
- 1/3 cup shredded Cheddar, smoked Swiss or blue cheese
Enjoy!
Cheers,
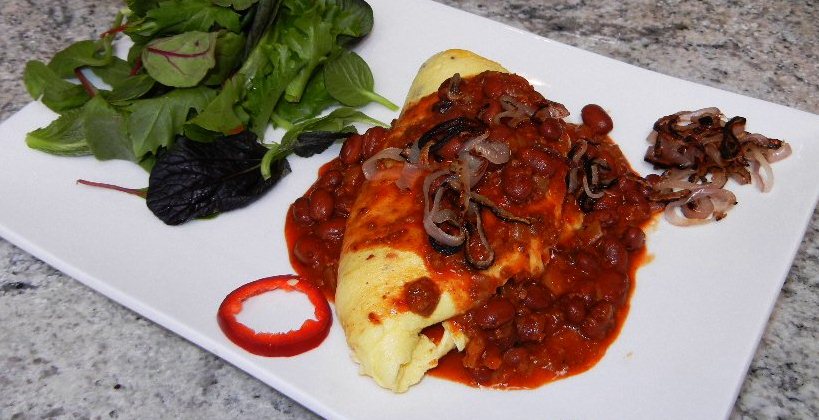
Chili and Cheese Omelet
Plan Z Phase: This is a Z3 (ZReboot) recipe contributed by our very own VP of Anger-management, Chris Lytle. There’s a 24-hour diner near our home called The Hollywood Grill. I rarely order anything except their Texas Omelet. For our “Omelet Day” lunch, I did a take-off on it.
Serving Size: Serves 1
Ingredients:
- 3 or 4 eggs
- 2 Tbl cream or unsweetened coconut milk
- ¼ cup Amy’s organic chili (or your own recipe)
- 1-2 oz of sharp Cheddar cheese, cubed or grated
- two slices of Neuske’s bacon (optional)
- 4 Tbl coconut oil
- 1 medium shallot sliced thin (optional garnish. You could use Vidalia onion, too)
Instructions:
Put 2 Tbl of Coconut oil in a small frying pan on low to medium heat. Add shallots and cook until they start to caramelize and even get a little crispy. They make a nice garnish. Remove from pan and set aside.
Simmer chili in a small sauce pan just to heat it.
Fry 2 slices of Nueske’s bacon over medium heat until crispy. Using a knife, crumble the bacon into small pieces.
Put eggs in a small or medium mixing bowl.
Add cream.
Add crushed bacon.
Whisk mixture for 30-60 seconds.
Pour egg mixture into a clean frying pay into which you’ve added the other 2 Tbl of coconut oil
Keep lifting edges of egg batter with a spatula to let uncooked eggs get to the bottom of pan. I hope you have made omelets before because this is the delicate part.
After most of the omelet is cooked, I like to flip it over in the pan like they do in at hotel buffets. A flick of the wrist will do it. Practice this over the sink and don’t do it at all if you only have 3 eggs. But you look really cool and accomplished if you can flip an omelet in the pan. (Oil helps). You can also loosen the bottom with a spatula before you attempt the flip. (This is totally optional and just for show.)
Once you have flipped your omelet add half of the chili and all of the cheese.
Slide omelet onto plate and fold in half as you do so.
Garnish the top of the omelet with the rest of the chili and add crispy shallots.
Enjoy!
Cheers,

Pink Punch a la Zola
Plan Z Phase: This is a Z3 (ZReboot) recipe for those who HAVE to have a punch.
Servings: Makes about 3 quarts.
Ingredients:
- 2 lb of a combo of blackberries, raspberries and cut up strawberries
- 1-1/2 cups cranberry juice cocktail
- 3 Tbl lemon juice
- 1 Tbl of Truvia
- 3 cups white wine or champagne (optional)
- 1-2 qts club soda, (plain, lemon, lime or a combo). If you don’t use the wine/champagne you’ll increase the club soda to the larger amount.
Instructions:
Fill ring mold (any size that fits into punch bowl) with berries of all colors. Barely cover with water; freeze.
Add remaining ingredients except soda or champagne into a large pitcher or container. Stir til Truvia dissolves. Cover and chill two hours or overnight. At serving time, dip ring mold in hot water for ten seconds; remove ice ring. Put into punch bowl. Pour in chilled ingredients mixture. Add soda water and wine/champagne. You don’t want to add this early or it will lose its fizz. Ladle punch into cups. When the mold melts it will give some fruit to eat too.
Don’t go nuts with this even on ZReboot. Each serving will have approximately 4 – 5 grams of carbs. For yourself, continue to dilute the drink with more club soda. The cranberry juice is more for the uninformed and the kids who have too much of a sweet tooth. At least this is better than most punches. It will give it flavor and a burst of pink.
Enjoy!
Cheers,

French Martini
Plan Z Phase: This is a Z3 (ZReboot) recipe. This recipe is for a sweet version. I think it tastes just like a Dreamsicle. For a drink that's not as sweet, use regular vodka.
Serves: Makes one martini
Ingredients:
- 2 shots Lillet (a French apéritif)
- 1 shot vanilla-flavored vodka
- 1 capful Cointreau
Instructions:
Mix just like a regular martini. Garnish with an orange twist.
Enjoy!
Cheers,

Honeydew Mint Frosty
Plan Z Phase: This is a Z3 (ZReboot) recipe. Gotta love this on a hot day for a treat. Or even as a liquid dessert. Adding rum even makes it a slushy cocktail reminiscent of a frozen margarita. You could also use vodka or even Canadian whiskey.
Just in time for the big holiday weekend, a frosty new drink. Drinks and ice creams incorporating herbs and exotic ingredients are all the rage. Have some fun cooling off with this one over the weekend if you’re in ZReboot. ZReduction types, stand by. I’m going to come up with one for you using strawberries!
Servings: Serve 1 large or 2 medium. Can be doubled in a large blender or make in batches.
Ingredients:
- 1-1/2 cups of honey dew melon cubes
- 1 cup of ice cubes
- 1 Tbl of fresh mint leaves, (3 or 4 medium leaves will work). My mint this year is called Kentucky Bourbon Mint. Any mint should work; even chocolate mint!
- squeeze juice of ½ of a lime
- ¼ cup of water or to taste for your amount of slushiness
Instructions:
Put all in a blender and whiz. Add more water if you want it less thick. Drink. Savor. Big YUM.
Enjoy!
Cheers,
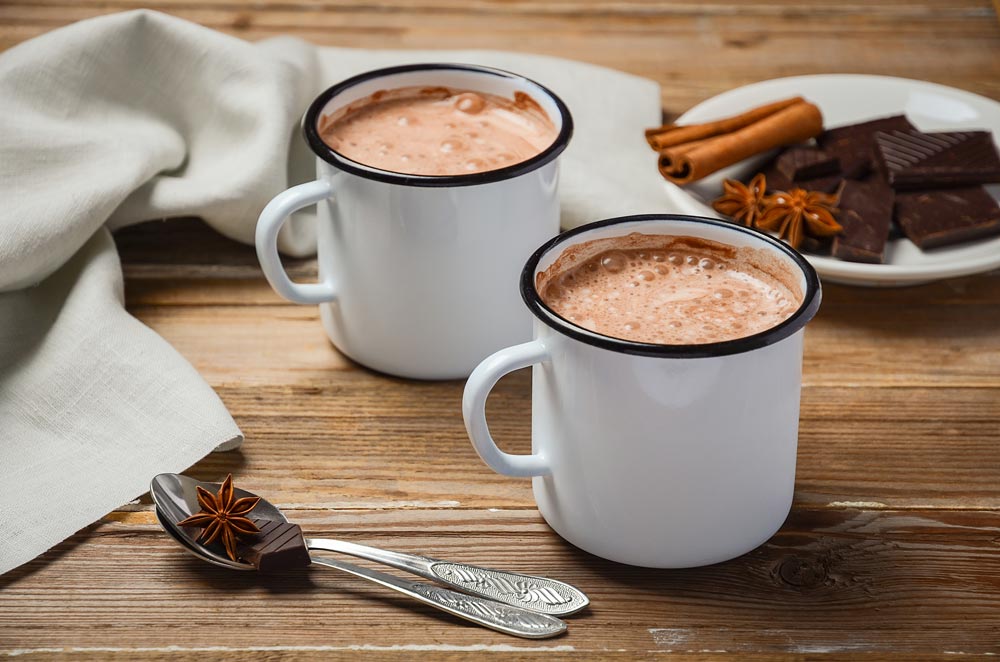
Good for You Hot Cocoa
Plan Z Phase: This is a Z3 (ZReboot) recipe. Finally, a hot chocolate recipe without all the sugar!
Serving Size: Serving size: 1 cup
Ingredients:
- 1/2 cup unsweetened cocoa powder (use a good brand like Ghiradelli)
- 6 tsp of Truvia
- 1 pinch grated sea salt
- 1/3 cup HOT water
- 2 cups of whole milk
- 1 cup of whipping cream
- 2 teaspoons vanilla extract
Instructions:
Combine the cocoa, Truvia and pinch of salt in a saucepan. Blend in the boiling water using a whisk. Whisk until completely smooth. Heat on medium high just until you see teeny bubbles forming along the edge of the pan. Stir in the milk in milk and cream. Heat until the same teeny bubbles start to form along the edge of the pan, stirring often. Don’t boil. Take off heat and add vanilla. Stir once more.
You can add more milk if you want a lighter cup of cocoa.
I sprinkled the top of mine with cinnamon.
Other options:
- Top with whipping cream sweetened with Truvia and vanilla
- Add a tsp of mint flavoring for minty cocoa
- Add a bit of your favorite liqueur to your mug for an adult beverage. Such as Grand Marnier, Cointreau, Chambord or Kahlua are all good ideas
Enjoy!
Cheers
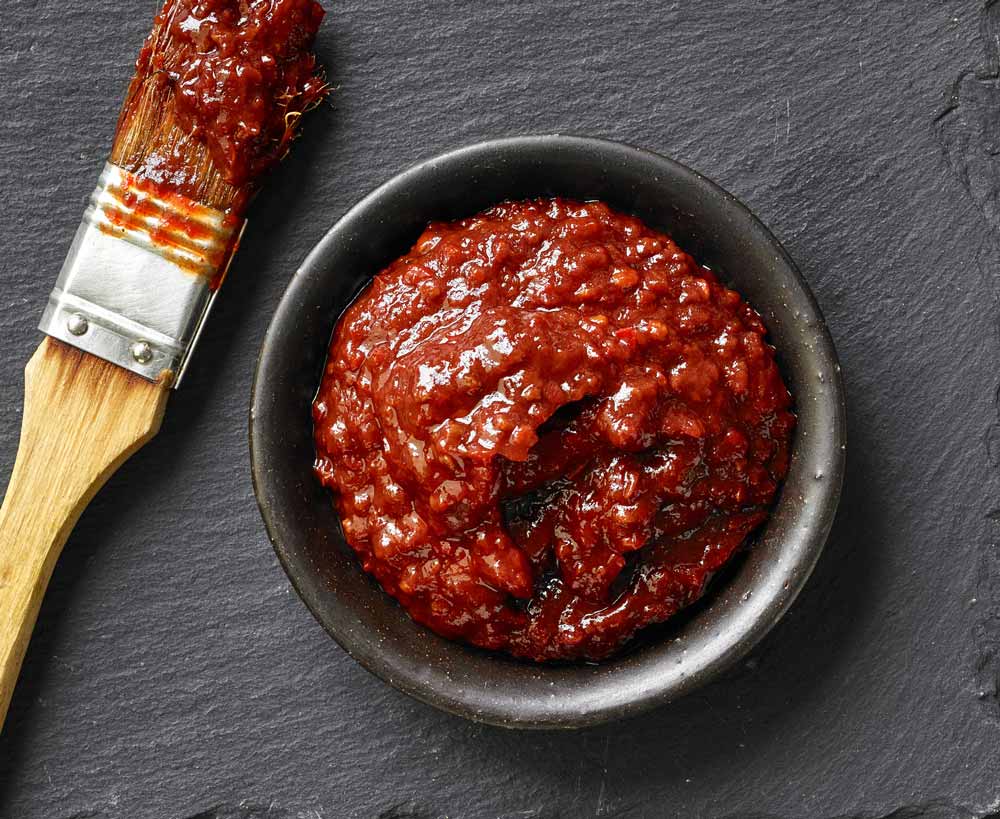
Barbecue Sauce - Zola Style
Plan Z Phase: This is a Z3 (ZReboot) recipe.
Servings: 1 small jar
Ingredients:
- 1 small onion minced
- 1 clove of garlic minced (you can use jar garlic)
- 1 tsp of liquid smoke
- 6 oz of tomato paste
- 1 cup of white wine or low carb beer (or water if you are on Z2)
- ¼ cup of tomato sauce
- 1 Tbl cider vinegar (or a bit more of you like your sauce to have a vinegar bite)
- 3 Tbl of dry mustard
- 2 pinches of pumpkin pie spice
- 1 tsp of vanilla extract
- 1 tsp of Truvia (stevia)
- hot sauce to taste
Instructions:
Put the onions in a sauce pan. Heat on medium until the onions wilt. Then add the garlic. Stir to heat. Add the other ingredients and cook on medium for 15 – 20 minutes to blend the flavors.
Check the flavor and make personal adjustments as you please. Some like really hot barbecue sauce and you can always zip it up more.
Enjoy!
Cheers,
Tahini Dressing
Plan Z Phase: This is a Z3 (ZReboot) recipe submitted by Plan Z dieter Steve W.
If you like sesame and garlic, you will love this dressing!
Servings: Makes 1/2 to 1 cup of dressing
Ingredients:
- 3 cloves of garlic
- 1 T of nama shoyu/tamari/soy sauce
- juice of ½ fresh lemon
- water to create the consistency you want (around ½ -1 cup)
- 8 oz of tahini
Instructions:
Blend all ingredients except the tahini in your electric blender, until garlic is completely blended and then add the tahini 4 oz at a time.
Enjoy!
Cheers,

Don’s Pizza Sauce
Plan Z Phase: This is a Z3 (ZReboot) recipe submitted by Plan Z dieter, Don. You can use this pizza “sauce” for your pizza Zola style. Sauce is added warm after the pizza cheese portion is cooked. Make the pizza with no sauce or give this a try.
Servings: 1 serving for 1 pizza Zola style
Ingredients:
- 4 oz tomato paste
- 1 Tbl garlic powder
- 1 tsp oregano
- 1 tsp basil
- 1/2 tsp salt
- 1/2 tsp pepper
- 2 Tbl approx of water
Instructions:
Mix all the ingredients except water into a bowl. Slowly add water to the consistency that you would like your sauce.
Gently spread the sauce over your Zola pizza being careful not to put holes in the layer of cheese beneath the sauce.
Top with pizza topings and a little extra cheese on top.
Enjoy!
Cheers,
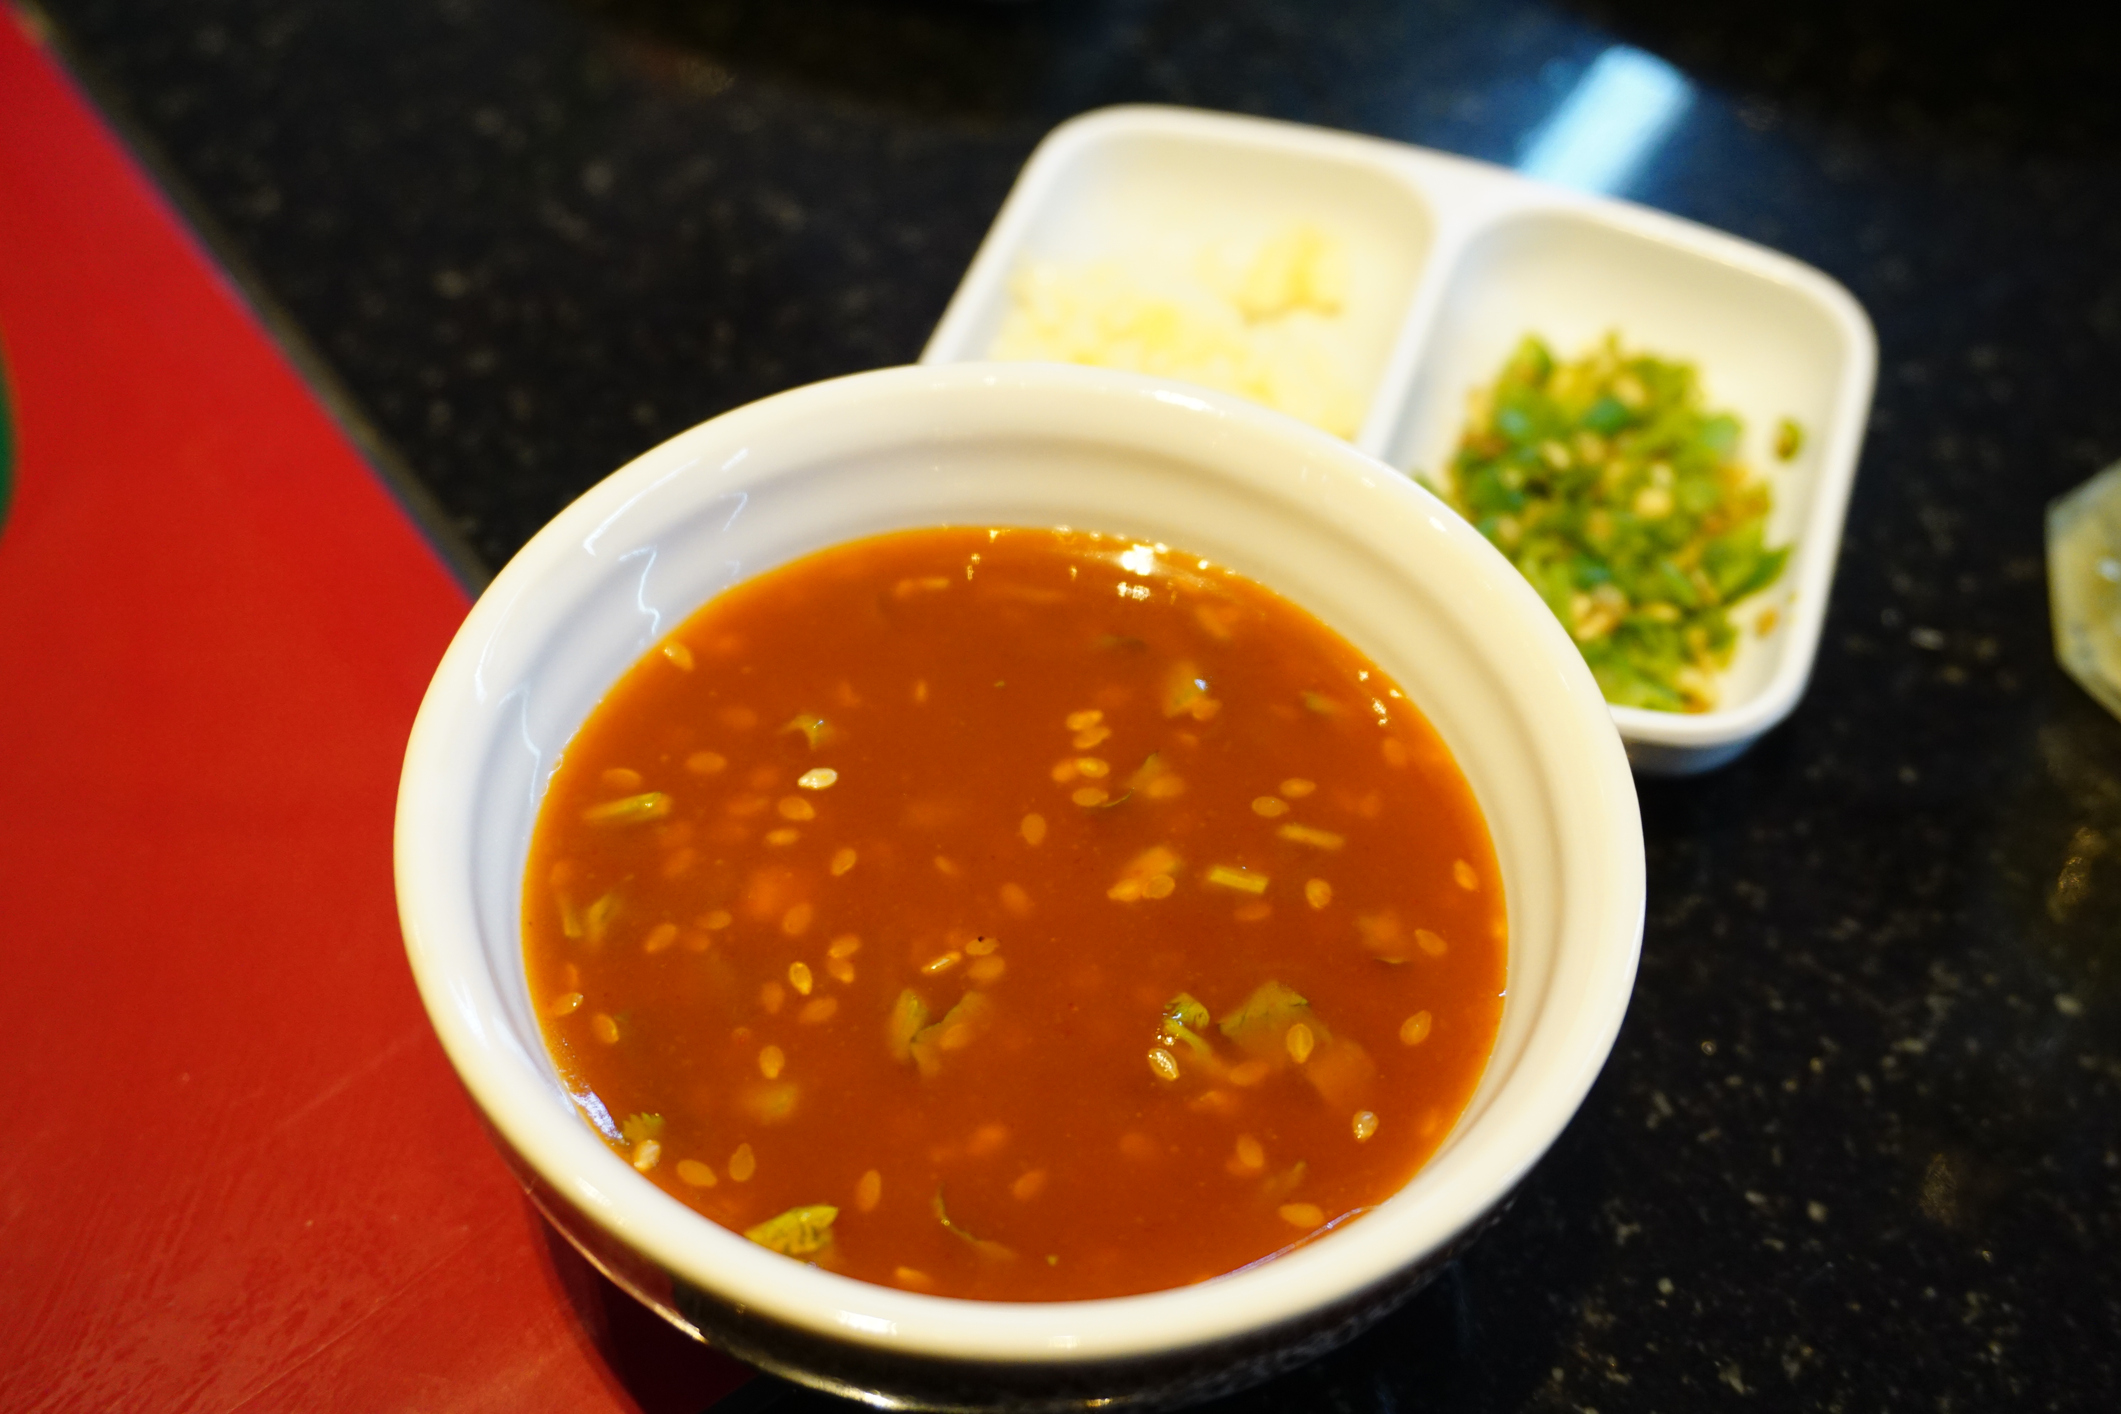
Chinese Dipping Sauce
Plan Z Phase: This is a Z3 (ZReboot) recipe. This dipping sauce could go well with a grilled chicken breast or even a steak. You might also consider this with grilled fish, scallops or shrimp. They will all work nicely.
Servings: Serves 6
Ingredients:
- ½ cup of Bragg’s aminos
- ¼ cup of organic chicken broth
- 2 tsp of Truvia
- 12 scallions cut to fine dice. You can use the white part and some of the green too.
- 4 Tbl of minced, fresh ginger
- ¼ tsp of red pepper flakes. You can very this amount based on how spicy you like things. This gives it some heat but not overwhelming at all.
- 1/3 cup of peanut oil
- 1/2 a jalapeno, minced (optional)
- 1/8 tsp sesame seeds (optional)
Instructions:
In a heat proof bowl add all of the ingredients except the peanut oil. Keep the peanut oil to the side. Mix the sauce ingredients until the Truvia dissolves.
In a small sauce pan heat the peanut oil on medium heat until it’s very hot. This might take up to five minutes. What you are looking for is the oil will begin to shimmer when it's hot. Do not let it get to the point where it’s smoking, then it's too hot.
CAREFULLY pour the peanut oil into the heat proof container that has your other ingredients. The oil will spit at first because you are adding oil to the water-based Bragg's Aminos. When the sizzling stops, stir everything together. Let the sauce sit 2 minutes and then serve.
I put the dipping sauce in ramekins and dipped my meat pieces in the sauce. My husband loved it so much he stopped dipping and poured his sauce over his meat.
Enjoy!
Cheers,