Citrus-Marinated Fish Fillet with Mustard-Garlic Crust and a Cucumber Tomato Salad
Plan Z Phase: This is a Z2 (ZReduction) recipe.
Servings: Serves 2
Ingredients:
- 2 fish fillets. These can be sea bass, orange roughy tilapia or any of the other approved fishes.
- 1/3 cup of orange juice (fresh squeezed) or mandarin orange juice from a can of organic mandarin oranges packed in mandarin orange juice. DO NOT use mandarin oranges packed in syrup.
- dry mustard powder to taste
- garlic powder to taste
- celery salt to taste
For the salad
- 1 cup of cucumber slices
- 1 cup of cherry tomatoes cut in half
- 1 packet of stevia
- 1 Tbl of cider vinegar
- 1/3 cup of water
Instructions:
In a shallow bowl, pour in your orange juice. Place the fish fillets on top. Dust the tops of the fish fillets with the mustard powder, garlic powder and celery salt.
Heat your large sauté pan to medium high. Slightly spray the pan with olive oil.
Place the fish fillets in spice side down. Cook on medium high for 2 minutes. Gently turn them over and finish cooking them; how long it takes will depend on the type of fish you chose. Just make sure they are cooked so that the fish is no longer opaque in the middle.
The salad can be assembled while the fish cooks. Place the cucumber and tomato in a bowl. Mix the Stevia, vinegar and water in a blender jar or by hand. This is your dressing. Pour over veggies in the bowl and serve with a spoon.
Enjoy!
Cheers,
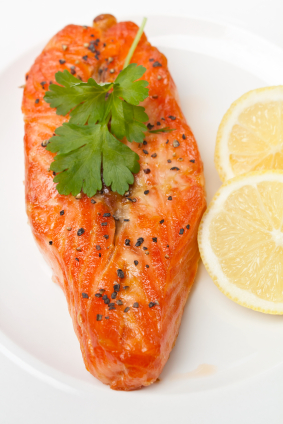
Citrus-marinated Salmon
Plan Z Phase: This is a Z2 (ZReduction) recipe.
Servings: Serves 4
Ingredients:
- 4 portions of salmon fillet or steak (6-8 oz each)
- sea salt and pepper to taste
- 2 tsp of onion powder
- ½ - 1 tsp of crushed pepper flakes (to taste)
- ¼ cup of fresh lemon juice
- 4 cloves of minced garlic (jar garlic will work for this dish)
- 3 Tbl of white balsamic vinegar (you can use apple cider vinegar for a sweeter flavor)
- ½ tsp of Truvia (1/2 tsp)
- 2 Tbl of minced green onions
- 2 Tbl of minced fresh cilantro
Instructions:
Preheat oven to 450 degrees.
Lightly grease an oven-proof baking dish. Place the salmon pieces in skin side down. Lightly sprinkle with sea salt and pepper. Then dust on the onion powder and the crushed pepper flakes. In a small bowl, combine the lemon juice, the vinegar, Truvia, minced onions and minced cilantro. Stir to dissolve the Truvia. Then pour this mixture over the salmon taking care to make sure an even distribution of the ingredients lay on top of the fish. Cover and marinate in your refrigerator for up to 2 hours.
Careful not to marinate the fish too long. The citrus juice will “cook” the fish the same as it does with ceviche if left too long.
Take off the plastic wrap and put the fish in the oven and roast for 5 minutes. Then turn the oven to broil and broil the fish until it’s done to your liking. Some like medium rare salmon and some like well done. The gauge is usually about 5 minutes of cooking time per inch of thickness to your salmon. Keep an eye on it. The salmon will begin to brown in spots.
Remove from oven and serve. Some of the skin may stick to the bottom of the pan. That’s fine. Some folks like to eat the skin and others work around it and toss it.
I served this with pea pods and cherry tomatoes that I cooked in a small pan with chicken broth. Very plain, but tasty.
This can also be made with other kinds of fish fillets. Halibut, tilapia, cod, whitefish and others.
Enjoy!
Cheers,
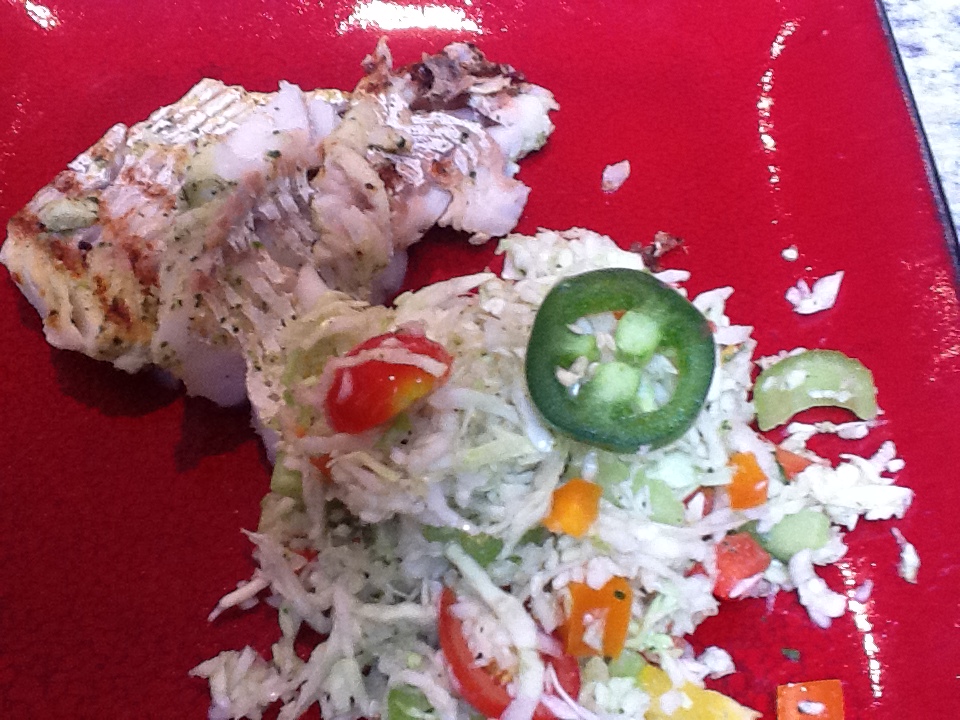
Grilled Fish with Mexican Slaw
Plan Z Phase: This is a Z2 (ZReduction) recipe.
Servings: Serves 4
Ingredients:
- 4 filets of fish (you could use salmon, tilapia, cod, haddock and more)
For the Dressing
- 1 tsp of finely shredded lime peel (use your rasp or micro planer to remove the shred easily from the lime)
- ¼ cup of fresh lime juice
- ¼ cup of minced, fresh cilantro
- 1 tsp of Truvia (stevia)
- 1 jalapeno chili, seeded and finely minced
- 4 cloves of garlic, minced. You can use fresh or jar garlic for this one.
- Salt and pepper to taste
For the Mexican Slaw
- 4 cups of shredded cabbage (or more)*
- 10 cherry tomatoes cut in half
- 1 cup of diced peppers. (I used yellow, red and orange)
- 1 cup of chopped celery
Instructions:
Place the fish filets in a large zipper bag.
Make the dressing. To do this put the lime peel, lime juice, cilantro, Truvia, jalapeno, garlic and a grate of sea salt in a bowl or in your small food processor or blender. Stir or whiz until mixed. Then pour half of the dressing in with the fish. Zip the bag shut. Put it back in your refrigerator to marinate about 30 minutes. Don’t leave it in much longer than that because a lime juice marinade will begin to “cook” the fish if you leave it too long.
Make your slaw. This is easy. Just put the cabbage and the tomatoes in your bowl along with the chopped veggies. Toss with the remaining dressing. Chill while the fish is marinating.
Have your grill heating while the fish is marinating. Or heat your grill pan. You can also do this in a sauté pan if that’s easier. The fish is delicate so it will break apart easily if you’re not careful.
At the 30 minute point take your fish out of the bag. Discard the marinade. Very lightly spray your fish with olive oil spray. Put the fish filets on the grill and grill them to your liking. You can season with sea salt and pepper if you choose. The fish usually takes about 4 – 6 minutes per side for a fish piece 1” thick. Your grill or heat level may vary. This is just a gauge to get you started. Be sure to spray both sides of the fish or it will stick when you turn it over.
*Even though carrots are not allowed on the ZReduction portion of Plan Z, you can use the coleslaw mix that’s pre-prepared in the grocery store. You can work around the few little carrot shreds or that few of them won’t harm your diet.
Serve the fish with the coleslaw on the side. For a person on Plan Z the portion is 6 oz of fish and a cup or a bit more of the coleslaw.
This is a great dish on a hot night. Perfect for the novice cook. Also good enough to invite company over or make this for a new date you are trying to impress.
Enjoy!
Cheers,
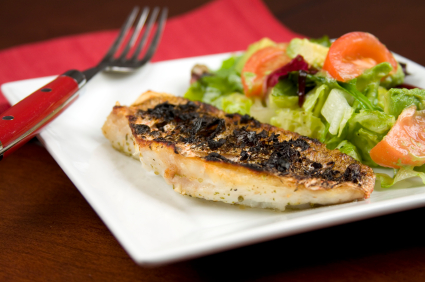
Middle-Eastern Sea Bass with Cucumber Salad
Plan Z Phase: This is a Z2 (ZReduction) recipe. This is a wonderful, healthy meal. It’s fit for a king, and for guests too. Sea bass is a wonderfully, flavorful fish. It is, however, expensive. You can substitute just about any other white fish in this dish and still have a great meal. Sea bass is just worth those extra dollars for the buttery smooth finish it has when cooked.
This is simple food. So easy to cook, a novice can handle it.
Servings: Serves 4, can be doubled for a dinner party
Ingredients:
- 4 pieces of sea bass fillets. 6 – 8 oz each. Ask your fish monger to cut them horizontally across the fish. They’ll be about 1-1/2” wide. Ask that person NOT to give you the thinner ends. You want your pieces cut from the center of the fish. If you buy them at Whole Foods they won’t give you a peep of conflict or even roll their eyes.
- cajun seasoning or blackening seasoning to taste
- cumin to taste
- olive oil spray
For the Cucumber Salad:
This is a dietetic version of a traditional cucumber salad. Don’t worry. This one tastes great.
- 2 smallish (6”) cucumbers, peeled and cut into large dice or slices. Or use one long, English cucumber. I prefer the English ones.
- 1 small onion cut into thin slices. Use your mandolin slicer if you have one and put it on level 1. Otherwise just get them as thin as you can. They’ll be fine.
- 2 Tbl of apple cider vinegar
- 4 Tbl of water
- 1 tsp of Stevia. This is a natural sweetener with no calories.
- salt and pepper to taste
Instructions:
For the fish:
Check the fish for bones by running your fingers along the edge. A great fish monger will have removed them for you, but sometimes they miss a few. Pull them out if you can do it without pulling apart the fish. If not, you can pull them out as you are eating the fish. There will not be too many either way.
Spray the fish on top with olive oil spray. Lightly. Then dust on the Cajun seasoning. You want to coat it but not douse it. Then dust the cumin on top of that. The cumin is what gives it the true Middle-Eastern flavor. If you are not used to cumin, go easy the first time. Either way you are just dusting the top to bring out that flavor.
Spray your oven-proof (cast iron is good) cooking pan with another quick spray of olive oil. Put the fish in, flesh-side down. Cook on medium-high, just to give it a bit of a crust. Then carefully flip it over onto the skin side. Put in your oven at 400 degrees. Roast it until done. This will take about 10-13 minutes more. It depends on how thick your fillets are. To check if it’s done, if it has started to separate at all, it’s done. It will shrink slightly too. Otherwise you can put a sharp knife in and see if the fish starts to easily pull away or apart. If it does, it’s finished.
While the fish is roasting you can make your cucumber salad.
Place the sliced cucumber and onion in a bowl. Mix them up. In a small bowl pour in your cider vinegar, water and Stevia. Then blend. You can use a whisk. Or I put it in my tiny blender and whiz it that way. You just want it fully mixed and the Stevia will dissolve.
Pour this over your cucumber salad and grate sea salt and pepper to taste. I love the salty addition to this dish. Now, it’s ready to serve. Or you can chill it.
Back to the fish. When the fish is fully cooked you might be able to carefully remove the fish from the pan and leave the skin behind. If you are worried about it breaking apart, just take the spatula and remove the whole thing. When your guests are eating the fish it will slide right off the skin and they can leave that on their plate. Don’t eat the skin.
Serve the cucumber salad on the side (For those in ZReduction this will serve as your only side).
For dieters in ZReboot you have the option of adding a carbohydrate to your meal. I suggest couscous. You can find Middle-Eastern couscous in a box-mix in most grocery stores. They will come flavored. There’s one with broccoli bits that would look nice with this meal and there’s also a parmesan one or garlic. You can add some red bell pepper bits to it for more color. Another authentic addition would be to warm up some naan. That’s a Middle-Eastern flat bread. Hot naan with a bit of butter spread across the top is heaven. Many stores have garlic naan now too. Yum.
If you have colorful dinner plates I suggest serving this dish on those because the sea bass is predominantly white when it comes out of the oven, with the light-colored crust. The cucumber salad is a light green and the couscous is pretty beige. You can always garnish with some fresh parsley to highlight it or sprinkle minced parsley over the whole dish like some fancy restaurants do.
Enjoy!
Cheers,
Super Easy Salmon
Plan Z Phase: This is a Z2 (ZReduction) recipe.
Servings: Serves 4
Ingredients:
- 4, 6-8 oz salmon filets. Skin on one side.
- 3 Tbl of Bragg's aminos
- 2 Tbl of dijon mustard
- ½ tsp of minced garlic
- a sprinkle of italian seasoning
- a whisper of cayenne (optional)
Instructions:
In a small bowl stir the Bragg's Aminos, dijon, garlic and cayenne together.
Sear or grill your salmon on one side (flesh side down) for 3 minutes. Flip over and spread on the sauce. Either finish cooking using your favorite method or do what I and chefs in restaurants do and finish it up by roasting it in the oven at 400 degrees. 15 minutes. The salmon will be cooked through and still juicy.
If you like your salmon more rare cut down cooking time to 11 or 12 minutes. Cook longer for well done salmon.
Serve with your veggie portion and an optional salad.
Enjoy!
Cheers,
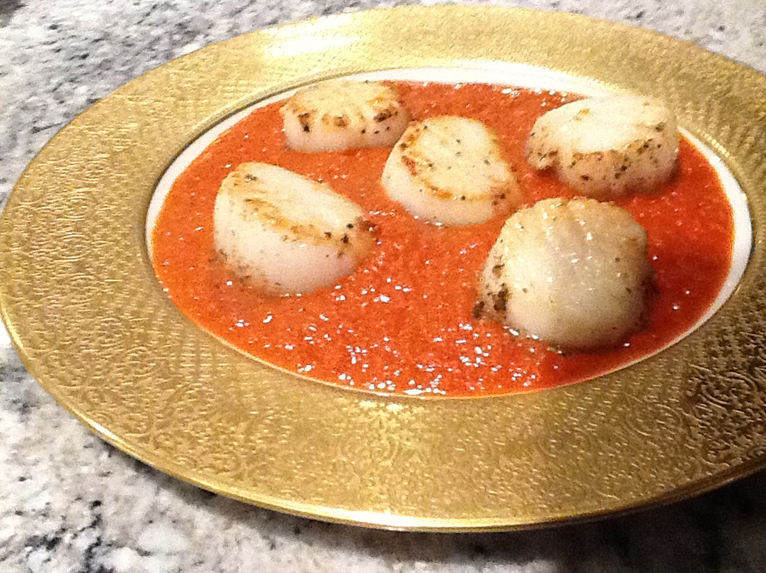
Sea Scallops with a Creole “Cream” Sauce
Plan Z Phase: This is a Z2 (ZReduction) recipe. You can make this dish with any fish. I just was in the mood for scallops.
Servings: Serves 2 (see notes for serving size for sauce below in the instructions)
Ingredients:
- 12 oz of sea scallops (those are the large ones). Around 8- 10 of them.
- olive oil spray
For the sauce
- 1 bunch of green onions, chopped. White and light green parts only.
- ½ of a large onion, chopped
- 1 red bell pepper chopped; seeds removed
- 3 cloves of minced garlic (jar garlic will do for this dish)
- 1 tsp of Italian seasoning
- 1-2 teaspoons of chili powder (to your taste)
- 1 tsp of dried lemon peel
- 28 of canned crushed tomatoes
- 1 cup of water
- salt and pepper to taste
- 1/3 cup of whole milk (optional)
Instructions:
Prepare the sauce first because the scallops cook quickly.
In a large sauce pan add the two types of onion, red bell pepper, garlic, seasonings, crushed tomatoes and the water. Bring to a boil. Turn down to medium to simmer for 10 minutes. Season with salt and pepper. Either let cool down or carefully transfer the contents to your blender. You are going to whiz the mixture to make it smooth. You might need to do this in two batches depending on how large your blender is. Be very careful. Be sure to put a towel over the top of the blender top and hold it securely while you turn the blender on low. Sometimes the force of the blender combined with the heat can blow the top off and you don’t want blazing hot tomato sauce flying around your kitchen. Turn blender up to puree but keep your hand on the top.
When you have it all blended return it to the sauce pan. Add the milk and stir thoroughly. Heat on medium-low until heated through.
Serving size for the sauce on Z2 is 1/3 cup. You can then still have your regular veggie portion. There will plenty of extra sauce. You can eat the leftovers as soup. Add cooked shrimp as a protein or have it alongside any other protein.
For the scallops:
Rinse and dry the scallops. Be sure to dry them well with paper towel. The dryer they are the better they will sear and get a crust on them.
In a large sauté pan, spritz lightly with olive oil. Let it heat up on medium-high until almost smoking. Then carefully place each scallop in the pan. Make sure they are at least 1” apart from each other or they won’t sear. If they don’t sear and get a crust it’s nothing horrible. They will taste great anyway but if you are able to keep them apart the moisture won’t transfer and they will brown.
Scallops don’t take long to cook. Maybe 3 – 5 minutes at most. Some like their scallops to be almost medium rare. My husband likes his fully cooked so the time will vary depending on what you want. I sear mine on one side for 3 minutes WITHOUT TOUCHING THEM and then turn them over. If you futz with them they won’t get a crust on them.
Pour the sauce on the pan and spread it out. Then top with the scallops.
Enjoy!
Cheers,
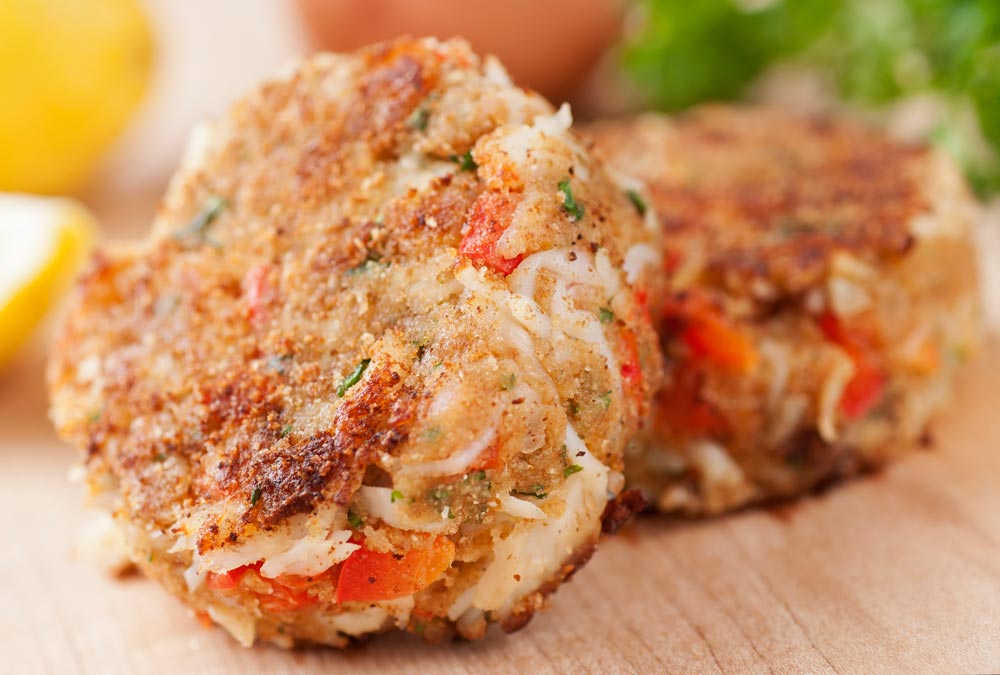
Crab Cakes
Plan Z Phase: This is a Z2 (ZReduction) recipe.
Servings: 4 Servings
Ingredients:
- 2 egg whites
- 2 Tbl of mustard (no sugar)
- 1 tsp of a Cajun seasoning with no sugar in it.
- 1/8 tsp of cayenne pepper or to taste.
- 2 tsp of dried parsley
- 4 Tbl of minced shallots (or you can use green onions or even regular onions)
- ½ of a red bell pepper, diced
- 1 pound of lump crab meat
- ½ cup of bread crumbs made from grinding up 4 large breadsticks
Instructions:
In a medium bowl, combine the egg whites, mustard, Cajun seasoning, cayenne, parsley and shallots. Stir. Add the red pepper and crab meat along with half of the bread crumbs. Form patties.
Now, because the fat has been removed from these crab cakes they will not be as gooey and stuck together as you may be accustomed. You can form 4 quarter pound patties or you can do eight smaller ones. I opt for the 8 so I can eat two at each meal.
After you form the patties you can spread out the rest of the crumbs and dip your cakes in the crumbs. You can coat one side or two.
Spray a sauté pan with a bit of olive oil spray and gently set your crab cakes in the pan. Saute on medium high for about 2 minutes until you get a nice brown coating on the one side. Don’t mess with them. Just let them sit and cook. Then gently turn them over. Again, because these are not “glued” together with fat they will have a tendency to fall apart if you are not very careful. This is okay though. If you completely blow it crab hash tastes just as good as crab cakes so don’t be yourself up about it.
If you are successful at turning them over, cook on the other side until that side is browned too, and they are completely heated through.
Serve with a veggie and you’re set for an elegant meal. Even an elegant diet meal.
Enjoy!
Cheers,
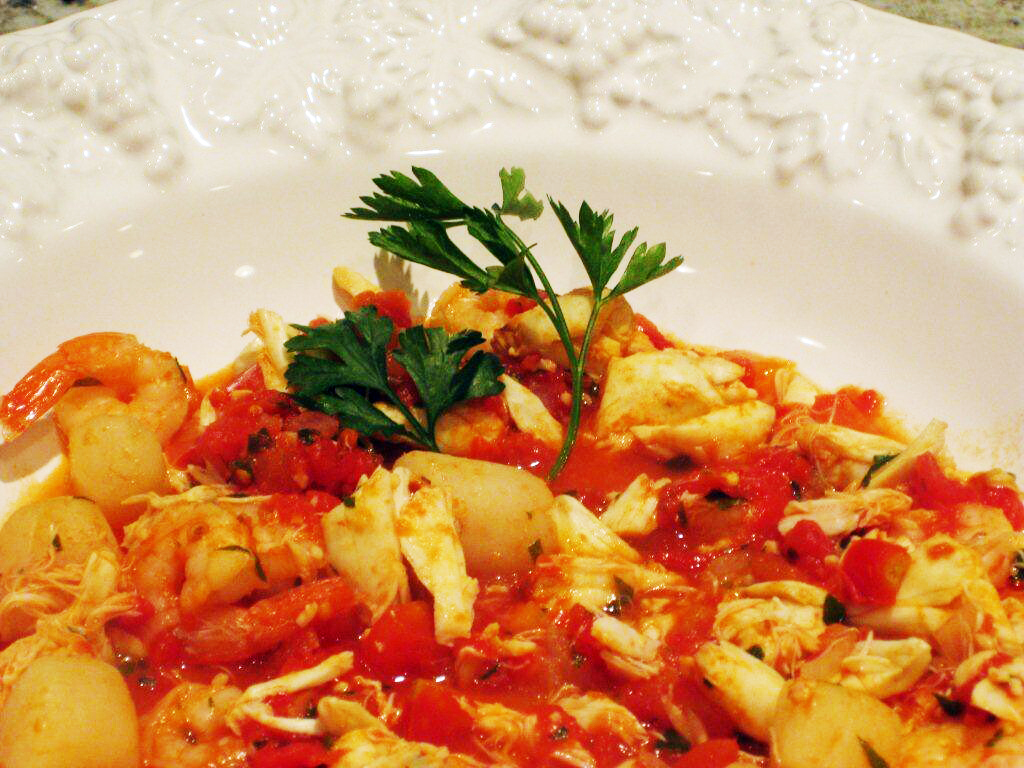
Italian Seafood Stew
Plan Z Phase: This is a Z2 (ZReduction), Zola To Go! and Healthy Happy Holidays recipe. Seafood is often served on New Year’s Eve. In some cultures it’s a celebration that is supposed to come with good luck if you eat seafood. Some Italian families also serve seafood on Christmas Eve. I think this seafood stew deserves center stage all year round.
Servings: Six servings, Each serving is 1.5 cups
Ingredients:
- olive oil spray
- ½ cup of shallots minced
- a large pinch of cracked red pepper flakes
- 1/3 – ½ cup of chicken broth (organic)
- 2 – 3 cloves of garlic, chopped (jar garlic will work)
- 30 oz of chopped tomatoes with garlic and oregano (2 cans)
- ½ cup of Italian parsley, minced
- 6 oz of smallish shrimp (30-40 count)
- 6 oz of scallops (bay scallops or sea scallops cut into pieces)
- 16 oz of lump crabmeat (you’ll find this in a can in the fresh fish section)
- sea salt and pepper to taste
- melba toast
Instructions:
In a large sauté pan or soup pot add your olive oil spray (just a bit) and then your shallots. Cook on medium just until the shallots begin to loosen up. Then add your chicken broth. Bring to a boil and cook for a minute to intensify the flavor of the now shallot broth. Add the pinch of cracked pepper and the garlic (both the garlic and the red pepper flakes can be increased depending on how spicy you like your food). Add the tomatoes. Again bring to a low boil and cook for about 10 minutes to meld the flavors. Add the shrimp, scallops and the crabmeat. Cook on medium five more minutes or until the scallops and shrimp are cooked and the crab is warmed through. Taste test and add salt and pepper to your liking. Add the minced parsley. Stir and serve.
The Melba toast is for dipping. You can also serve a side salad to round out the meal.
Enjoy!
Cheers,
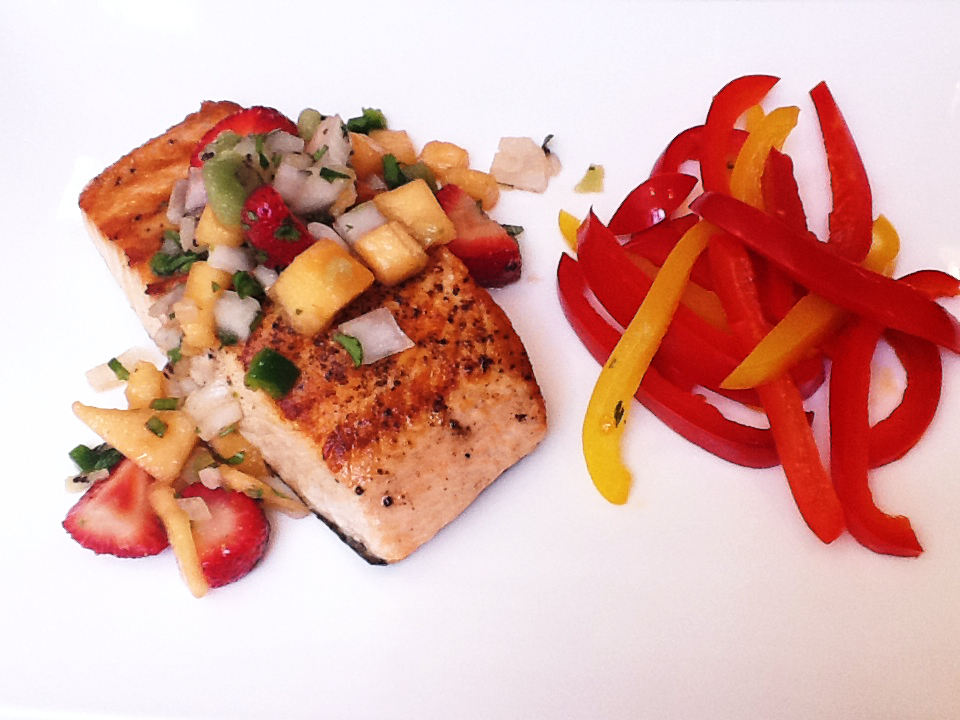
Grilled Fish with Fresh Fruit Salsa
Plan Z Phase: This is a Z2 (ZReduction) recipe.
This is a very light, Mexican meal. It’s great on a hot day… or anytime you have a hankering for fish tacos or a trip to the beach.
Servings: Serves 4
Ingredients:
- 4 fish fillets, 6-8 oz each. I used salmon, but you can use any ZReduction approved fish.
For the Salsa:
- 4 cups of chopped, fresh, approved fruit. In the picture you see kiwi, strawberry, and cantaloupe. You can add other berries or orange segments.
- 1/4 cup chopped, fresh cilantro
- juice of 2 limes
- 1/2 medium sweet onion (walla walla, vidalia, etc.) diced
- 1 small jalapeño, minced
Instructions:
Cut fruit into small cubes and place in a small mixing bowl. Add all of the other salsa ingredients and stir.
Let the mixture sit in refrigerator for at least 30 minutes prior to eating to allow the flavors to meld. This is not a hot salsa. You can add more jalapeno if you want to jack up the heat factor, or you can add a bit of cayenne.
If you have a full cup of salsa that will use up your fruit allotment for this meal. You can still have a veggie on the side and a side salad.
For the Fish:
Pick any approved fish filet. You can spray it and grill it on your grill or in a grill pan. You can even roast it in the oven. In the picture I offer salmon. In order to get that nice grilled crust, I sprayed the salmon with olive oil spray and then placed it flesh-side down in the grill pan and let it cook a full 4 – 5 minutes on medium high. That gave it a nice crust and made it easy to turn over. You can do this with any fish. Most fish only take 3 minutes before you get that nice crust.
Turn over and cook on medium high until it’s done to your liking. Most fish takes approximately 7 minutes per inch of thickness to cook.
For the Zola To GO! version, transport the salsa in one dish and the fish in the other and combine them when you're ready to eat.
Enjoy!
Cheers,
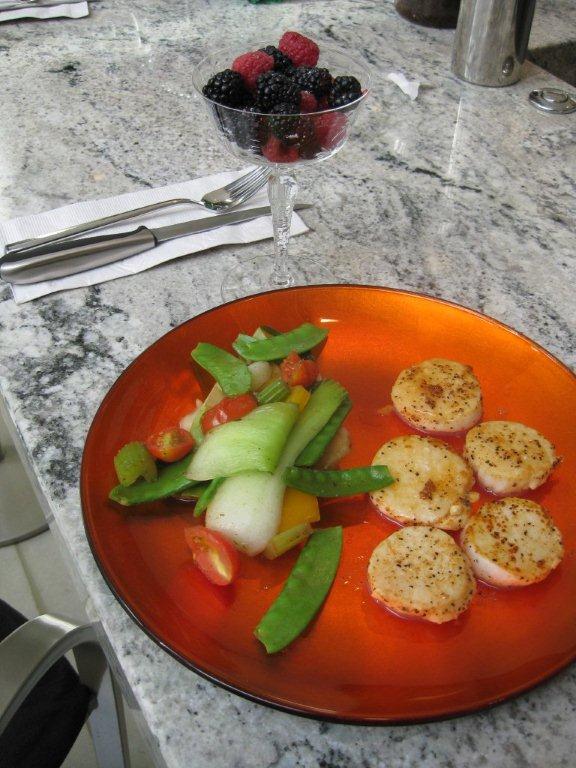
Scallops with Asian Stir Fry
Plan Z Phase: This is a Z2 (ZReduction) and Zola To Go! recipe. Greetings on a snowy day in the Midwest. I hear this snowstorm is going to affect 100 million people so I figure every dieter in the US and Canada are being affected for sure.
So what treats do I have for you today?
I have a special ZReduction splurge entrée.
This recipe is a budget splurge, but can also be made with less expensive shrimp. Sometimes, though, when you are on a diet you just need to splurge and let loose so you feel good about what you eat, and still lose weight!
Servings: Serves 2. Can be doubled easily.
Ingredients:
- 12 oz of sea scallops
- 1 baby bok choy cut into ½ cup portion
- ½ cup of yellow bell pepper chunks
- ½ cup of pea pods (snow peas)
- ½ cup of celery chunks
- ½ cup of cherry tomatoes cut in half the long way
- ½ cup of organic chicken stock or vegetable stock (or broth)
- 1 Tbl of Bragg’s aminos
- your favorite rub or seasoning (optional)
- thai spice blend (optional)
- sea salt and pepper
- cayenne (optional)
- olive oil cooking spray
Instructions:
The most important trick to cooking scallops is to make sure that after you rinse them you DRY them To do this I put them on a paper towel and let them sit for about 10 minutes. I also gently pat the tops of them with another paper towel until they are dry. If the scallops are not dry they will give off a lot of juice and then they won’t brown and get crispy on the outside. You also need to use a large enough sauté pan so they are not touching each other while they cook.
While the scallops are drying I sprinkle on salt and pepper. I also use a favorite rub to flavor them. You can choose your own favorite rub with no sugar or leave them plain. Up to you.
In this instance I also cut the huge scallops in half cross-wise so they resembled large checkers. This way I have twice as many discs (checkers) to eat. It makes the dish feel like it’s more food and lasts longer.
Have all of your chopping ready. This dish comes together very quickly.
In a large sauté pan spray a bit of olive oil spray and add your scallop pieces. Saute on one side for a full 2 minutes on medium- medium high WITHOUT TOUCHING THEM. This will give them a brown crust.
While the two minutes is ticking away get out another large sauté pan or your wok. Spray lightly with olive oil and add the bok choy and yellow pepper first. Cook 1 minute. Add the Bragg's along with the stock/broth. Cook on medium high. The broth will begin to boil and reduce. Add some Thai or Asian spice blend if you want. There are a zillion options. Just make sure you choose one with no sugar in it. Mine is called Thai Garden. I add about a tsp. This is all to your taste. I also add a sprinkling of cayenne because I like my Thai food spicy.
Turn the heat down to low and add the other veggies. Stir.
Take out a very sharp spatula and turn your scallops over. You want to make sure you get under the newly formed, golden crust. Cook on medium on the other side until the scallops are done to your liking. Some like their scallops rather translucent and on the other end of the scale some like them done throughout. I’m in the middle. I plan about 5 minutes total for a ½" – 1" thick scallop. Even if they are ‘done’ all the way through they will still taste good.
Serve scallops alongside the veggies.
Enjoy!
Cheers,
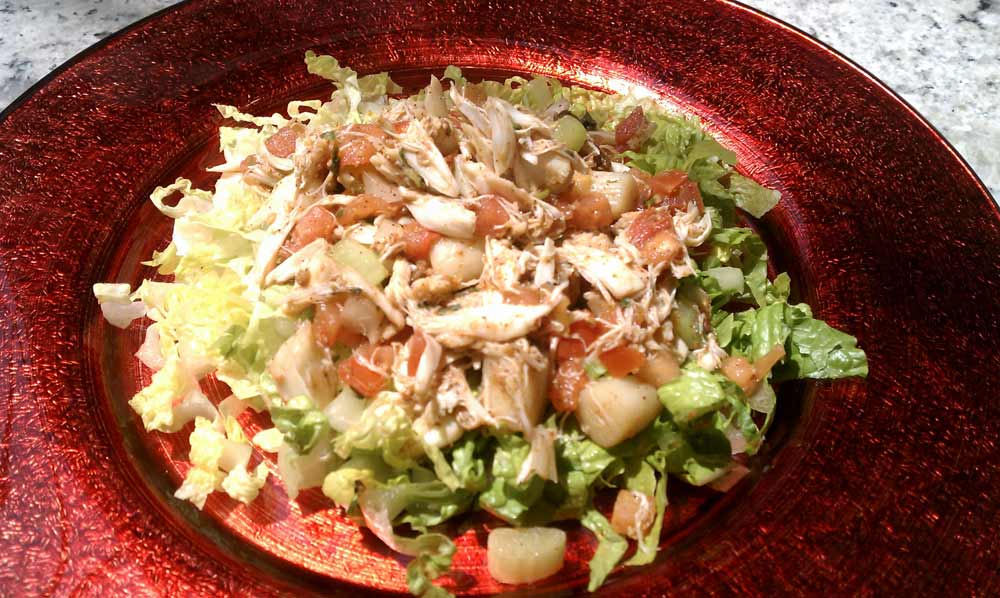
Mexican Seafood Salad
Plan Z Phase: This is a Z2 (ZReduction) recipe. The design of this dish is for fancy food for a hot day. You can make this much simpler and less expensive by using less expensive seafood and fish options. I’ll point that out in the recipe where appropriate. This is so very easy to make. I hope you enjoy it.
Servings: Serving size, one cup
Ingredients:
- 1 lb of scallops* (you can use the smaller bay scallops or cut larger ones into chunks)
- 1 lb of crab meat*
- 1 tsp of cumin
- 1 tsp of grated lemon peel (you can use the dry stuff in the jar or fresh)
- 1 tsp of chili powder
- cayenne to taste
- 1 cup of chopped celery
- 1 cup of fresh pico de gallo. This is just a simple, fresh salsa. You can find it in the deli section of most grocery stores. Or use salsa with no sugar in it.
Instructions:
In a large sauté pan cook the scallops to your liking. Then add the crab, veggies, pico and the spices and stir. Continue cooking on medium until warm. It’s that easy. Serve over your favorite greens.
Serving Suggestions (for Z3 Version):
To make this really extra fancy, add a scoop of guacamole on top of the sea food salad and serve with just a few tortilla chips.
- To save on budget, instead of scallops substitute fish. Tilapia will work fine. You can also substitute less expensive shrimp for the crab meat. If you do, make sure the shrimp are cooked and tails are removed.
Enjoy!
Cheers,
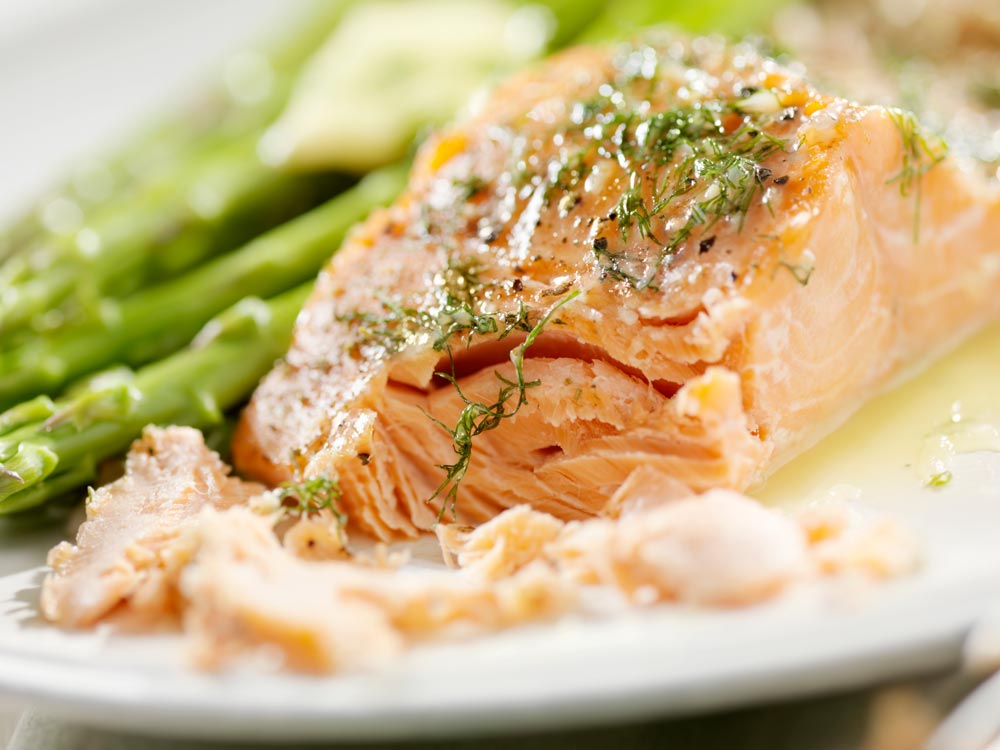
Simple Italian Baked Salmon
Plan Z Phase: This is a Z2 (ZReduction) recipe.
A word about salmon: As often as possible, I suggest you purchase salmon that has been wild caught. Salmon that is farm-raised in the US is not a very healthy version. In fact, some experts will tell you it’s bad for you. I found some salmon the other day at Whole Foods that was farm-raised in Iceland. That one is a GOOD one. The US farm-raised salmon is just raised to be cheap and fast to get to market. That’s not a good thing.
This also falls under the category of “so easy even a bachelor who professes to know nothing” can cook it.
Servings: Serves 2
Ingredients:
- 2 six ounce salmon fillets
- sea salt and pepper
- 2 cloves of garlic, minced (jar garlic will work)
- 1 tsp of dried basil
- 1 Tbl of lemon juice
- 1 Tbl of fresh parsley, chopped
- olive oil cooking spray
Instructions:
Grease an ovenproof pan large enough to hold the salmon pieces.
Grate a generous amount of sea salt and pepper on top (to taste).
In a small bowl, combine the garlic, basil and lemon juice. Stir. Spread this across the top of the salmon.
Take the chopped parsley and sprinkle it across the salmon.
Spray the top with a bit of olive oil spray.
Put the salmon in your oven at 375 degrees and roast for about 30 minutes. You’ll know when your salmon is done when you can touch it with your fork and a piece of it will flake off easily. You can also poke into the middle of the thickest part and make sure it’s done to your liking all the way through. Some folks like their salmon thoroughly cooked and some like it undercooked to medium-rare. 30 minutes will get most salmon pieces to medium. It will still be juicy.
Serve on the plate with the skin side down. Don’t eat the skin (unless you like salmon skin). When you move your fork across the salmon to pull it up onto your fork the salmon skin should stay on the plate. Sometimes it sticks to the bottom of the baking pan. That’s fine.
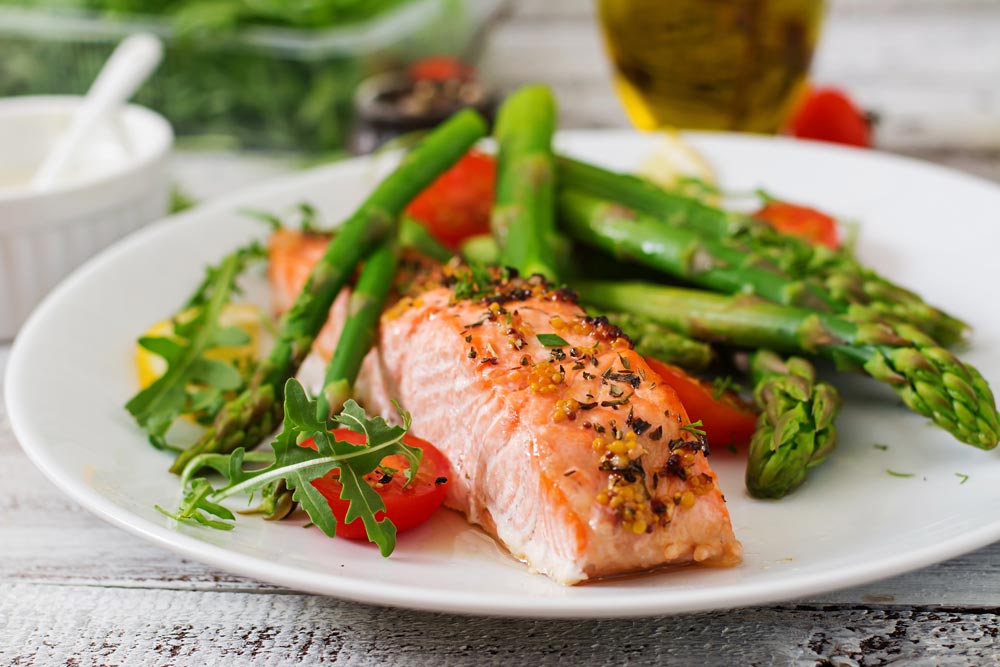
When I made this dish, I served it with grilled asparagus spears and some grilled cherry tomatoes. Just put the veggies on an oiled grill pan and cook them on medium until the asparagus is done and the tomatoes start to burst.
Enjoy!
Cheers,
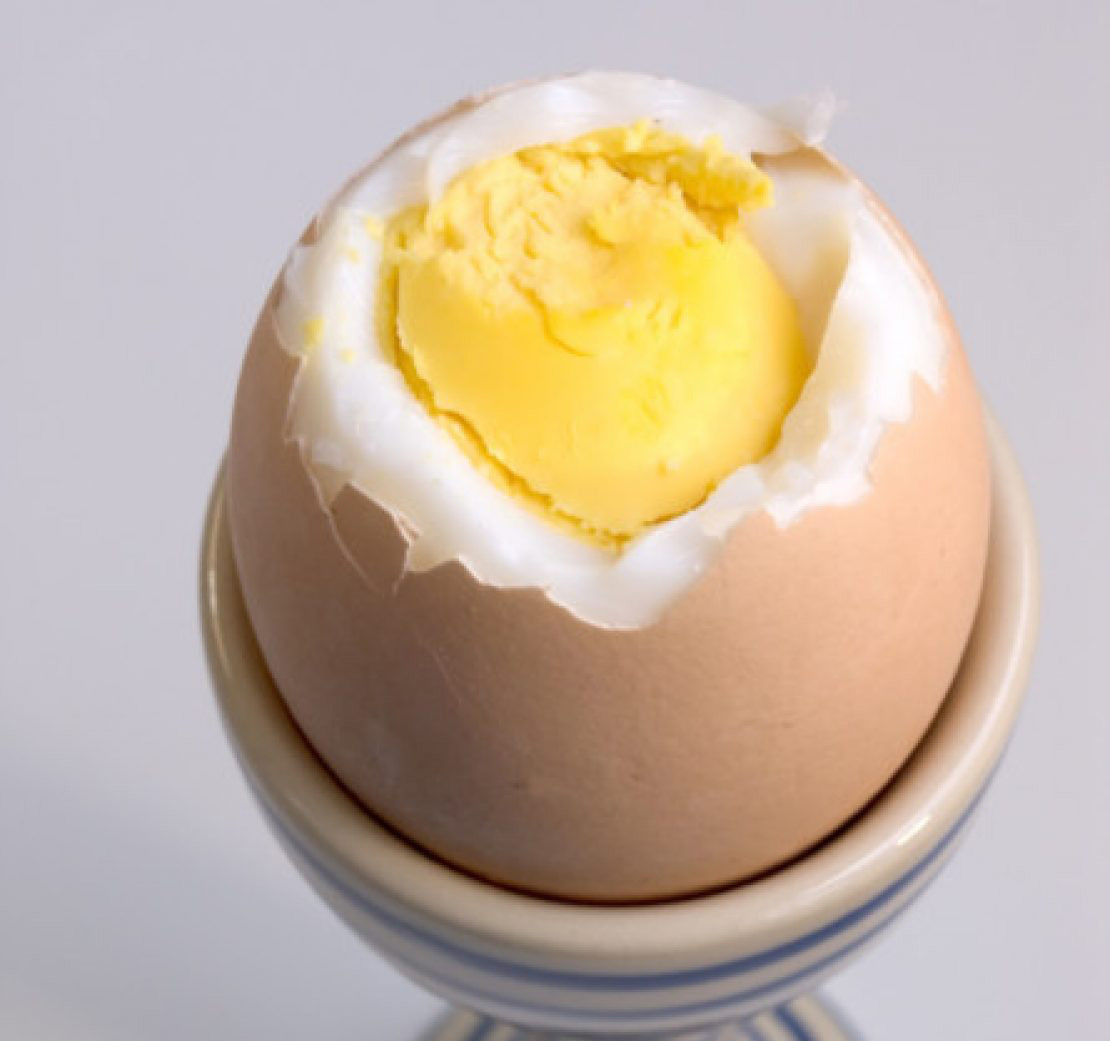
The Perfect Hard Boiled Egg
Plan Z Phase: This is a Z2 (ZReduction) recipe. A dieter asked me, “What’s the recipe for a perfect hard boiled egg?” At first I was taken aback. No one had ever asked me that before. On the surface it seemed like such a simple question. But when I started to answer, I realized that for many, it might not be such a simple question after all. There really was a method to my madness in making hard boiled eggs and I had made so many I never really thought about it. I learned to make hard boiled eggs when I was 12 from watching my mom, so at this point in my life, it was just a routine; an exercise that was ingrained in me. My recipe for making the perfect hard boiled egg is really quite simple. Follow these steps and your eggs will turn out perfectly every time. You won’t have runny eggs. The yokes will be fully cooked. You won’t have eggs that refuse to peel from the shell. And, probably most importantly, you won’t have rubbery blobs that are standing in for hard boiled eggs. You’ll have moist, firm, smooth, hard boiled eggs.
Ingredients:
- 6 fresh eggs - whether organic or not is not important. I prefer organic. White or brown doesn't matter.
- water - enough room temperature water to cover the eggs by an inch. No shells sticking out the top of the water.
Instructions:
Place the pan with the eggs on a strong burner. Turn on to high. You want to get the water boiling quickly. This is mostly because I have no patience. Stick around, because as soon as the water starts to boil you are going to start a timer. When the water starts to boil, set the timer for 6 – 8 minutes. I can’t be exact here because it depends on the size of the eggs you bought. After you set the timer, turn the heat down to a medium boil. You just want the eggs bubbling away.
When the timer rings, immediately put the pan, water and all, in your sink. Start to run cold water over the eggs in the water. Run this cold water until the hot water in the pan is completely replaced by fresh, cold water. I run it for at least a full minute. Then let your eggs sit in the pan. They should sit there until completely cool.
Cracking the eggs seems to be a challenge for some. I just lightly tap the egg on the counter over much of the surface to crack it fairly evenly. One crack per inch as I roll it in my hand in a clockwise direction. My goal is to peel an egg in big chunks of shell, not bits. Again, I have no patience. I love it when the shell almost unwinds off of the egg.
A couple of points. If your shell sticks miserably to the egg, your eggs were probably old or you really over-cooked them and you have those rubbery blobs we talked about earlier. If the shell is just sticking a bit, the membrane might be stubborn. I just find a bit of membrane and pick at it with my finger nail to get it started and fold the membrane back a bit so you can get hold of the shell better. If necessary you can do this under running cold water and that should do the trick.
I love a plain hard boiled egg or two with salt and pepper for breakfast or lunch. The protein really fills me up. They are great when I’m in a hurry too. They are even transportable!
Enjoy!
Cheers,
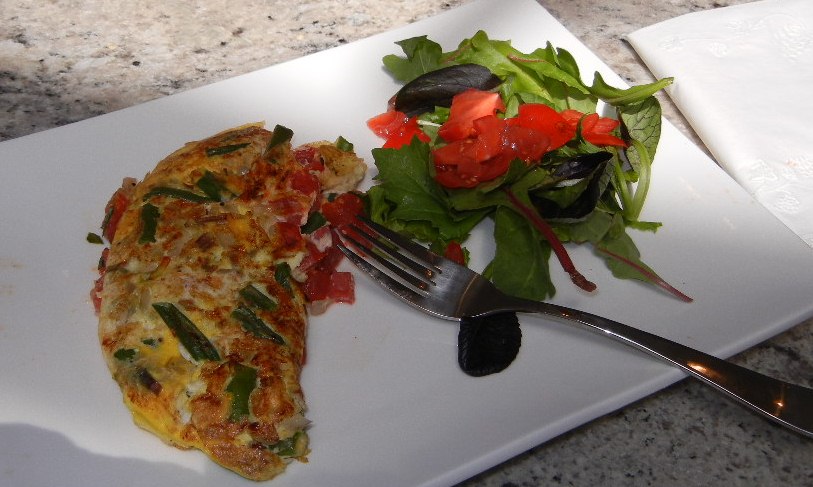
Green Bean Omelet
Plan Z Phase: This is a Z2 (ZReduction) recipe contributed by ZTeam member Damian.
Serving Size: Serves 1
Ingredients:
- 2 eggs
- 2 Tbl shallots, minced
- 1/2 cup of green beans or asparagus, cut into bite sized pieces
- 1 glove of garlic, minced
- 1 large tomato, chopped
- salt & pepper to taste
- olive oil spray
Instructions:
In a small bowl add the eggs, salt & pepper and whisk lightly and put to one side for now.
Heat olive oil in a small Teflon lined omelet pan over medium-high heat (small sauté pan). Add the shallots and garlic and sauté for 2-3 minutes, add the green beans and continue sautéing for another 3-4 minutes on medium.
Pour the egg mixture over the green beans and using a rubber spatula, lift up one of the edges of the omelet to allow the liquid which is not yet set to flow underneath. Do this with the other edges until all the liquid has gone. You will see that the top still looks a little runny so what I do is turn the broiler on high heat, place the pan on the top shelf ensuring the handle is not under the flame and cook for about 1 minute. This just quickens the setting of the omelet.
Remove from broiler and put back on the stove on a medium heat. Add the chopped tomato (leaving half to garnish your side salad) to one half of the omelet and using the rubber spatula ensuring the edges are lose. Gently lift the non- filled side and ease it over the filled side of the omelet.
Serve with a side salad.
Grubs up!
Damian
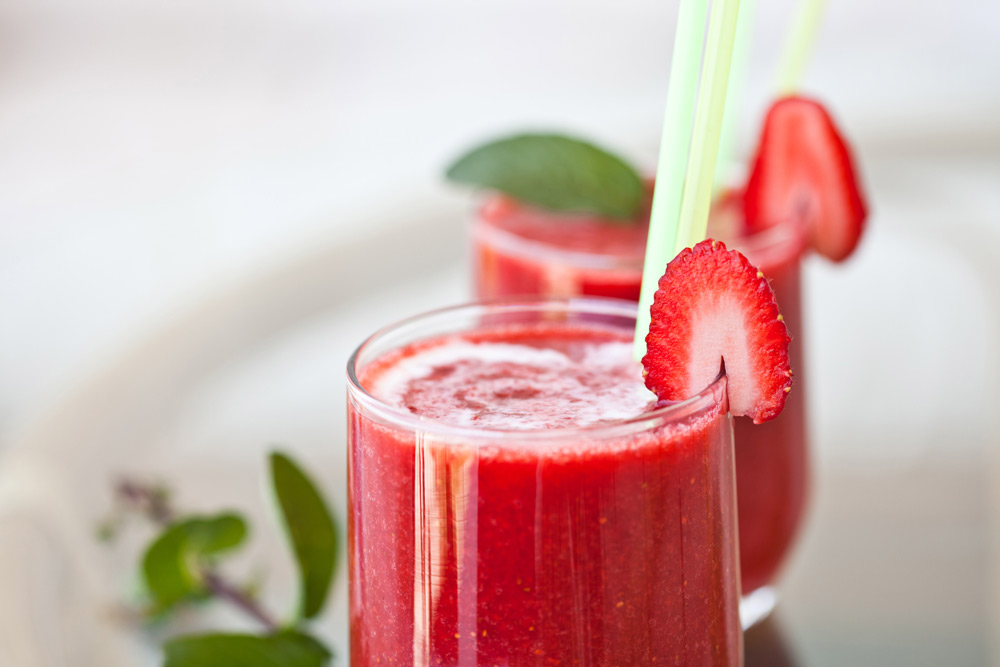
Strawberry Spiced Shake
Plan Z Phase: This is a Z2 (ZReduction) recipe. A cool treat for a dessert drink.
Serves: 1 serving. Can be doubled.
Ingredients:
- 1 cup of strawberries cut into pieces
- 1 cup of ice cubes
- ½ tsp of apple pie spice mix. You can also use plain cinnamon or nutmeg. Your choice.
- ¼ cup of water
- 1 tsp Truvia
Instructions:
Put all in a blender and whiz. If you want it thicker, add more ice.
Enjoy!
Cheers,
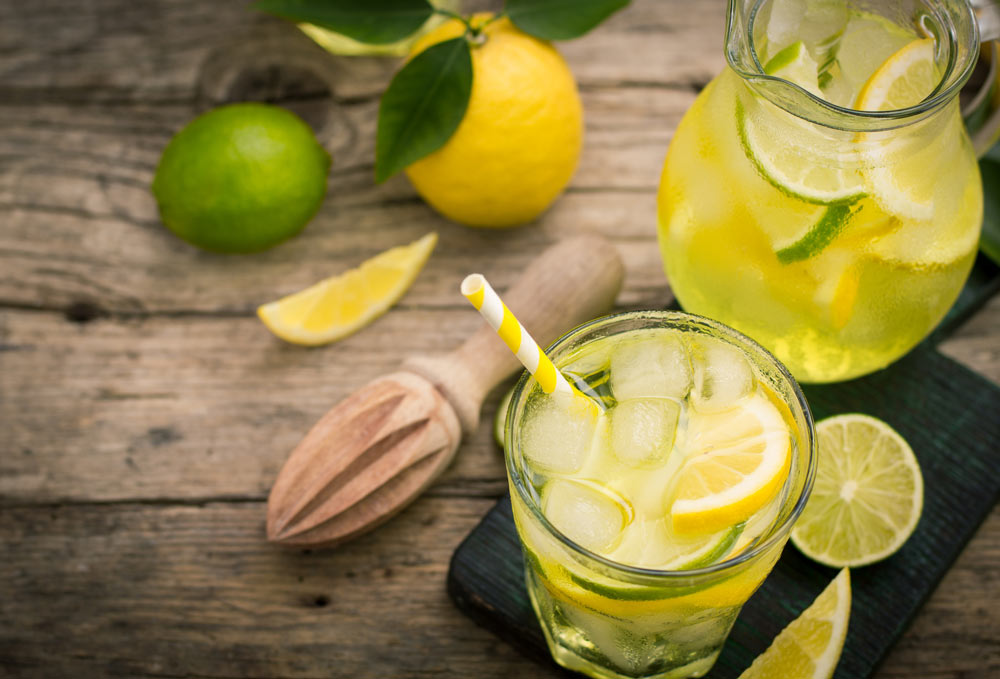
Frozen Lemon-Limeade
Plan Z Phase: This is a Z2 (ZReduction) recipe.
Servings: Serves 2
Ingredients:
- ¼ cup of freshly squeezed lemon juice
- ¼ cup of freshly squeezed lime juice
- 1-1/2 cups of water (or La Croix if you want it sparkly)
- 3 tsp of Truvia
Instructions:
Add all ingredients together and blend.
If you blend this with ice you get a nice frozen drink to sip on.
In the Z3 phase, this makes a nice, sugar-free base for a margarita. Just add tequila.
Enjoy!
Cheers,
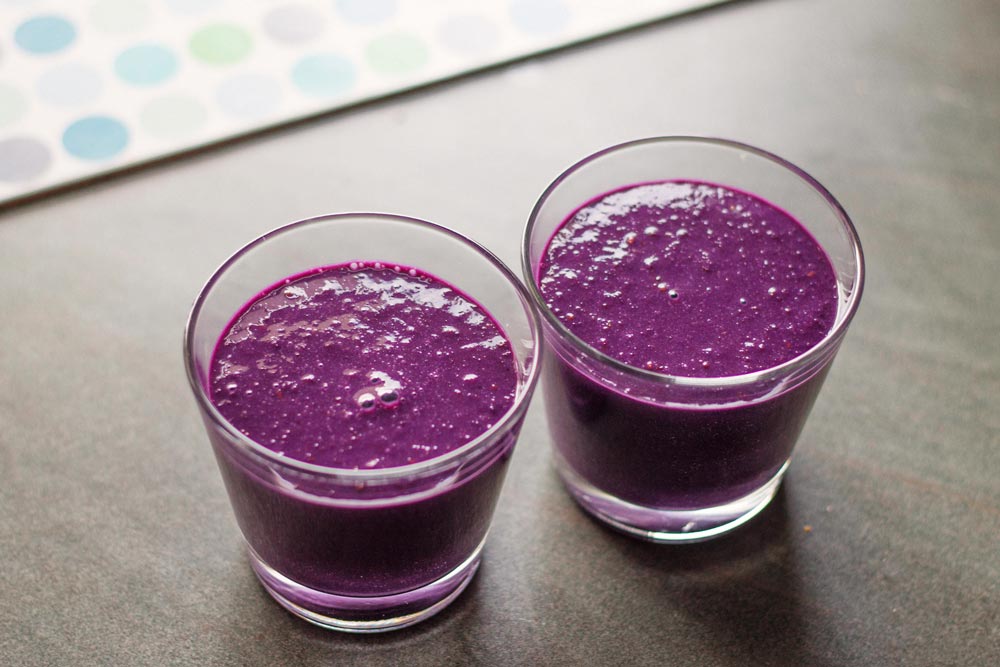
Blueberry Shots
Plan Z Phase: This is a Z2 (ZReduction) recipe.
Servings: Makes 3-4 servings. Serving size is ½ cup.
Ingredients:
- 1 pint of fresh blueberries, picked over and rinsed
- 1 tsp of Truvia (or stevia sweetener)
- ½ cup of water
- 2 tsp of organic vanilla
- 1 cup of chopped ice
Instructions:
Put all of this in a blender and whiz. If you want it thicker, add more ice.
Serve in small glasses and you’ll feel like you are having a very sophisticated after dinner drink.
Enjoy!
Cheers,
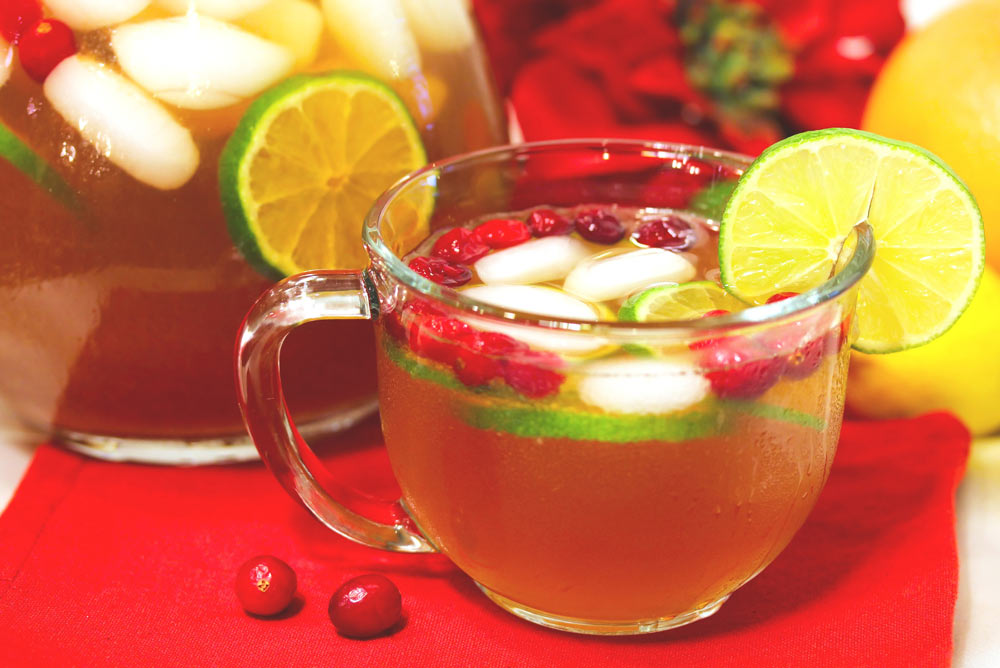
Cranberry Lime Iced Tea
Plan Z Phase: This is a Z2 (ZReduction) recipe. Perfect for ZReduction. This iced tea makes you feel special.
Servings: Serves 6
Ingredients:
- 6 packets of cranberry tea.* I use organic herbal tea (but that’s cuz I’m allergic to caffeine). You can use herbal or not.
- 6 – 8 cups of water
- 1 lime sliced thinly
- ice
Instructions:
In a large microwave-proof bowl add 6 – 8 cups of water. Open the tea bags and float them in the water. Microwave until the water just about boils. Remove from microwave and let set for 5 – 7 minutes.
Carefully remove the tea bags with a spoon. Be really careful so you don’t split any of them or you’ll have to strain your tea. If you get them all out you can put them in a bowl and save them and likely get a second batch of tea from the same tea bags.
The tea will be a lovely pink color.
When it cools down for 10 minutes or so, pour the tea over a large pitcher half-filled with ice.
Add the lime slices and stir. As the tea sits the lime will ooze out a bit. If you like more lime flavor you can add some lime juice or put slices of lime into the individual glasses.
Pour the iced tea into tall glasses filled with more ice. Serve.
Store leftovers in the refrigerator.
*As you probably have figured out you can do this with any fruit-flavored tea. This one definitely doesn’t need any sweetening. A few others might need a tsp or two of Truvia. Be careful not to consume too much Truvia (for most this is 3 – 4 tsp a day maximum) or it can stall weight loss in some folks.
Enjoy!
Cheers,
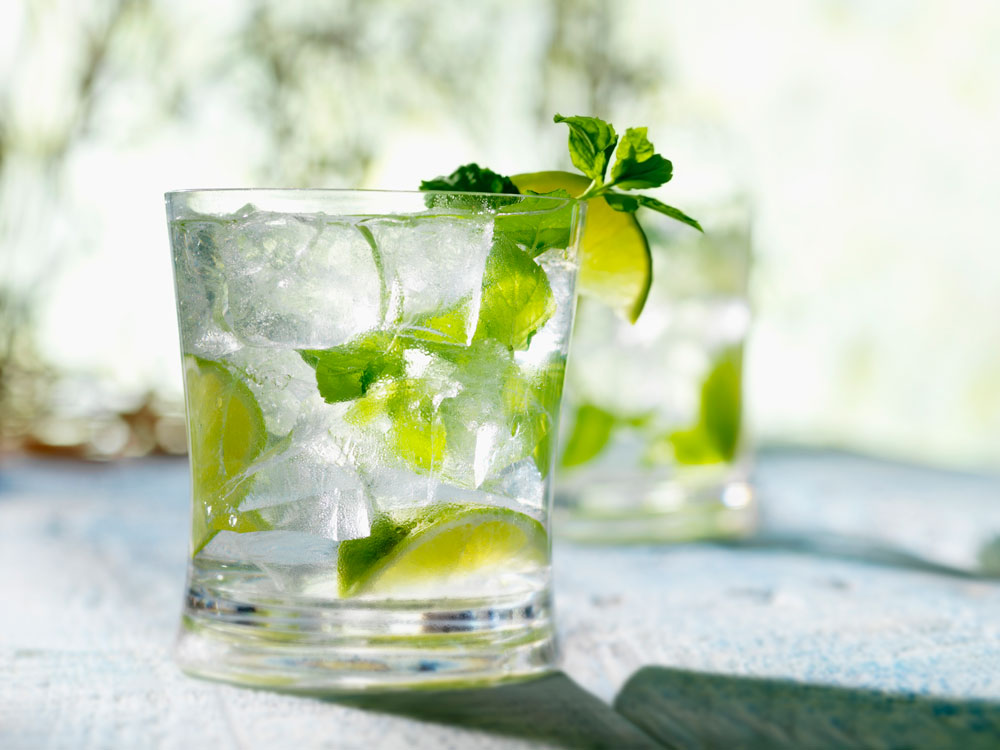
Redneck Mojitos
Plan Z Phase: This is a Z2 (ZReduction) recipe. This refreshing recipe was submitted by Plan Z dieter Debbie. It's a nice treat on a hot summer day. Thanks Debbie!
Servings: 4 Servings
Ingredients:
- 1 large stem of spearmint
- 1/2 lime sliced thin
- 1 packet of stevia
- 32 oz water
- 2 cups crushed ice
Directions:
In a pitcher, add the mint, stevia, lime and about 1 cup of the ice. Using a wooden spoon, mash the mint and lime against the ice to release the oils in the mint. Slowly add the remaining water while mixing slowly. You can add the rest of the ice to the pitcher, or you can add it directly to your glasses.
Serve immediately. You can add a piece of mint and slice of lime to each glass as a garnish.
Enjoy!
Cheers,

Cinnamon Water
Plan Z Phase: This is a Z2 (ZReduction) recipe. When you are dieting with Plan Z, one of the things we recommend is that you increase your water consumption. People on Plan Z who drink 100 - 125 oz of water per day lose 30% more than those who drink less than 70 oz. Studies show that when your body unlocks the stingy fat, that it needs a ready vehicle to flush it out of your system. That’s where the water comes in. But for many, water is boring so we give them lots of ways to jazz it up. This one I learned in Costa Rica. I came back to my room after dinner one night and there was a pitcher of water by my bedside. But instead of it being flavored with the usual lemon slices, it was flavored with cinnamon.
Cinnamon water tastes reminiscent of snickerdoodle or oatmeal cinnamon cookies. It makes a nice treat!
Ingredients:
- water
- cinnamon stick
Instructions:
Cut about a 1” long piece of cinnamon stick. Then cut that piece again the long way.
Put the cinnamon pieces in the pitcher and pour up to 30 oz of water over. As the cinnamon steeps it will pick up the flavor of the cinnamon and give you cinnamon water. Beats iced tea for me! When you finish the 30 oz, just pour more ice and water over and the process will begin again.
Even better, I bet you can take the cinnamon out and let it dry for reuse.
Enjoy!
Cheers,