
Creme Soda
Plan Z Phase: This is a Z2 (ZReduction) recipe. Makes a great substitute for flavored sodas.
Servings: Serves 1
Ingredients:
- 12 oz glass of sparkling water
- ice cubes
- vanilla-flavored stevia (or whatever flavor suits your taste)
Instructions:
Fill a 12 oz glass with sparkling water and ice. Add 3 – 4 drops of vanilla-flavored stevia and you have a no calorie cream soda!
Stevia also comes in a bunch of other flavors. The root beer flavor is great too!
Experiment with these flavors and fizzy water and enjoy!
When in a restaurant, order a glass of plain club soda and keep your stevia with you. You can make your own cream soda on the spot!
Other Stevia flavors I’ve seen:
Cinnamon, grape, chocolate, peppermint, root beer, apricot nectar, English toffee, vanilla crème, orange, lemon and chocolate-raspberry.
Enjoy!
Cheers,
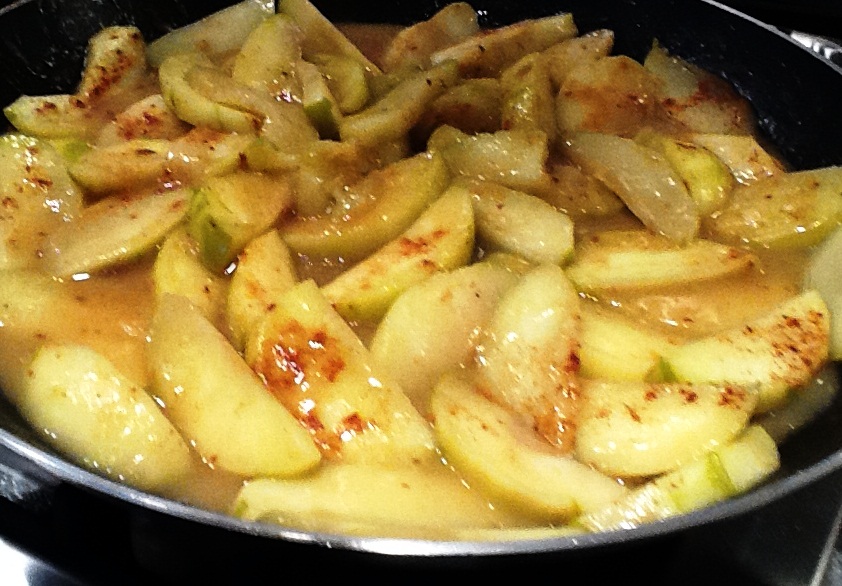
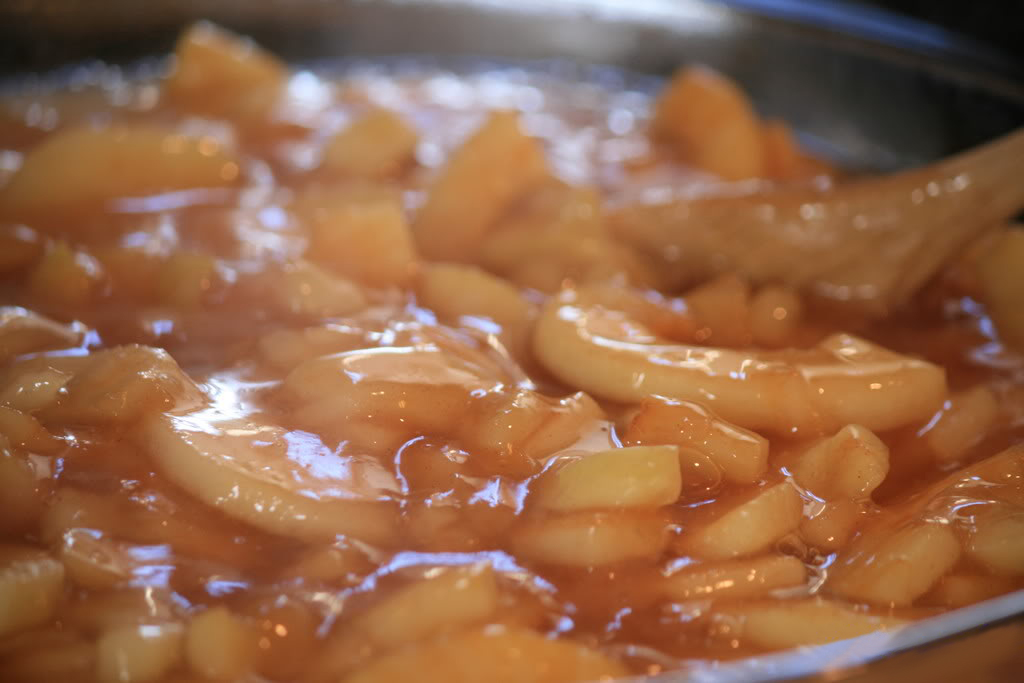
Warm Apple Dessert (Compote)
Plan Z Phase: This is a Z2 (ZReduction) recipe. This tastes amazingly like gooey apple pie! You can make this with the chicken broth as I outlined. Believe me. It will still taste like dessert! Or you can use water or sparkling water instead of the broth. But trust me. This is delightful. Either way I am confident it will taste like grandma pie insides.
Serving Size: Serves 4 - 6
Ingredients:
- 2 cups of organic chicken broth
- 4 apples, peeled, cored and sliced. I used Granny Smith.
- 2-3 tsp of cornstarch
- cinnamon or apple pie spice to your taste
- truvia (optional)
Instructions:
In a large sauté pan put in your apples with one cup of chicken broth. Bring to a mild boil. Let them bubble to soften. Stir and flip them over periodically. When the broth is almost gone add the cornstarch to the second cup of broth and stir to dissolve it. Then add it to the pan and continue cooking til the sauce thickens around the apples. The apples should have a bit of bite left in them depending on how thinly you sliced them. Before you take then out of the pan sprinkle on your apple pie spice and stir one more time. You can also add a tsp or two of Truvia at the end if you want it really sweet. I did not need the Truvia at all.
Serving size up to ¾ of a cup. You can risk just diving this by 4 since it is made with 4 apples. For my intake that’s a lot of apple slices, so I cut back. If you use the Truvia, definitely cut your portion back.
Enjoy!
Cheers,
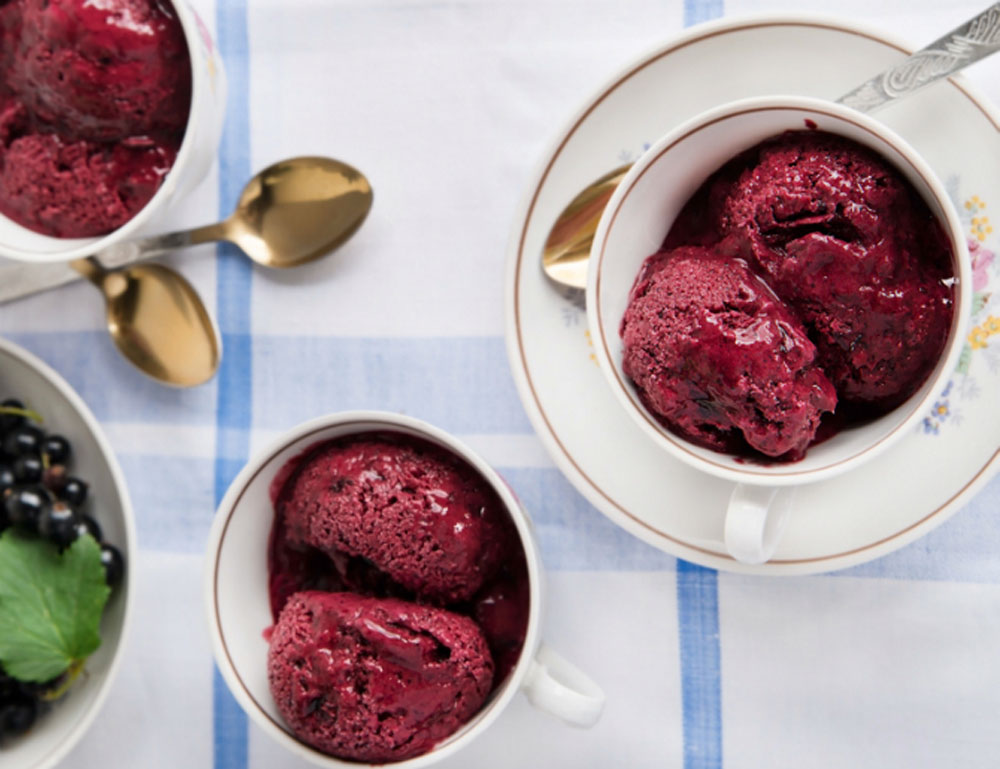
Blackberry Smoosh
Plan Z Phase: This is a Z2 (ZReduction) recipe. This dessert will become a very special one during ZReduction. You can make it as a special treat. If this is going to be a very fancy dinner this can also be served as an intermezzo to clear the palate before the entrée is served. This feels very French. Cold and refreshing, too.
Servings: Serves 1
Ingredients:
- 30 - 40 frozen blackberries (you can get unsweetened ones in bags in the grocery store or take fresh ones and freeze them)
- 1 tsp of organic vanilla
- 1 tsp of Truvia (stevia)
- up to one cup of water
Instructions:
This one requires a food processor. I’m afraid unless you have a really strong blender that it would kill it.
Put the berries and the vanilla and Truvia in the blender. Pulse the berries to break them up into small chunks. It will look sort of like chunky slush.
Open your processor and scrape down the sides. Put the top back on and add a 1/3 cup of water. Pulse some more to get it softer. Scrape again. Then add bits of water and continue to blend until it’s smooth and moves around the inside of your processor like frozen slush.
Each portion is 1/3 cup. You can eat it right away. It’s BEST eaten right away. It does freeze well in a container. When you take it out of the freezer, plan to leave it on the counter for a bit to soften up. Unlike ice cream it will freeze solid and will be a bear to scoop out unless you let it soften some.
This never lasts long at my house.
Enjoy!
Cheers,
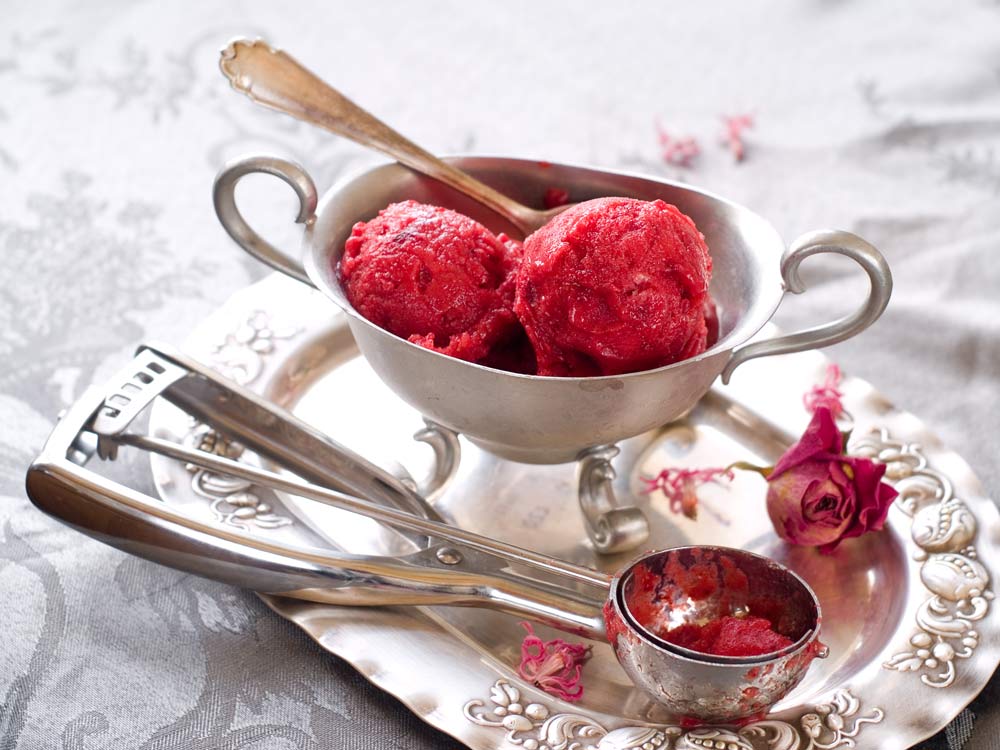
Raspberry Sorbet
Plan Z Phase: This is a Z2 (ZReduction) recipe submitted by Plan Z dieter Christine.
Servings: Serves 1
Ingredients:
- 1 cup frozen raspberries
- 1 Tbl water
- 1-2 tsp of Truvia
Instructions:
Put all ingredients in blender and blend until no large pieces of berry remain. You can either eat it immediately, or refreeze it to eat later.
The amount of stevia needed will depend on how tart your berries are to start with, and how sweet you want your sorbet. Start with one tsp of Truvia and taste midway through blending to see if you want/need to add the second tsp. For added variety, try with blackberries or strawberries.
Enjoy!
Cheers,
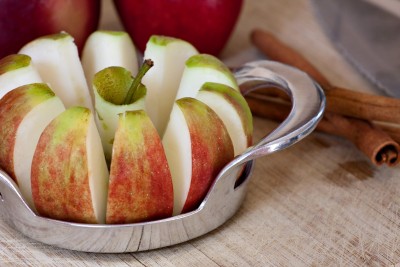
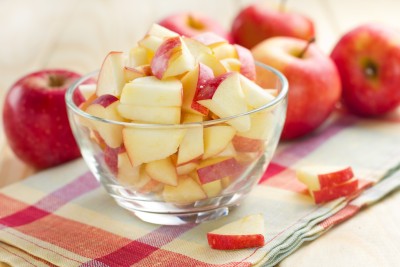
Vanilla Apples
Plan Z Phase: This is a Z2 (ZReduction) and Zola To Go! recipe. A simple, tasty dessert.
Servings: Serves 1 or 2
Ingredients:
- One apple, washed, cored and cut into slices. Leave the skin on. I use Granny Smith but you can use your favorite eating apple.
- ½ tsp of vanilla powder
- a sprinkling of cinnamon
Instructions:
Put your apple slices in a bowl. Sprinkle on the vanilla powder and the cinnamon. Toss. As the vanilla powder soaks into the apple slices it gives it a very nice flavor.
Enjoy!
Cheers,
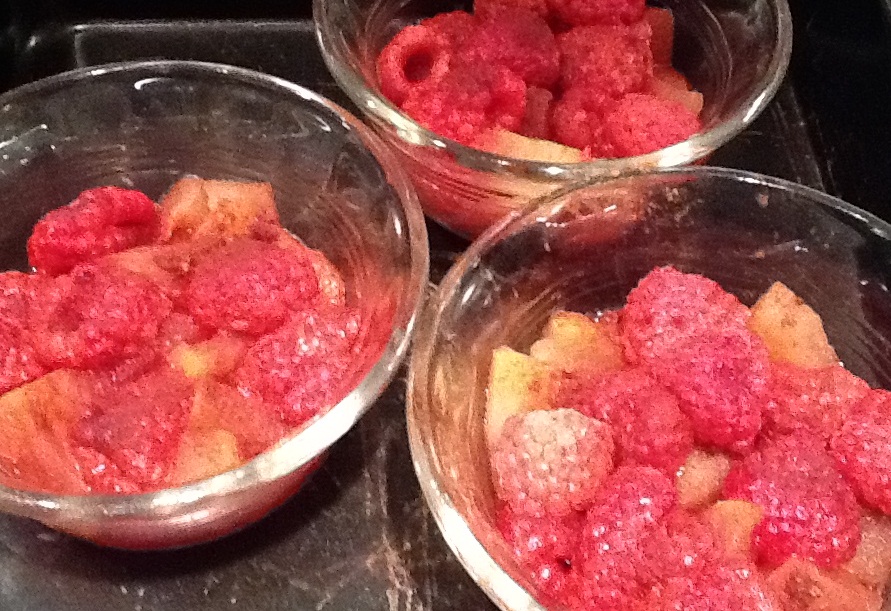
Apple Raspberry Bake
Plan Z Phase: This is a Z2 (ZReduction) recipe. This dessert tastes a lot like Mom’s apple pie with a twist. A nice, zingy twist. If you are one of those people who likes an apple/cranberry pie you’ll love this.
Serving Size: Serves 6
Ingredients:
- 2 large apples. Honey-crisp is my favorite or Granny Smith. Peel and cut them into chunks.
- 1 pint of raspberries
- 2 tsp of Truvia
- apple pie spice mix (to taste)
Instructions:
Preheat the oven to 375 degrees.
This is super easy. Just a toss it in the bowl/pan kind of recipe.
Distribute the apple chunks evenly across 6 medium ramekins or you can use a 9" x 13" pan and just scoop out the dessert later; rather than have individual servings. Spread the apple chunks across the bottom of the 9" x 13" pan.
Sprinkle the Truvia over the apples.
Scatter the raspberries across the top of the apples.
Sprinkle the tops with the apple pie spice. If you don’t have apple pie spice you can use a mixture of nutmeg and cinnamon or whatever combo of baking spice you prefer.
Put the ramekins in another oven-proof pan and cover with aluminum foil. If you're using the 9" x 13", just cover the whole thing with aluminum foil.
Put in the oven and bake, covered for approximately 30 minutes or until the apples are soft. You can check by poking them with a sharp knife.
And voila.
You can eat these warm, room temperature or cold. Refrigerate leftovers.
If you are making them in a 9" x 13" pan your serving size is ½ cup. The apples shrink during cooking so your portion size decreases.
Enjoy!
Cheers,
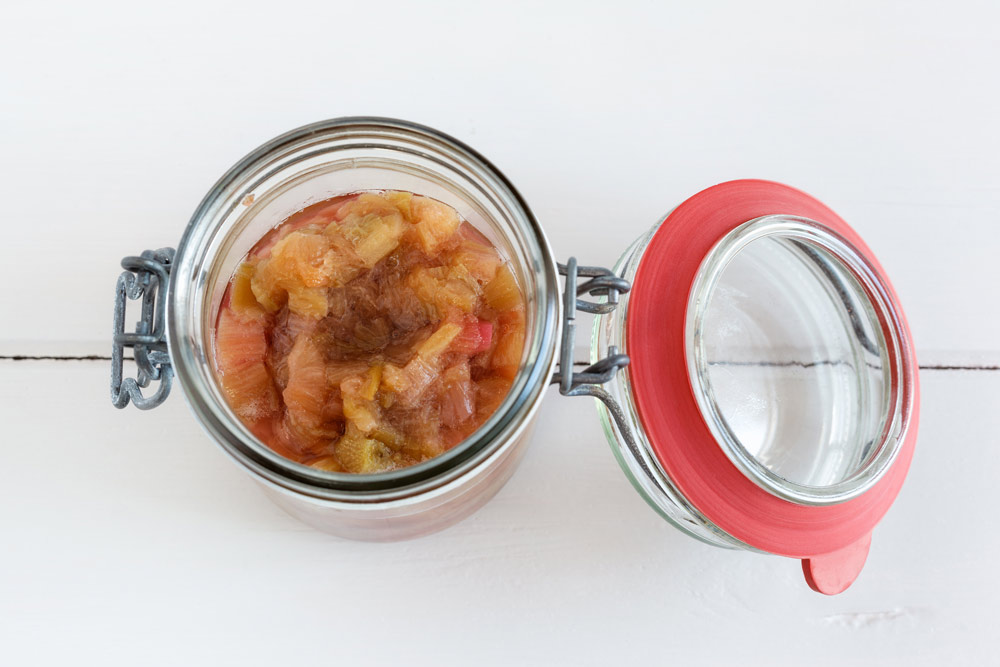
Rhubarb Compote
Plan Z Phase: This is a Z2 (ZReduction) recipe.
Servings: Serving size is 1/3 cup
Ingredients:
- 1 pound of fresh rhubarb, chopped. Frozen would work, too. Make sure there is no sugar added.
- 1 cup of water
- 5 tsp of Truvia
- 3 tsp of organic vanilla
Instructions:
Put all ingredients in a medium sauce pan. Cook on medium until it gets to the texture you like. You can cook it til it’s soft and chunky or keep right on going until it dissolves to mush.
Enjoy!
Cheers,
Apple Pie Filling
Plan Z Phase: This is a Z2 (ZReduction) recipe contributed by Plan Z dieter Amy.
Servings: Serves 2
Ingredients:
- 2 apples, chopped - I left skins on
- 3/4 cup water
- 2 tsp apple pie spice
- 3 pkts Truvia
- 3 Tbl fruit pectin
*Ingredients to make your own apple pie spice:
- 1/2 teaspoon ground cinnamon
- 1/4 teaspoons ground nutmeg
- 1/8 teaspoon ground allspice
- 1/8 teaspoon ground cardamom
Instructions:
Put all ingredients in a saucepan and bring to a boil over med-high heat. Boil for 5-7 minutes. Turn off heat and let sit and cool to thicken before eating.
Special note:
We have never worked with fruit pectin in this diet. Amy came up with the idea to try it. Brilliant idea! I checked the carb content and approved it. This opens up a whole new world of opportunity for thickening.
Enjoy!
Cheers,
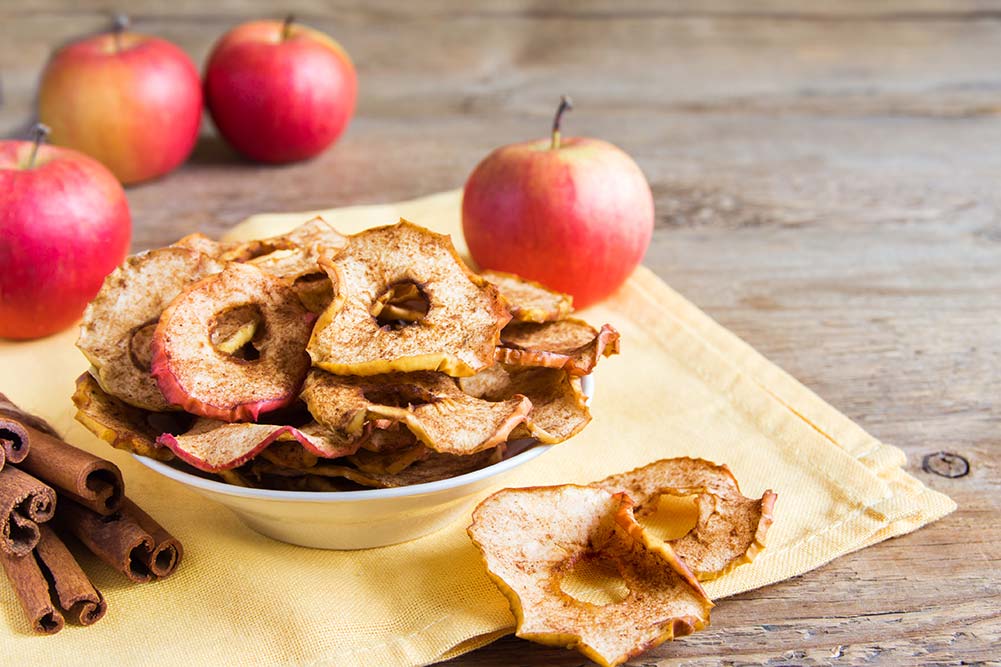
Apple Chips
Plan Z Phase: This is a Z2 (ZReduction) and Zola to GO! recipe from the creative mind of ZTeam member, Jen. When we were at lunch the other day, Jen mentioned how dieters miss their crunch. She wondered if we could come up with a recipe for apple chips.
I will tell you they worked. They are crunchy if you eat them quickly. If you let them sit overnight they become chewy. Still good but not crunchy.
With this recipe be careful with your portions. Be sure not to eat too many.
I like the ones cut with the apple placed on its side. I feel those look the most like potato chips. The rings are fun, too. Use any kind of apple. I used Granny Smith for the chip style and Golden Delicious for the rings.
Servings: Serves 2, serving size one apple maximum
Ingredients:
- 2 apples. Don’t bother to peel them.
- 2 tsp of ground cinnamon mixed with
- 2 tsp of Truvia
Instructions:
Preheat oven to 250 degrees.
You’ll want to slice your apples very thin or they won’t get crunchy. To do this I used my mandolin slices and set it on level 1 which is the thinnest setting. Without a mandolin slicer, this will be tricky but you can get them fairly thin by hand, too.
Take out 2 cookie sheets. Cover each of them with a piece of parchment paper. Without the parchment paper, the apples will stick terribly.
Place your apple slices on the paper. Try not to have them touch each other unless you don’t mind them sticking together, but they are easy to pull apart. Each cookie sheet will probably hold one apple portion.
Sprinkle the top side with the flavor mixture. I put mine in a leftover shaker jar so it sprinkled on very evenly. Don’t worry if it’s a bit messy. They will still taste great.
Put the cookie sheets in the oven and bake for 2 hours. Watch them for the last few minutes to make sure they don’t burn.
Serve hot or cold.
I can see all kinds of flavors. You can use nutmeg for another sweet flavor. You can use cumin for an East-Indian version, use cayenne for a spicy version. You can even use the barbecue rub and make barbecue-flavored apple chips. Use your creativity to find flavors you love.
Enjoy!
Cheers,
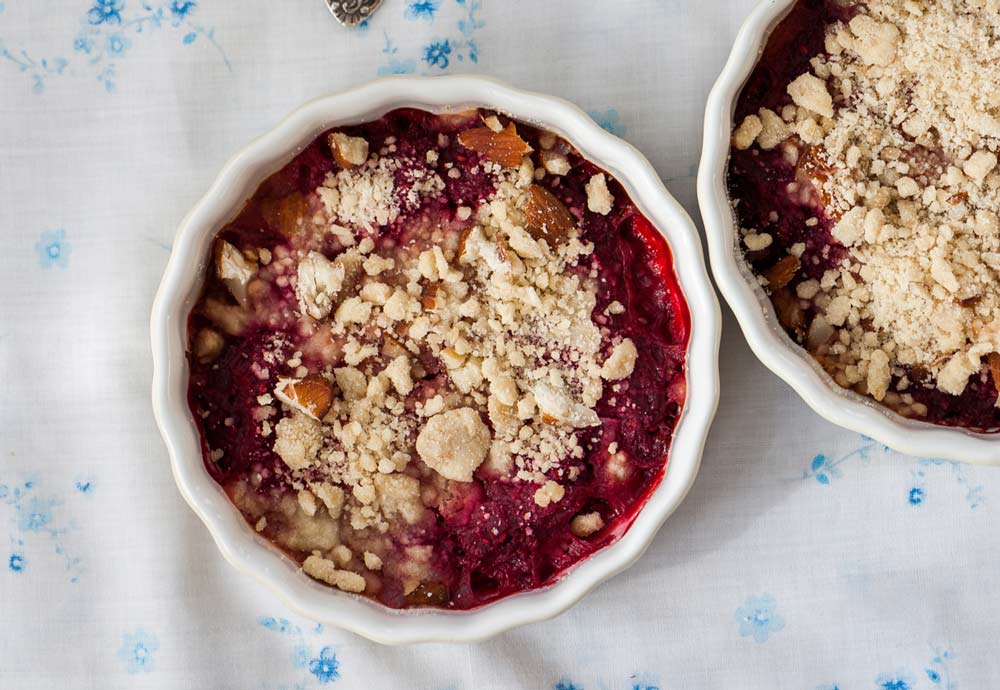
Hot Strawberries with Crumb Streusel
Plan Z Phase: is a Z2 (ZReduction) recipe. It’s not often I come up with new desserts in ZReduction so look this one over carefully. It’s yummy. Hot strawberries with a crumb streusel.
Servings: Serves 1
Ingredients:
- ½ cup of strawberry slices
- 1 Tbl of plain breadstick crumbs*
- ½ tsp of Truvia or to taste
- ¼ tsp of vanilla powder
Instructions:
Put the strawberries in a small, microwave proof dish or ramekin.
Sprinkle part of the Truvia on your berries.
Mix the other Truvia with the crumbs and vanilla powder**
Sprinkle the breadstick crumbs (streusel) on top of the berries.
Microwave on high for 1 minute.
Let cool slightly and eat.
*Be sure not to eat your full portion of breadsticks on the day you eat this so you have allowance for this part of your dessert.
**If you don’t have vanilla powder you can stir a bit of vanilla extract into your berries.
Enjoy!
Cheers,
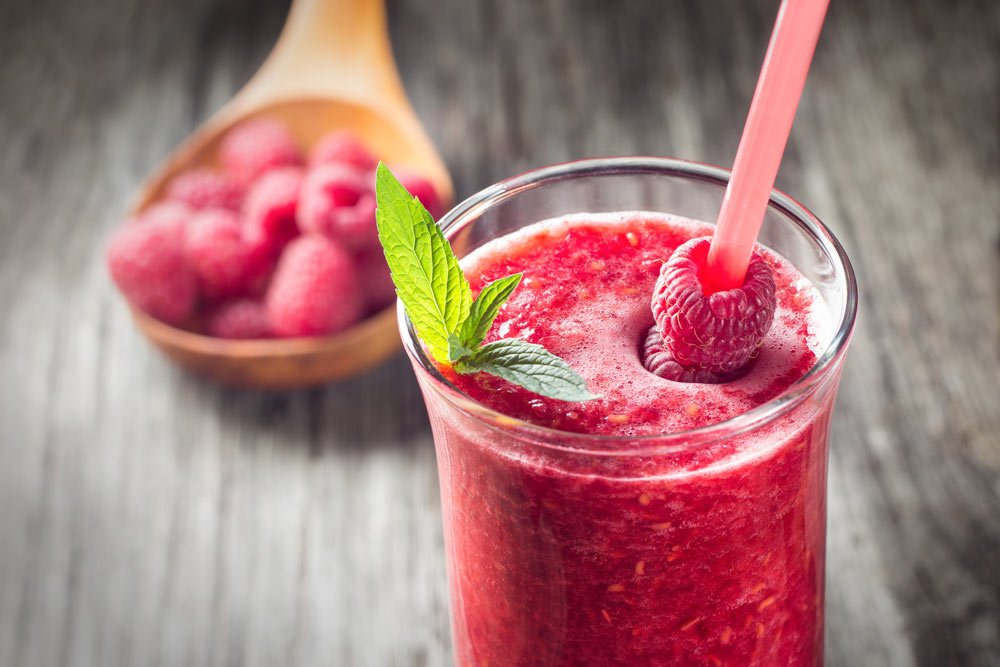
Raspberry Smoothie
Plan Z Phase: This is a Z2 (ZReduction) recipe contributed by Plan Z dieter Linda. What a great idea! She came up with a YUMMY Raspberry Smoothie.
Servings: Serves 1
Ingredients:
- 4-5 ice cubes
- 1 cup of raspberries
- 1 Tablespoon of Lemon juice (optional)
- 1 Packet of Stevia
Instructions:
Add 4-5 ice cubes to a blender and grind them until they are the consistency of a snow cone. Add raspberries, lemon juice and stevia and blend until smooth.
Enjoy!
Cheers,
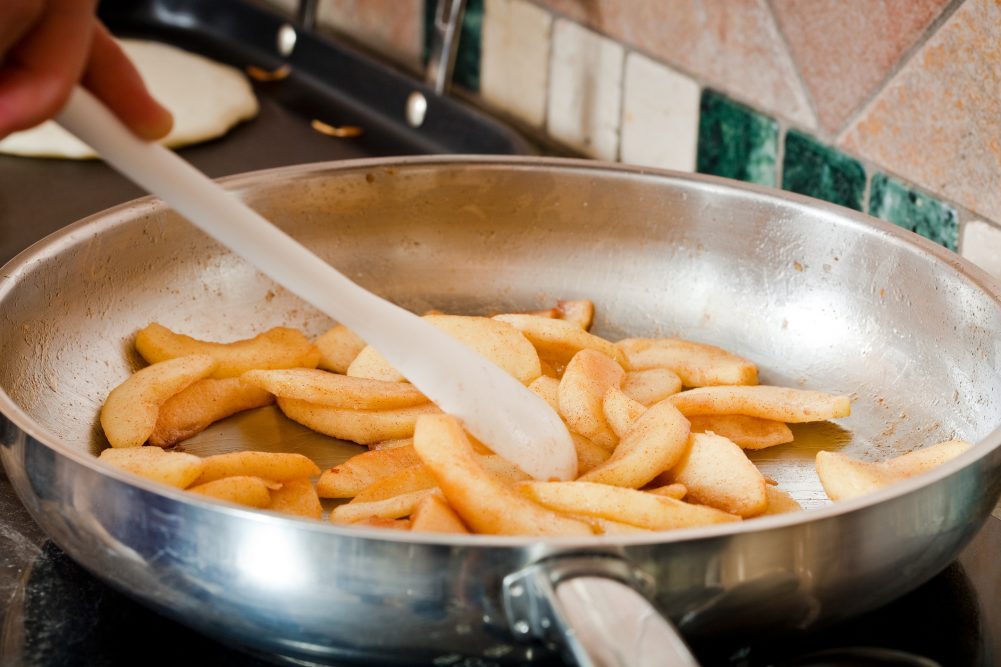
"Fried" Apples
Plan Z Phase: This is a Z2 (ZReduction) recipe submitted by Plan Z dieter Dave. He calls it "apple pie sans the crust!"
Servings: Serves 1. Can easily be doubled.
Ingredients:
- one Honeycrisp apple, thinly sliced – skin on
- olive oil cooking spray
- lime flavored sparkling water
- 1 tsp of Truvia
- 1/4 tsp cinnamon
Instructions:
Spray a little olive oil cooking spray in a non-stick pan. Fry the apple slices on a medium-high heat until they start to become transparent. Add 2 tbsp of lime flavored sparkling water and stir in one tsp of Truvia. Stir together at med/high heat for 30 seconds.
Place on dish, sprinkle ¼ tsp of cinnamon over apple slices, and serve.
Enjoy!
Cheers,

Balsamic Strawberries
Plan Z Phase: This is a Z2 (ZReduction) recipe. In a hurry for a ‘fancy’ dessert? Well, it’s really not fancy but it tastes different and tastes gourmet so most folks would call it fancy. And super simple. Enjoy them plain or look for serving suggestions below.
Servings: Serving sizes vary per person.
Ingredients:
- 1 lb of ripe strawberries, hulled and cut in half or quarters (depends on how big they are)
- 2 tsp of Truvia (or to taste)
- 2 Tbl of good balsamic vinegar
Instructions:
Put all ingredients in a bowl and stir. See how easy this is?! Then just wait 1 – 3 hours for the juices to develop and serve. You can store them in the refrigerator.
Z2 - My first suggestion is just serve them plain, in a pretty cup or glass
Z3 - Second suggestion is to serve them over the almond pound cake recipe. That takes more time to bake but it’s also an easy recipe/
Z3 - Third suggestion is to serve them over ice cream. I get SO Delicious brand vanilla ice cream. It’s made with coconut milk instead of cow milk. It’s only 19 grams of carbs per serving. My serving is 1/3 cup of ice cream and pile on the strawberries. In the old days it was a big bowl of ice cream and just a few strawberries. Times have changed. Reverse your old habits.
Z3 - Fourth suggestion would be to serve these with the flourless chocolate cake. FANCY! And decadent.
Z3 - Fifth suggestion would be to serve them over Truvia-sweetened yogurt or Truvia-sweetened cream cheese.
Enjoy!
Cheers,
Apple “Almost” Pie
Plan Z Phase: This is a Z2 (ZReduction) recipe. This is an amazingly satisfying dessert. Close your eyes, chew slowly, and you can almost imagine that you are eating real apple pie.
Ingredients:
- 1 apple sliced
- 1 tsp of Truvia
- a sprinkling of pumpkin pie spice
Instructions:
Slice your apple into thin slices. Skin stays on.
Sprinkle on the Truvia and the pumpkin pie spice and toss around. Eat with your fingers and lick those same fingers as you go.
Have a cup of coffee with this, or a cup of tea and you have a relaxing experience.
Enjoy!
Cheers,
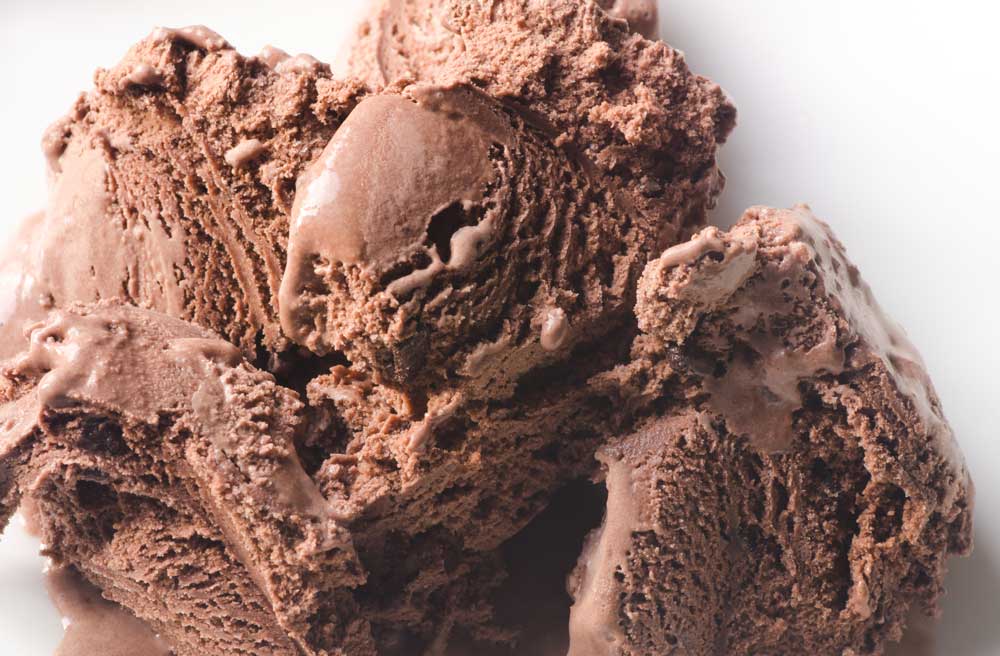
Mocha Ice Cream
Plan Z Phase: This is a Z3 (ZReboot) recipe that is one decadent recipe. It’s almost adult it’s so good. Make this for a dinner party or family gathering and you’ll be a hit. Eat it FRESH. This kind of ice cream freezes HARD. If you have leftovers (not likely) you can freeze them in a heavy container but let it sit on the counter for 15 minutes to loosen up before you try to serve it.
Servings: Makes about a quart
Ingredients:
- 8 oz of chocolate. 70% cacao or higher. The higher the number the more bitter the chocolate is and less sugar.
- ¼ cup of strong brewed coffee, HOT (you can use decaf if you want)
- 3 cups of whipping cream
- 4 tsp of Truvia
- 3 Tbl of instant coffee granules (you can use decaf if you want)
- 4 egg yolks
Instructions:
Chop the chocolate finely. Pour that and the hot coffee into a small bowl and stir so the chocolate melts. Set aside.
Bring whipping cream and 3 tsp of the Truvia as well as the coffee granules to a boil in a heavy sauce pan over medium-high heat. Stir until coffee and Truvia dissolve. It won’t take long.
Beat the yolks and the last tsp of Truvia in a bowl until pale yellow. An electric beater set to a high speed for two minutes should do it.
Then turn the mixer on low speed and slowly add the hot cream mixture to the yolk mixture. Don’t go too fast or it can curdle.
Transfer back to the sauce pan and cook on medium heat stirring pretty much constantly until the mixture begins to thicken. You can tell it’s thick enough when it coats the back of the wooden spoon. Remove from heat and immediately stir in the chocolate mixture.
Put in your refrigerator for 2 hours to chill it.
I get out the ice cream maker as someone else cleans up the dishes. See how I got out of that work?! Ha!
Then I add the cooled mixture to the ice cream maker and follow instructions. My ice cream maker has fresh ice cream done in about 20 minutes. I serve it immediately.
Cheers,
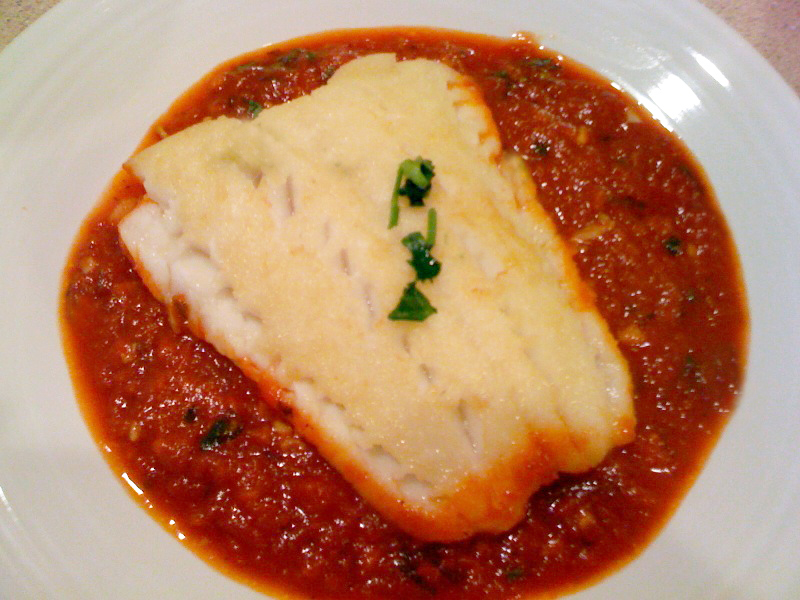
Sea Bass alla Fiorentina
Plan Z Phase: This is a Z2 (ZReduction) recipe that is easy to make.
Servings: Serves 4
Ingredients:
- 4, 6-8 oz pieces of sea bass (or other meaty white fish).
- sea salt and pepper to taste
- favorite fish rub with no sugar (to taste)
- olive oil spray
- 28 oz of crushed tomatoes in a can. (no sugar)
- 3 garlic cloves minced (3 tsp of jar garlic will work for this recipe)
- ¼ tsp of cracked pepper flakes (or to taste … and optional)
- 1 – 2 tsp of Italian seasoning blend
Instructions:
Preheat your oven to 400 degrees.
Lightly spray the fish with olive oil spray. The dust the fish rub on top of the fleshy side of the fish. Sprinkle with salt and pepper too. Let sit for a few minutes.
In a sauté pan lightly spritz with olive oil spray. Put the fish in flesh side down. Sear the fish for 2 minutes on medium high to get a nice crisp coating. Then turn over. You can finish the fish in that pan or do what I do. I put the fish in the oven at 400 degrees and roast it to finish it up. That will require a pan that can handle high heat (I use cast iron), or transfer the fish from your pan to and ovenproof 9" x 13" pan.
I roast the fish for approximately 15 minutes. The exact time depends on how thick the pieces of fish are. You can tell it’s done when it starts to crack on the top or you can take a knife and check to make sure it’s not translucent in the middle.
While the fish is in the oven you can make your sauce. In a medium sauce pan add the crushed tomatoes, garlic, cracked flakes and Italian seasoning. Cook on medium high until it bubbles and then turn it down and just let the flavors meld until the fish is done.
Garnish with fresh basil cut into strips if you like, just to add more color. This is a simple yet fabulous flavor. Sea bass tastes like it’s been soaked in butter. So yummy and special when you’re on Plan Z. Sea bass comes with a high price however so be prepared budget-wise. Or you can do this dish with other types of white fish. Tilapia, snapper, and many more will work. You just need to adjust the cooking time because most of these fishes are not as thick.
Cheers,
Blackened Sea Bass with Cayenne-Dusted Leek Rings and Heirloom Cherry Tomato Salad with Balsamic Reduction Drizzle
Plan Z Phase: This is a Z2 (ZReduction) recipe and is the current winner for recipe with the longest title!
Servings: Serves 2
Ingredients:
- 2, 6-8 oz pieces of sea bass
- blackened fish seasoning
- 2 large leeks cleaned and cut into quarter-inch rings. White part and very light green part only.*
- olive oil spray
- cayenne to taste (optional)
- 2 cups of quartered cherry tomatoes (the heirloom ones are just more colorful)
Instructions:
For the Balsamic reduction**
Set oven to 400 degrees.
Take your cut leek rings and separate them into individual rings. The last bits in the middle get difficult to separate so just put those on the sheet as a bit of a blob. That’s fine. Lightly spray a large cookie sheet and place the rings on top. Scatter them around and grate sea salt over the top. Roast the onion rings for 15 minutes or until the edges begin to blacken on the outermost ones. Remove from oven and every so gently sprinkle with cayenne to give them zip.
While the onion rings are roasting…
Dust your sea bass pieces with a nice coating of blackening spices on the flesh side only.
Heat a cast iron pan (if you have one, or other high-heat resistant sauté pan) with a light spray of olive oil. Put the fish in the pan spice side down. Sear on medium high for 2 minutes. Gently turn the fish over. At this point, if you DO NOT have a pan that can handle a 400 degree oven, transfer your fish to an oven-proof baking dish. Otherwise you can transfer the fish in the cast iron pan to your oven.
Roast the fish in the 400 degree oven for 8 – 9 minutes or until the fish easily flakes off of the bottom skin and does not have any translucency left.
While the onion rings and the fish are roasting you can assemble your salad.
Place the quartered tomatoes on a plate and grate with sea salt. Drizzle on some balsamic reduction instead of salad dressing. If you do not have balsamic reduction you can use any Plan Z approved salad dressing. Just a couple of tsp will be enough.
Special Notes:
*Cleaning Leeks. Messy devils they are. They always come with mud attached. Rinse the leeks. Then cut off the white roots. Now, take a sharp knife and slice vertically through the top later of leek and separate it from the rest. You’ll probably see mud. Then rinse the whole leek thoroughly. Cut your rings and discard the green parts. DO NOT put the leek garbage in your garbage disposal. If you do, it won’t be long before you will be calling a plumber.
**Balsamic reduction. Balsamic reduction is very easy (yet tricky) to make. All you need to do is put a bottle of balsamic vinegar in a sauce pan. Gently boil it down until only syrup remains. The balsamic vinegar will become thicker. Stop and let it cool. I’ve made the mistake, at the end of the process, of looking away and then burned it. If you spent $12 on your vinegar that will really aggravate you, so be careful. The results are well worth it! I use a bit of a drizzle on so many things. It’s a rich taste.
For storage, I buy one of those old-fashioned bottles with the pointy top and cut it off. Sort of like an old ketchup bottle that you see at restaurants. The easiest place to pick one up is a hair care/beauty supply store. Stylists use them for dying hair. They are nice because you can cut just a bit off the closed top so you have a very narrow drizzle and can control the amount. If you are not that into cooking, and this looks like a craft project instead of cooking, just ignore me and use dressing. This stuff stores very well in your refrigerator for quite some time. Just don’t put it in the bottle until it’s completely cool or you’ll melt the bottle.
When ready to plate your food:
Dieters get one half cup of cherry tomatoes and a heaping helping of onion rings. Or a larger portion of cherry tomatoes and very few onion rings. My dining husband LOVES the onion rings. Extra onion rings can be saved and re-heated. Cherry tomatoes can be saved, too. Everyone gets to eat a full portion of fish.
Enjoy!
Cheers,
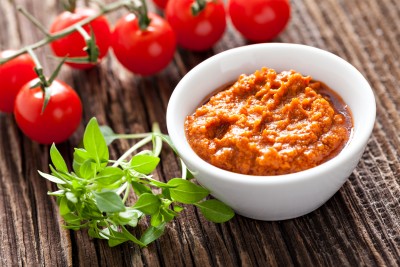
Pizziola Sauce
Plan Z Phase: This is a Z2 (ZReduction) Recipe. This is a great Italian sauce that you can serve with steak, chicken or fish. You can eat it warm or cold.
Servings: Serves 2. Can easily be doubled. On Z2 a quarter cup will count as part of your veggie portion.
Ingredients:
- 1 shallot minced
- 2 garlic cloves, minced
- 2 Tbl sundried tomatoes, minced (dry ones NOT the ones packed in oil)
- ½ cup of diced tomatoes (from a can of diced tomatoes)
- 1/3 cup of juice from the can of tomatoes. If you cannot get 1/3 cup from the can, make up the difference with water.
- 1 roasted red pepper, diced (make sure the jar you buy has the peppers packed in water; not oil). Rinse before you dice.
- 1 Tbl of fresh basil shreds (chiffonade)
Instructions:
Put all except the basil in a sauce pan. Stir. Let the flavors meld for 15 minutes. Then:
Option 1: Heat and just before serving add the basil
Or
Option 2: Heat lightly and cool. Then add the basil and serve.
Leftovers store well in the refrigerator for another meal.
On ZReboot you can serve this over an omelet or scrambled eggs, too.
Meal Plan: Serve with steak, chicken or fish. Simply grilled on your grill pan with salt and pepper.
Then add a large salad made with romaine lettuce and other veggies. Use the balsamic-pesto dressing.
Or serve with a sliced tomato with raw onion rings and the balsamic-pesto dressing.
For Zola To Go: You can grill your meat or fish in advance. Store the sauce in a separate container and pour it over your entrée when you go to eat it. This is great on cold meat so you don’t have to reheat your meat before you can eat. Perfect for a picnic, too.
Enjoy!
Cheers,
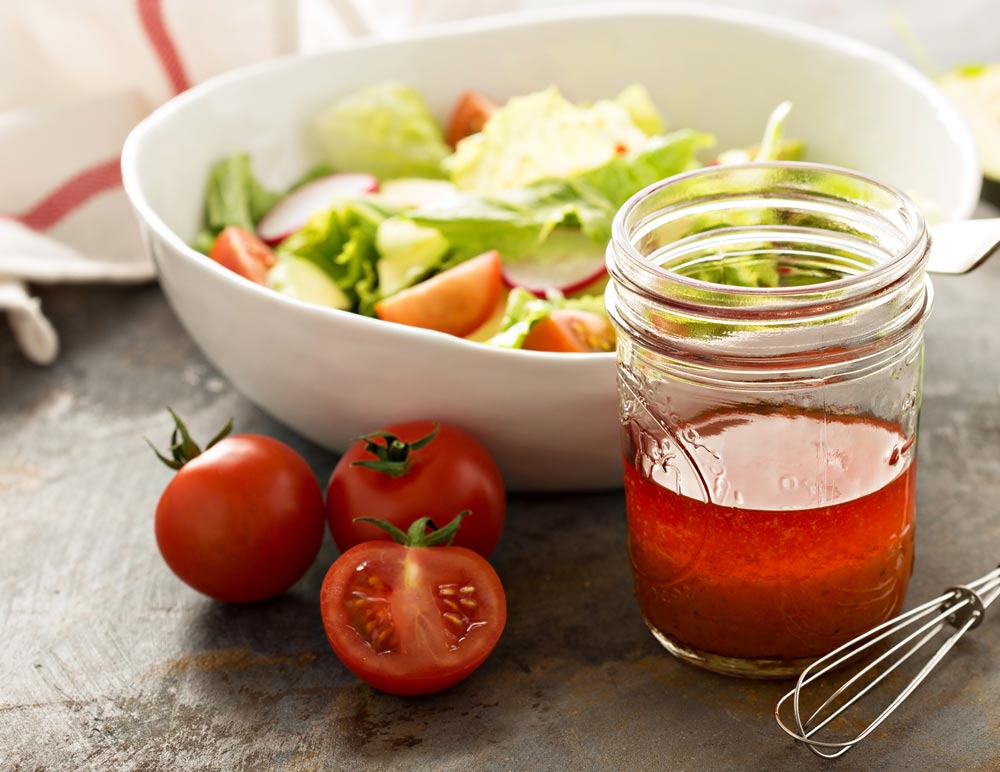
Fresh Tomato Dressing
Plan Z Phase: This is a Z2 (ZReduction) recipe. This creative dressing comes to us from Plan Z dieter Maria. This is perfect for those who want a dressing that has more thickness. Love it! Big YUM!
Ingredients: 6 - 8 servings
- 1 small tomato, chopped up
- 2 Tbl of organic vegetable broth
- 2 Tbl of red wine vinegar
- 2 Tbl olive oil
- ¼ tsp of sea salt, grated
- ¼ tsp of ground black pepper
- 1 Tbl of chopped chives (fresh)
- 1 tsp of oregano (fresh)
Instructions:
In a blender, whiz all of the ingredients except the chives and oregano. Add the herbs after blending so they stay intact. If you must use dried herbs you will reduce the amounts to your taste or you can add 1 tsp of dried Italian seasoning and go with that.
One portion of dressing is 2 Tbl maximum.
Keep in mind that this is fresh dressing so it will last about a week in a closed container in your refrigerator.
Enjoy!
Cheers,
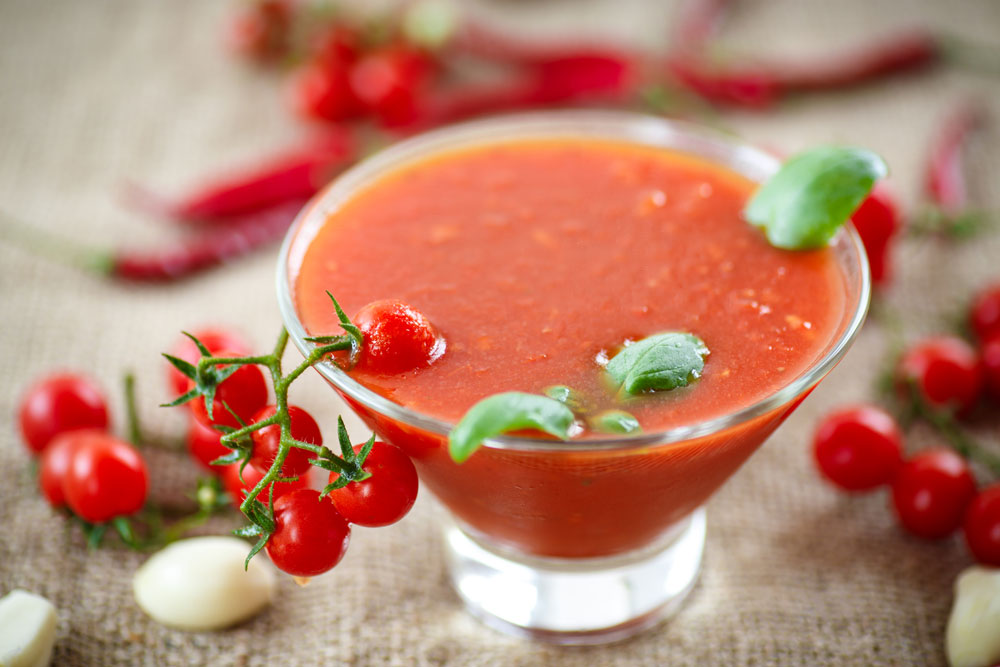
Bloody Mary Dressing
Plan Z Phase: This is a Z2 (ZReduction) recipe. This dressing is really good. If you like Russian dressing you might consider this Russian dressing’s cousin. Just whiz it up and pour it on.
Servings: 2 Tbl is one serving (or less if you don’t need that much)
Ingredients:
- 4 Tbl of Worcestershire sauce
- 1 cup of chopped canned tomatoes
- 1/3 cup of chopped onion
- 1/3 cup of vinegar. I used balsamic but you can use your favorite. Apple cider would make the dressing a bit sweeter or red vinegar will work, too.
- 1/4 cup of water
- 2 Tbl olive oil
- 1 tsp of celery salt
- ¼ tsp of nutmeg, ground
- 1 tsp of Truvia
Instructions:
Put this all in a blender and whiz until smooth.
Fresh dressings like this one won’t keep in your refrigerator like a bottled dressing. I’d say it’s good for 4 – 5 days and then it might begin to spoil so use it up fast.
Enjoy!
Cheers,