Cookie Mission
When I was just a tween there was another war going on. That one was the Vietnam War.
My brother-in-law was in the navy. He was stationed on the aircraft carrier named after John F. Kennedy; our slain President. The “JFK” (as they called it) was sent to the Mediterranean Sea so it would be closer to Vietnam if it was needed for any action.
Paul was expected to be floating around the Mediterranean Sea with thousands of other sailors for over a year.
At that time, I was really big into making cookies. My specialty was chocolate chip, and I followed the recipe on the bag of chips precisely each time. I usually spent my afternoon on Saturday or Sunday making chocolate chip cookies; especially in the winter.
I got what I thought was a magical idea. I decided all 4000 of those guys stationed on the JFK deserved a cookie. I wanted to make enough cookies so they could all get one.
When I took my idea to my mother I was not surprised when she said, “Sure. Bake away.”
I now know I should have been VERY surprised my mother said yes. She actually funded the Cookie Mission. I can’t imagine at this point what that cost her. The chips, all the other cookie ingredients, the boxes and the postage! Maybe she thought I’d never go through with it. She was wrong.
I got my first batch of supplies and went into my baking project. I baked all weekend. As each batch cooled, I would box them up. Several batches fit into each box.
The second weekend I invited one of my friends to help. The third week I asked a second friend to help. After about 4 weeks of this, my friends started finding excuses not to come help.
My family was probably sick of our whole house smelling like chocolate all the time, but they didn’t say anything. The entire dining room was taken over by my boxes, my shipping supplies and piles of boxes of cookies.
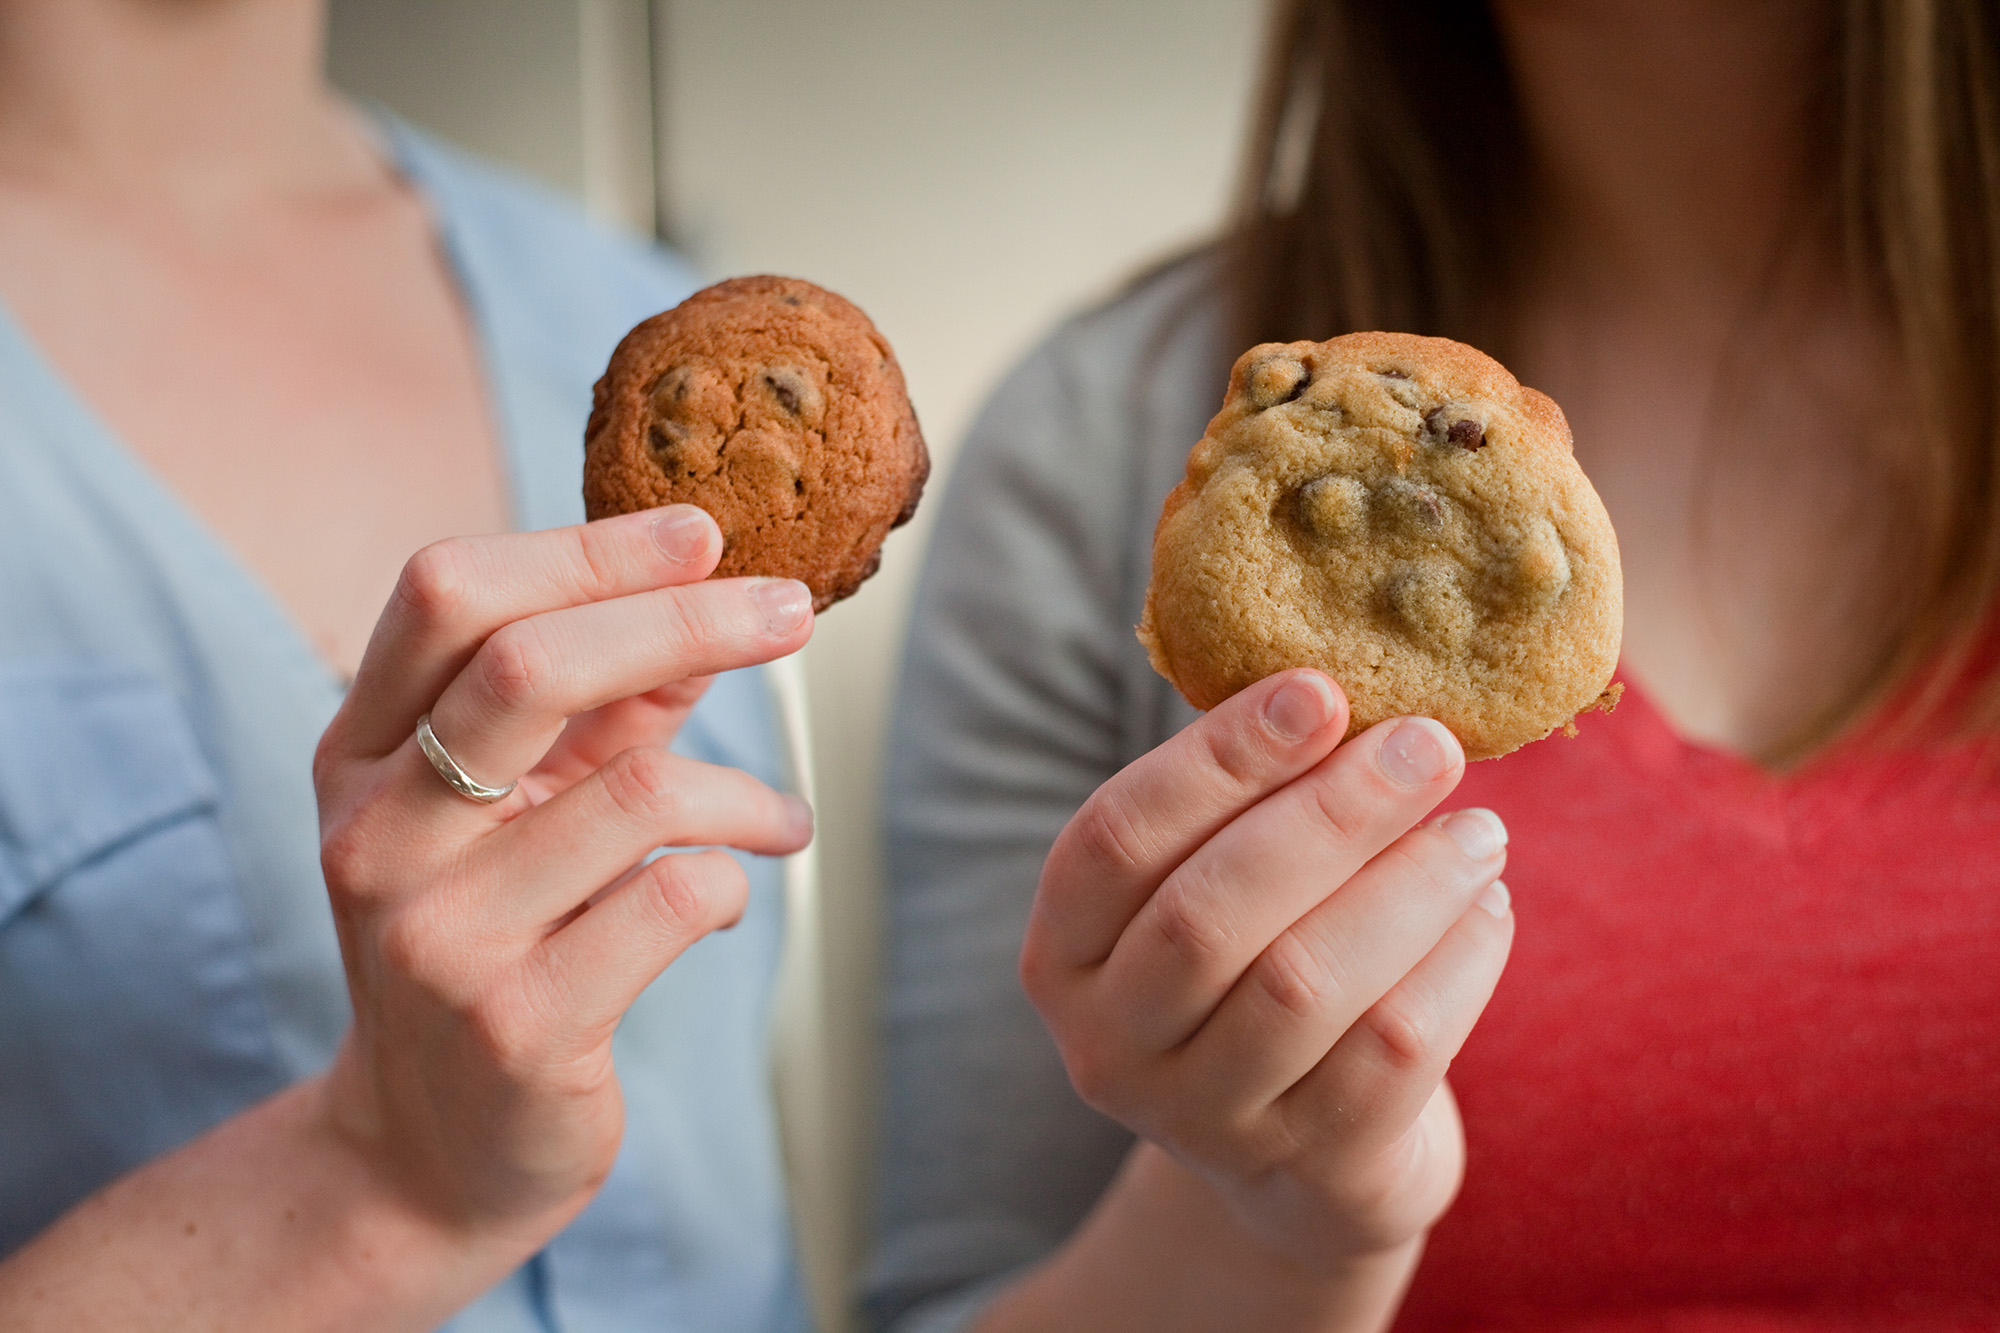
My favorites of the cookies were the “medium rare” ones. When one batch came out of the oven a little too dark, I was about to put it in the trash when my mother stepped in. She barked at me. “Put those cookies in the box. You are not throwing any of them out!”
My mother had driven me to the post office several times to ship off my cookies. She never complained.
At some point I quit counting the cookies.
And then it just stopped. Cookie production ceased.
The novelty had worn off and I convinced myself I had baked and shipped enough cookies to cover all the guys on the ship.
Months later I received the single thank you note I got for sending all those cookies to the JFK. The thank you note came from the guys who worked in the engine room on the massive ship. It was really funny because those are the guys who got the cookies I thought were burnt. They worked in a dirty engine room and they loved the cookies that were (in my opinion) overcooked. They even said in their note that they especially liked the “dark ones.” Dark cookies for dirty guys. Hmmm. Is there some kind of connection?
Decades later I think back on all the crazy projects, big and small that my mother supported. And when I think of them, and her, I smile.
Cheers,

We are going HOME!
Now for the news we have all been waiting for….
We are going HOME!
We got the approval.
The cardiologist said, “Fly, Fly, fly away!” (In case you haven't heard about Chris' diagnosis you can read about it here. And you can read about his amazing progress and RECOVERY here.) What a wild ride!
The urology surgeon said, “I’m so proud. You were so brave. You have come so far. You are cancer-free. Go home.”
Now for some details:
We will pack up and leave here soon. We are not running out the door because of ME. I decided for my own mental health I needed some time here to chill and try to enjoy the best Nashville has to offer. Otherwise, I was going to go home complaining about the Nashville traffic and all the stress. I want to build some happy memories on top of the other garbage so I can walk away with energy instead of exhaustion. We both deserve this. So, we will be going to restaurants we have put on a “must-do” list. Two days ago, we toured the Cheekwood Gardens before the tulips got wiped out (see pics). We are looking at the weather report and planning to go to a Nashville Sounds baseball game. You can probably guess that one leans a little more toward Chris’s (VP Anger Management) wish list, but it was a joint idea. We will take more long walks in lovely parks and maybe tour a museum or two. We plan to gather one more time with Chris’s cousins for a rousing game of Quiddler.
And more…
Our hotel-apartment has become a bit of a second home. I will miss it. The people who run this place and work here have become dear friends. They have taken care of us through all the tough stuff. They were especially supportive of me. My rocks and cheerleaders. The support could not have been stronger. If you ever journey to Nashville, you HAVE to stay at Bento Living. This place is amazing. We will be back every six months because Chris wants to meet with his urologist face-to-face for his checkups. He loves that guy. We will be able to meet with the cardiologist in Chattanooga. He’s built a new clinic there and comes twice a month.
Chris does have some restrictions.
He can’t lift more than 10# for six weeks. He could get a hernia or split his internal stitches if he does.
We had talked about taking a more exotic trip in later May. Time off to re-energize. The cardiologist put the nix on the barge river cruise in Europe. He wants Chris to stay in the US for at least six months; just in case. We will find something to do…count on it.
Other than that… he can walk for workouts (me too) until he can lift more weight or do core work.
Chris does have to take a few meds – probably for a year or so until all settles in. He has always prided himself on “no meds – just supplements” but he’s had to get over that. We are waiting on one more blood test result for his kidney function, but no one is worried.
We will look forward to getting back to the green and peace of Chattanooga. Can’t wait to see some friends there too. And our employees. They have been heroic in keeping all glued together and serving over 7000 clients like it was easy.
We are hoping to take our kitty Titan home. Titan is taking a new med starting today that’s considered a last-ditch effort. Fingers crossed.
Chris managed to get himself written up in the paper recently. The PR folks from the hospital originally called him because the staff at the hospital called him an exemplary patient. Chris was just being himself…being nice and a patient patient while he was confined to his room for weeks on end.
Instead of talking about his attitude, they decided to write up his whole journey of having the Afib heart issues and then finding out he had cancer and how he got through it all. You can read the article here.
Thanks for listening through all of this. I took great comfort in knowing we had all of you on our side.
Cheers!

All Clear

The Update on Chris Lytle, VP Anger Management
So many of you dieters have been concerned about Chris and keeping tabs on his progress. I thought I’d offer this major update.
On St Patrick’s Day Chris was released from the hospital. I fed him and his brother meatloaf made with my mom’s recipe, mashed potatoes and corn. If you’re not going OUT to celebrate you might as well savor staying in -- eating Irish comfort food.
Over the next weekend it was pretty much basketball all day and evening. Chris was in pain if he burped or hiccupped, so we laid low. Most of our chosen teams lost. So much for our NCAA bracket.
Then, just this week…
Drum roll please…
We got a call from the urologist. Chris has been officially declared CANCER FREE. The pathology is completely CLEAR. The surgeon suggested Chris go have a beer (at 10AM). – Sounds like St. Patrick’s Day to me!
He asked Chris to go 4 -6 weeks without any core workout to let the internal stitches heal. He can walk… and walk we will.
Then he will be surveilled every six months for 5 years. They don’t expect anything to come back. If a stray cancer cell got into this bloodstream, they are ready to catch it early, but his margins were completely clear. No need for chemo, radiation, or anything else. This magic was completely done through robotic surgery! And a very talented human being who says, “I cut good and I sew good”. He’s a dream surgeon.
He told Chris, “Go back to your life”.
And another gift….
Another drum roll is in order…
Chris had an echocardiogram to follow up the surgery. You might remember that his heart was performing at just 10% capacity in December. The Echo measures the EF (ejection fraction) which is the efficiency number. 10% is BAD.
They had a bet in the OR on what his new number would come in at. The surgeon won his bet. Chris’s EF is now over 50%!
That’s normal! Chris’s heart is back to NORMAL! No Afib. No pump needed. Rising to 50% in a guy who was as sick as Chris was is pretty much unheard of. “Impossible” they said. But here we are.
We have to wait to hear the “official news” from the cardiologist, but the urologist read the report. No one runs 100%. 50% is amazing for an adult male --let alone one who’s over 70 years old.
We have two follow up appointments in early April. Then we just might be able to get back to Chattanooga.
March 23 was our three-month anniversary of our arrival in Nashville for the journey this has been. And what a story we now have to tell. The whole odyssey was just under 4 months.
I’m starting to plan that trip that will replace all the holidays we missed. ‘Probably won’t get too exotic considering the state of the world these days but we will definitely begin to breathe easier now.
Thank you ALL for your support.
Whew….. long whew…..
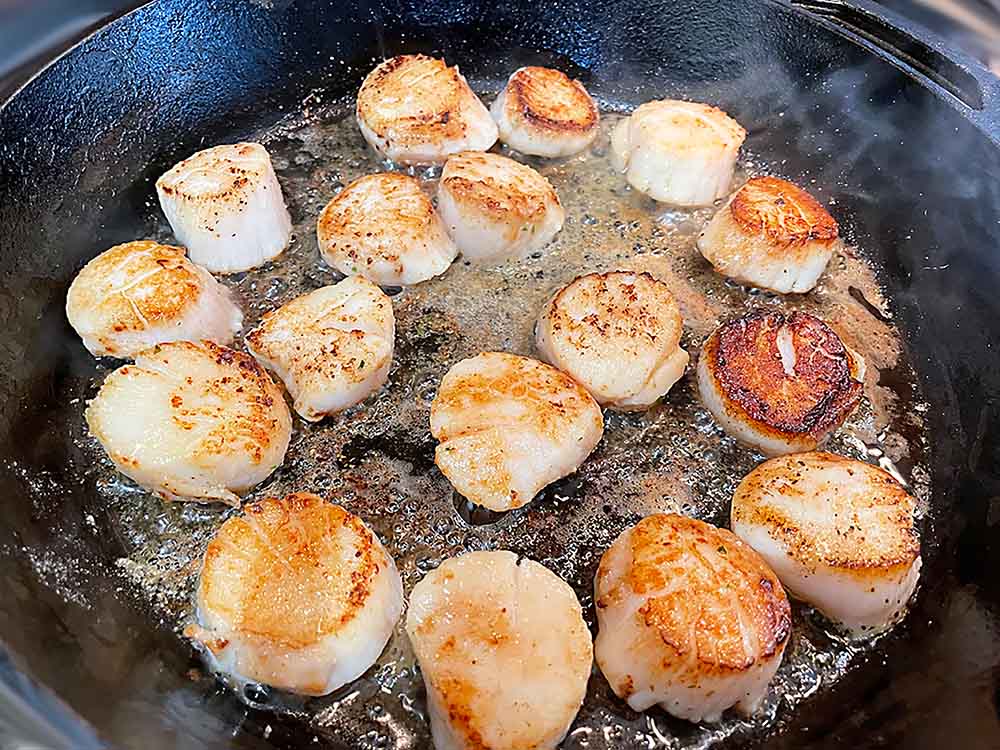
Pan-Seared Sea Scallops with Zucchini, Baby Bok Choy and Cherry Tomatoes
Plan Z Phase: This is a Z3.5 (ZReboot 3.5) recipe.
Servings: Serves 4
This dish is both spicy and sweet. I made it on the less spicy side for my current tastes but it’s easy to have a jar of cracked red pepper flakes handy for those who want to add some to the final dish to make it “hotter.”
Ingredients:
- 1/4 cup tamari or coconut aminos
- 2 Tbl rice vinegar
- 1 Tbl honey. I use a good organic honey or you can even use a product called Whole Earth Honey 50 which is honey with half the sugar.
- 2 tsp of minced garlic (jar garlic will work)
- 1 Tbl sesame oil
- 1/4 tsp red pepper flakes (or to taste).
- 1 tsp cornstarch
- 1-1/2 pounds fresh or thawed sea scallops
- Salt and pepper
- 4 Tbl peanut oil, divided
- 2 medium zucchinis. Cut off the stem end and cut the rest into 3” long wedges.
- 2 baby bok choy. Cut off the ends and cut the remainder into chunks. You can substitute 2 cups of regular-sized bok choy if you can’t find the tiny ones.
- A handful of cherry tomatoes cut in half.
Instructions:
In a medium bowl, whisk together the tamari, rice vinegar, honey, garlic, sesame oil, red pepper flakes, and cornstarch. Add scallops to the bowl or a large ziplock bag and marinate for at least 10 minutes. Keep them in the refrigerator while they marinate. Don’t marinate seafood for more than 30 minutes or it will start to break down and cook itself; like ceviche. Remove scallops but reserve marinade.
Heat a cast iron pan or heavy sauté pan on medium-high heat and add two tablespoons of peanut oil. Sprinkle scallops with salt and pepper. Gently put the scallops in the pan. Sear scallops on one side 3 to 4 minutes until golden brown. Don’t be messing with them. Leave them still. That’s how they get a nice sear (crust) on them. Flip and sear on the other side for about 2 minutes more. Add half of the marinade to the pan to coat the scallops. Turn off heat.
While the scallops are cooking you make your veggies. Use another sauté pan and add two tablespoons of peanut oil. Sauté the zucchini and bok choy until they wilt but are still a bit on a the al dente side.
Stir the other half of the marinade into the veggies. Cook until it boils and then turn off heat. Add the cherry tomatoes and toss.
Plate the scallops with the veggies on the side.
Enjoy!
Cheers,
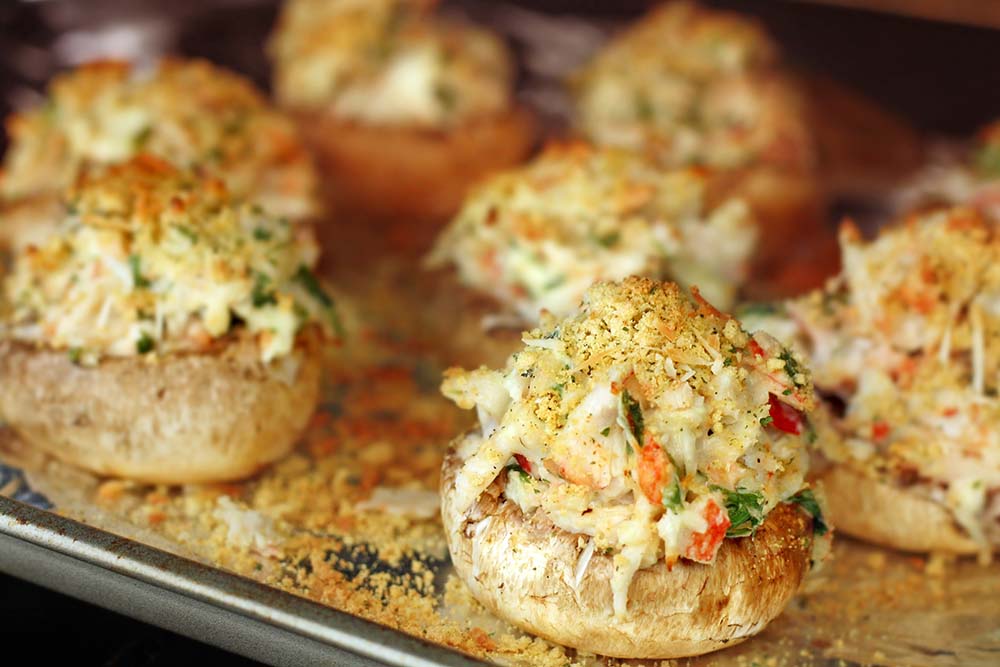
Crab-Stuffed Mushrooms
Plan Z Phase: This is a Z3 (ZReboot) recipe.
My husband found a recipe in the newspaper that he thought sounded good. He asked if I could make it. Valentine’s Day was coming so I tossed out the idea that he make it as a romantic little gesture. He agreed.
I read the recipe and didn’t think it was going to taste all that good. I decided I’d put my signature on it and make it myself in the hopes that I could add it to the collection. No credit to me, but when it was done it was delicious! I hardly changed a thing! I hope you enjoy it as much as we did. We even ate it as a light entrée and didn’t need anything else to round out the meal. A salad might be a good idea. An easy Caesar perhaps.
Servings: Serves 3 – 4 as an entrée or more using small mushrooms as an appetizer.
Ingredients:
- 1 lb of mushrooms. I used LARGE capped button mushrooms. Those are sort of a tradition in my Irish family. As an entrée the large ones are meatier and feel like a meal. You could also make this with smaller mushrooms and serve it as an appetizer or on a buffet.
- ½ cup of finely chopped onion. I used shallots.
- ½ cup of finely chopped bell pepper. I used red bell because I thought it would be prettiest and it was Valentine’s day. Any color can work or a mix.
- 2 tsp of minced garlic (jar garlic can work)
- 4 oz of canned crab meat. Claw and lump are the best. They are a little more expensive but way worth it. Buy it in a can in the canned fish aisle or by the fish department. You don’t need the BIG can of lump crab. That’s very fancy and overkill for this recipe.
- 4 oz of softened cream cheese. Use full-fat.
- 1 egg
- ¼ cup of breadcrumbs. I used panko crumbs. They are crunchier.
- 1 Tbl parsley, finely chopped
- ½ cup of finely grated parmesan plus another ¼ cup for dusting on top later
- Grated sea salt and fresh pepper to taste
Instructions:
Preheat the oven to 375 degrees and lightly spray olive oil in a baking dish.
Clean the mushrooms. Not sure how? Check out this article.
Carefully pop off the mushroom stems. I light twist them as I pull so the come out completely in most cases.
In a medium sauté pan add 1 Tbl of olive oil and sauté the veggies. Add the onion/shallots, and the pepper bits. Cook on medium until they are loosened. Add the garlic and stir. Take off of the heat.
Put the cooked veggies in a mixing bowl. You are now going to add the crab but before you do, be sure to sort of run your fingers through it to catch any leftover bits on shell that might have snuck in during the processing of the crab.
Add the crab and the other ingredients (except that last parmesan for the topping). Be sure to grate in the sea salt and pepper too. Mix with a rubber spatula until well mixed. Generously add the filling to the mushroom caps. Really pile it on and press it down so you can add even more on top. Fill all the caps. Put them in the prepared baking pan mushroom side down.
Sprinkle on the remaining parmesan and bake. How long you bake them is going to depend on the size of the mushrooms. There is nothing worse (in my book) than an under-cooked stuffed mushroom. I’d rather have them over done than under done. On average, about 25 minutes should do it. If you are unsure, you can cut one open and make sure the mushroom is completely cooked and soft. It’s not like they won’t work if they are less done. I just like them completely cooked so they melt in my mouth. Teeth hardly required.
I did use a fork and knife to cut them because they were so large. I’ll leave it up to you for how you eat them. They can be a bit messy so have napkins at the ready.
Enjoy!
Cheers,
The Little-Known Queen of the Culinary World
I worked for a woman named Marilyn Lewis in 1980. I only met her in person once, but she made a lifelong impression on me.
Marilyn and her husband Harry lived in LA. He was an actor. Actors are not always working constantly and some fall on harder times. Harry knew that and had experienced that himself.
Besides acting, Harry dreamed of opening a restaurant; one that could cater to people who didn’t have a ton of money for dining. Marilyn took on that dream, became an entrepreneur, and started a restaurant that became a successful chain. It was called Hamburger Hamlet. I worked for the Hamburger Hamlet as a manager in the Chicago location. I was practically a youngster, but they hired me anyway.
Out in California, Hamburger Hamlet started small and grew into a chain that folks in the 80’s referred to as a “nice Denny’s sort of place.” There were locations all over California by the time I came to know Hamburger Hamlet in Chicago.
But Hamburger Hamlet in Chicago was no Denny’s. It was a fancy burger place. They served other things besides hamburgers but as you’ll see if you read the longer story about Marilyn she was the one who put gourmet burgers on the map. When you eat a burger with more than LTO and cheese on it you have Marilyn to thank.
The location I worked in was an experiment in leaving California and opening the fancier version of Hamburger Hamlet. The place seated 250 people. That’s a large restaurant. It was located in a wealthy neighborhood just off of Michigan Avenue. It was lavishly decorated with wood paneling that had been taken from the finest homes in Europe. A really fancy bar held center position. The coveted table in the room was actually an elevator – a lift as the English would say -- taken from Winston Churchill’s country home in England. That one booth set Marilyn back over $1 million dollars. It seated four. Anyone who got to sit in that lift was stared at. They had to be famous… or so people thought.
Hamburger Hamlet did not take reservations. The wait was always almost an hour for dinner. Of course you had a drink in the bar while you waited.
I saw many a famous person and greeted several of them; everyone from the local TV weather man (who was an American Airlines pilot too) to actors, rich guys and sports stars. The Chicago Bears used to come in on Sundays and pack the house after a big victory. One day Billie Jean King walked in for a late lunch. I knew she was famous, but it didn’t dawn on me who she was until I looked down and saw her famous, gleaming white tennis shoes. Remember the bald guy from the 7-UP commercials? He came in for dinner once. You could hear his booming voice from one end of the place to the other. And when he laughed you could hardly hear the music. The list goes on.
I could probably write a short novel about my experiences at Hamburger Hamlet but I’m here to talk about mushrooms.
One of the things that Marilyn taught me was how to clean mushrooms. She was an absolute fanatic about it. It was not how I was taught how to clean mushrooms, so I thought she was a bit nuts. But I learned. This link is to an article on how to clean mushrooms published by Bon Appetit. This lines up with what Marilyn taught me. I will never forget that one of my first gourmet cooking purchases was a mushroom-cleaning brush. I think I still have it over 40 years later.
Writing this article makes me miss a woman I only met once. How’s that for making an impression?
Cheers,
Baked Salmon with Bragg’s Sauce
Plan Z Phase: This is a Z2 (ZReduction) recipe.
Serving Size: Serves 4
Ingredients:
- 4, 6-8 oz salmon fillets, either skinless or skin on one side
- 1 lemon halved
- ¼ cup of balsamic vinegar
- 2 Tbl of Bragg’s Aminos
- ½ tsp of Truvia
- 1 tsp of minced garlic (jar garlic will work)
- 2 Tbl of minced parsley
Instructions:
Preheat the oven to 375 degrees.
In an ovenproof pan spray lightly with olive oil spray and put in the fish, skinside down. Squeeze one half of the lemon over the fish and then cut the other half into wedges for garnish.
In a bowl, whisk the vinegar, Braggs, Truvia and garlic. Drizzle this over the fish and let the extras flow off the sides into the pan. Bake for 20 minutes or until salmon is done to your liking.
Plate this fish and sprinkle on the parsley bits.
Notes: The fat from the salmon will rise to the surface and leave a white foam look on top. That’s fine. The salmon skin is edible but I would not recommend it. It tastes very "fishy." You can use any liquid in the bottom of the pan as extra sauce.
Enjoy!
Cheers,

The Truth About Food, Inc.
https://youtu.be/wXmF_erEv1o
Have you ever wondered why it costs more to eat healthy food?
Filmmaker Robert Kenner and Michael Pollan explain this in their film, "Food, Inc." to John Dickerson.
This video clip is an interview about the film. Even though it's old (and a little grainy) it's an eye-opening 8 minutes and 38 seconds.
You can rent Food, Inc, the documentary on YouTube for $2.99. It's probably available other places, too.
You can watch it for extra credit if you so desire.
I'm not trying to turn you off of food.
But you should know that everything we eat comes at a price.
You'll either pay more for healthy, unprocessed food now, or you'll pay more for doctor's visits and meds later.
It's up to you to decide how you want to spend your dollars.
Stay angry,

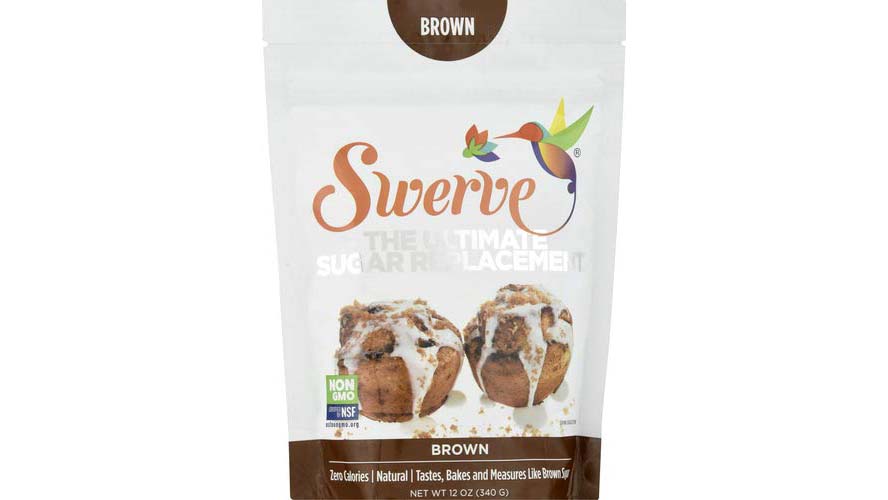
Swerve Brown (Brown Sugar Substitute)
- TASTES AMAZING: Brown Swerve is sweet and delicious. It is a natural brown sugar replacement that does not have the bitter aftertaste associated with other sweeteners like stevia and monkfruit.
- MEASURES LIKE BROWN SUGAR: If your recipe calls for a cup of brown sugar; simply replace with a cup of Swerve. Since it measures just like brown sugar, using Swerve in your favorite recipes will be a breeze.
- ZERO NET CARBS: The ingredients in Swerve do not affect blood sugar, so the carbohydrates it contains are considered non-impact.
- KETO-FRIENDLY: Because Swerve is non-glycemic, it is the perfect sweetener to use in Ketogenic recipes.
- NON-GMO VERIFIED: Only the highest quality ingredients are used.

#ad
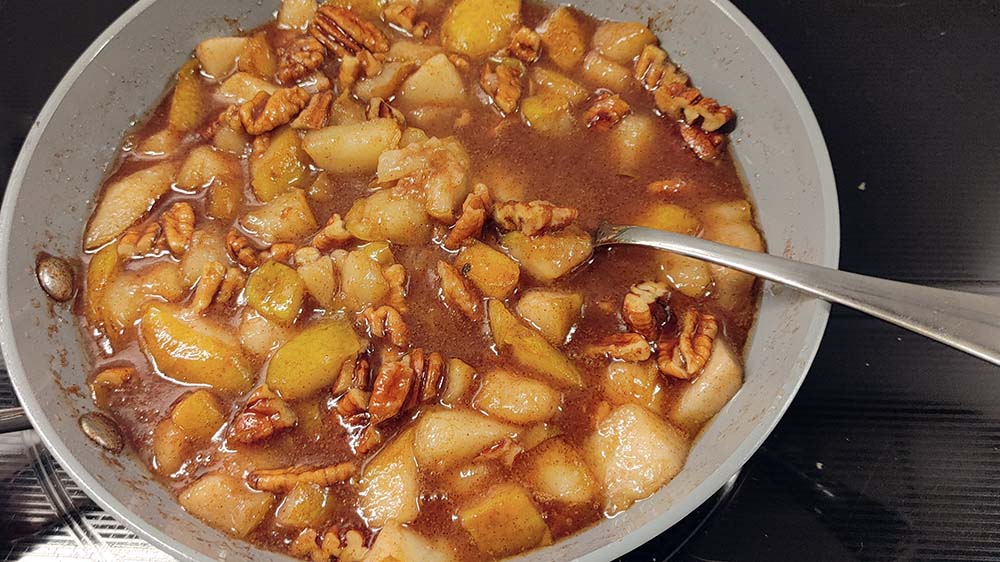
Caramelized Pears (ZReboot Version)
Plan Z Phase: This is a Z3 (ZReboot) recipe. Get the ZReboot 3.5 version with brown sugar here.
Chris’s cousins sent us a HUGE box of fruit as his get well wish. In case you haven't heard, here's what happened.
There are only two of us, so in order to use the fruit I have had to get creative! I made chunky applesauce to go with pork. I have also now made caramelized pears, so they got used up before it was too late. Oh, my, these are yummy! Serve them warm, cold, room temperature or even over ice cream.
Servings: Serves 4
Ingredients:
- 4 cups of chopped, ripe pears. I didn’t even bother to peel them. I like the extra fiber and they were so ripe I thought if I try to take a peeler to them, they’d go to mush. For me this was 4 pears.
- ½ cup of brown sugar substitute (like Swerve brown)
- ¼ cup of butter
- ¼ tsp of cinnamon (or to taste)
- pecan bits (optional)
Instructions:
In a medium sauté pan, melt the butter on medium heat. Add the brown sugar substitute. Turn up to medium high. You want to get it to melt so it won’t be grainy. Take your time. Stir a lot. Turn the heat down once it starts bubbling.
Add the pears and cinnamon. Mix them into the sauce. Depending on how ripe the pears are they won’t take long to cook. Some like them to have a bit of firmness or others like them mushy. Your choice.
Add the pecan bits before you serve (if you choose).
Enjoy!
Cheers,
Caramelized Pears (ZReboot 3.5 Version)
Plan Z Phase: This is a Z3.5 (ZReboot 3.5) recipe. Get the ZReboot version without brown sugar here.
Chris’s cousins sent us a HUGE box of fruit as his get well wish. In case you haven't heard, here's what happened.
There are only two of us, so in order to use the fruit I have had to get creative! I made chunky applesauce to go with pork. I have also now made caramelized pears, so they got used up before it was too late. Oh, my, these are yummy! Serve them warm, cold, room temperature or even over ice cream.
Servings: Serves 4
Ingredients:
- 4 cups of chopped, ripe pears. I didn’t even bother to peel them. I like the extra fiber and they were so ripe I thought if I try to take a peeler to them, they’d go to mush. For me this was 4 pears.
- ½ cup of brown sugar/brown sugar substitute. You can use ½ Swerve brown and half regular brown sugar if you want to splurge a bit. Using only Swerve will work just fine, too (that would make this a ZReboot recipe).
- ¼ cup of butter
- ¼ tsp of cinnamon (or to taste)
- pecan bits (optional)
Instructions:
In a medium sauté pan, melt the butter on medium heat. Add the brown sugar. Turn up to medium high. You want to get the sugar to melt so it won’t be grainy. Take your time. Stir a lot. Don’t cook it too fast or it will harden up like candy. Turn the heat down once it starts bubbling.
Add the pears and cinnamon. Mix them into the sauce. Depending on how ripe the pears are they won’t take long to cook. Some like them to have a bit of firmness or others like them mushy. Your choice.
Add the pecan bits before you serve (if you choose).
Enjoy!
Cheers,

Life's Curveballs
It all started December 3rd, 2021.
My husband Chris (our VP of Anger Management) was wheezing so I talked him into going to the walk-in clinic. He’s not crazy about doctors and getting him to the ER during a pandemic was unthinkable. He hasn’t been sick in so long I can’t remember.
The clinic diagnosed him with pneumonia because of fluid in his lungs and sent him home with steroids and antibiotics for 10 days.
On day 9 I could not take it anymore. He was not getting better. I insisted we go back in.
This time they also took an EKG.
They came back in and said he needed to get to an ER ASAP. They were willing to call the ambulance.
Then the nightmare began.
Turned out he was in serious AFib. His heart rate was 150 – 160. He never felt it. He was in congestive heart failure. After a series of tests, they announced that only 10% of his heart was working. He was admitted.
By December 23 they decided his issues were now too big for them to handle. They insisted he be transferred to Nashville to a bigger hospital with more equipment, more expertise and more options.
We spent Christmas Eve, Christmas Day, New Years Eve, New Years Day and even my birthday on Jan 10 in the hospital.
They did tests during that time to find out if his body was strong enough for heart surgery. On New Year’s Eve they discovered stage 3 cancer in his right kidney and stage 2 in his left. No symptoms at all!
Chris and I have a new understanding of how closely linked heart and kidney issues are. When your kidneys are not properly filtering your blood, your body goes into overdrive to increase blood flow to the kidneys and back to the heart. That raises the heart rate a LOT and increases the workload on your heart…
As Plan Z fans you’ll find this interesting. They also sent a camera down his chest to look at his heart. When they reported out they were amazed. They said he didn’t need a stent; in fact, he didn’t need bypass surgery at all. They said his heart was amazingly healthy except it would not pump correctly. They told us his “diet” must be amazing because there were no clogs at all that they’d normally see in a 71 year old.
The cancer news was a shock, though. So no Happy New Year.
Since then, Chris had surgery to remove ½ of one of his kidneys. His other kidney will likely get surgery around the end of February. Then we’ll figure out what to do about his heart. The cancer has to be dealt with first.
I tell you all of this just to give you a head’s up that I’ve been rather…busy. And since so many of you have spoken with Chris over the years, I thought you should know what’s going on. You can stay connected to Chris and read updates about his recovery through the CaringBridge website we’ve set up for him. Here’s the link: https://www.caringbridge.org/visit/chrislytle.
Chris and I are now living in a two bedroom, furnished apartment in Nashville. We need to stay here for his care for some time.
We have our cats with us, so it feels a teeny bit like “home.”
I look forward to being able to get back to beautiful Chattanooga and a more normal life.
Life sure does hand out curveballs.
Cheers,
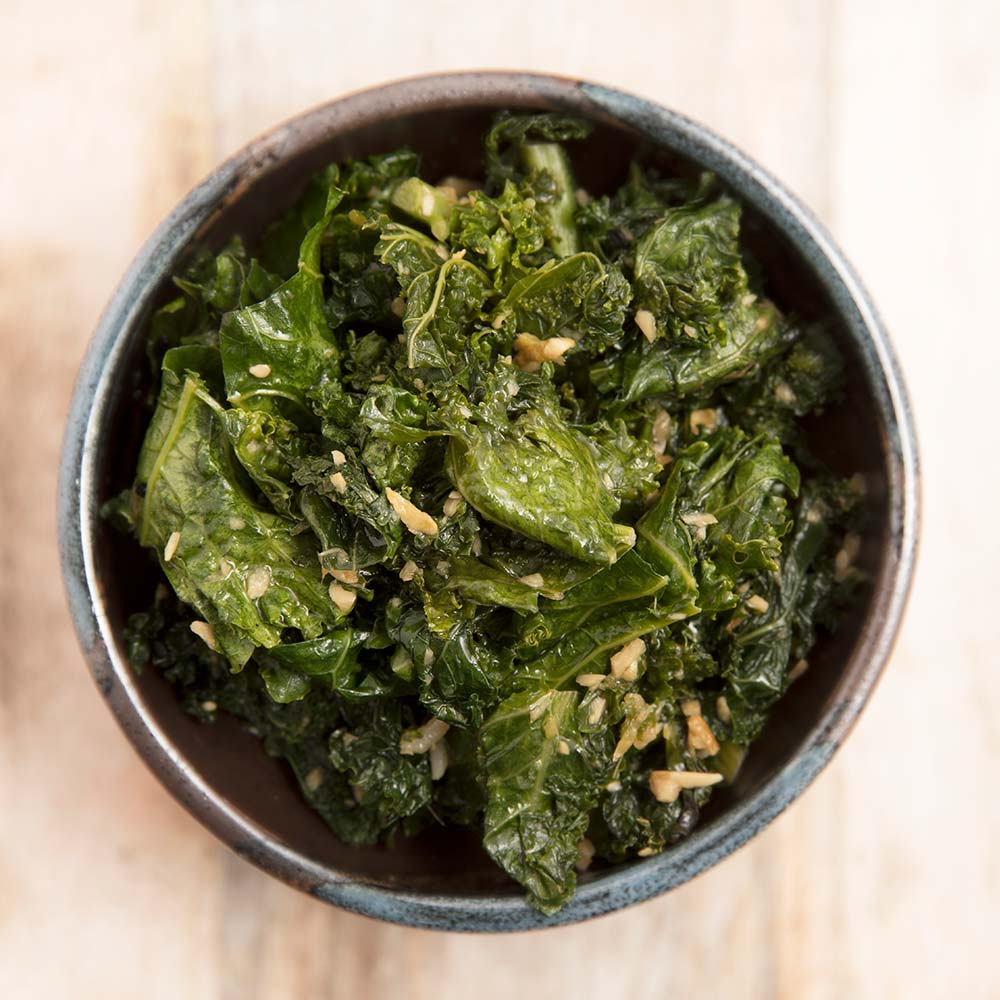
Sesame Kale
Plan Z Phase: This is a Z2 (ZReduction) recipe.
This recipe was submitted by Plan Z coach, Pearl. She loves kale and makes this recipe often. She Zolafied it for ZReduction. Thank you, Pearl!
Servings: Kale is unlimited on ZReduction, but this recipe contains 1 Tbl of oil (the equivalent of your salad dressing portion for one meal).
Ingredients:
- 1 bunch of kale
- 2 tsp olive oil
- 2-3 cloves of minced garlic (jar garlic works, too)
- 1 Tbl Bragg's Aminos
- 1 tsp sesame oil
Extras
- 1/4 cup of water or chicken broth (optional)
- sesame seeds (optional)
- cayenne pepper (optional)
Instructions:
Wash and massage your kale thoroughly (wash and rub vigorously under cold water, like you are massaging it - this will make it more tender when you cook it). Then cut out the woody stems in the center of the kale leaves. Slice the kale into pieces about 1 inch thick. This doesn't have to be precise. If you like your kale in larger or smaller pieces, that's ok, too.
In a medium-size pot, saute the garlic in 2 tsp of olive oil. Once it starts to smell really good (about a minute), add the kale to the pot with 1/4 cup of chicken broth and stir. Cover the kale and let it cook for about 5-7 minutes. It should be wilted and glossy. If you like your kale more tender, cook it to your liking.
Once the kale is nice and tender, add Bragg's Aminos, sesame oil, and sesame seeds to your kale and mix it up. If you like your kale spicy, add a bit of cayenne pepper.
Enjoy!
Pearl
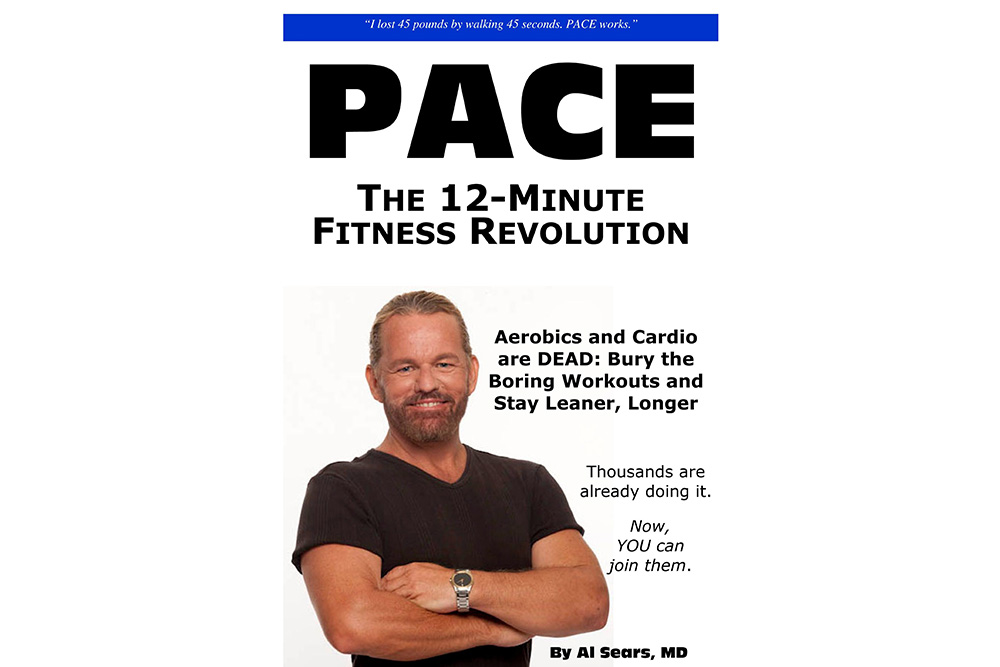
PACE: The 12-Minute Fitness Revolution
PACE is the ONLY doctor-designed program proven to help you reclaim a young, lean, and effortlessly energetic body in as little as twelve minutes a day.
PACE is a growing revolution. It's already practiced by thousands of people in dozens of countries around the world. PACE overturns years of failed ideas and exercise advice. PACE upends current exercise trends by revealing their flaws and offering a more effective, more natural way of moving our bodies. This book will show you how to replace the flawed and ineffective theories the have been mistakenly accepted without proof with what really works.
Join the PACE revolution and your body will soon become naturally strong and resilient. You'll join the cutting-edge group of thousands who now feel energized, motivated, and ready to take on any challenge. And the best news is that joining the PACE revolution takes on average only twelve minutes per day. You can buy the book here #ad.
The food is actually GOOD. It has taste to it!
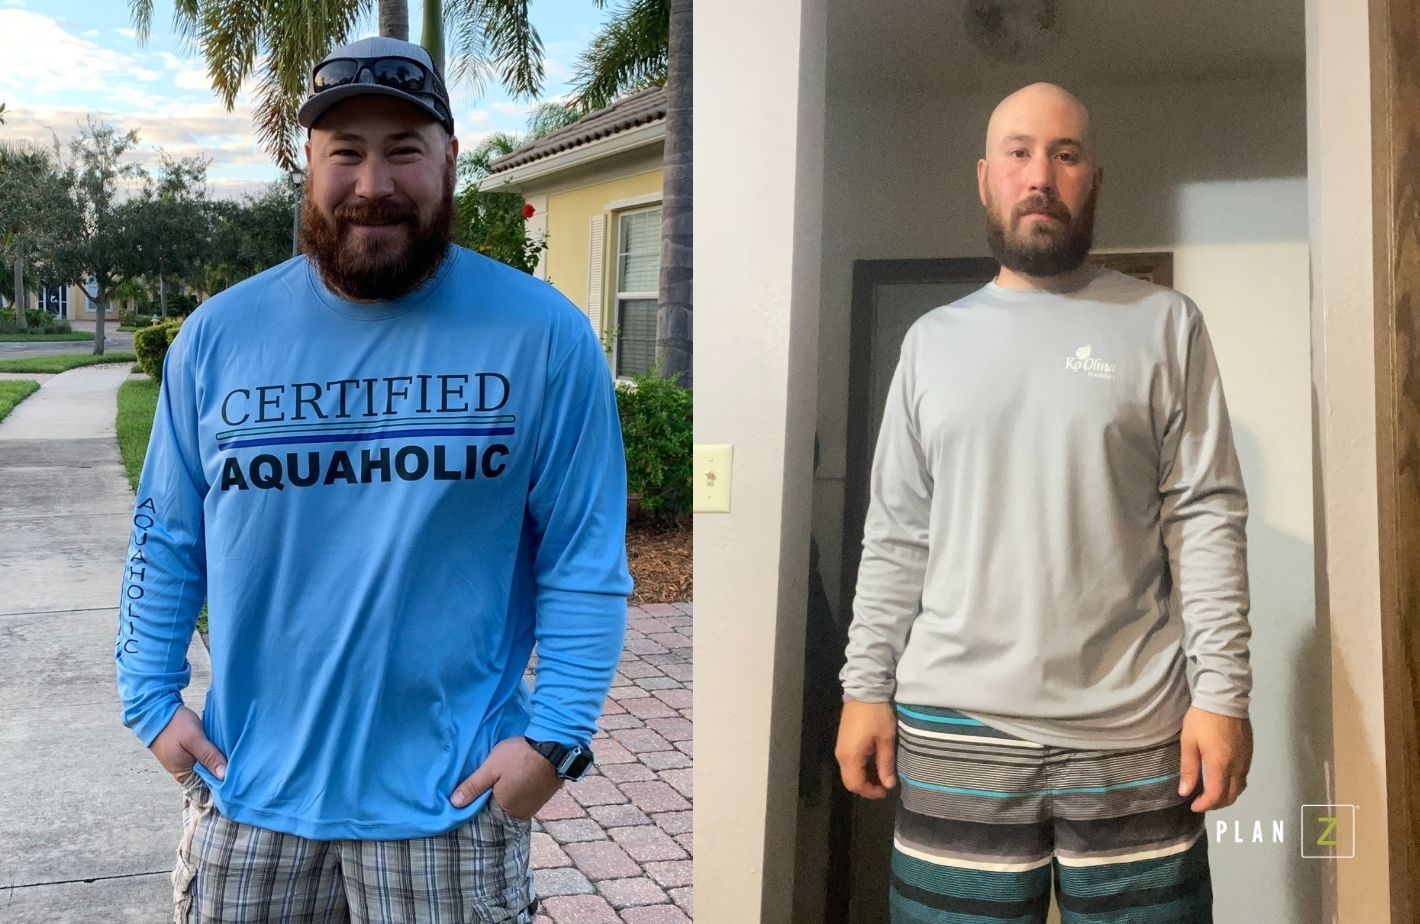
When a guy posts on TikTok “I love this diet!” he gets our attention. This is Dieter Mike from Alexandria, Minnesota.
Mike is down 37 pounds in less than 50 days. When you can, listen to his interview below, but in the meantime, here are a few highlights:
He loves that he gets to eat REAL food. On other diets, he describes his experience with drinking shakes and eating a lot of veggies. On Plan Z he’s eating meatloaf and taco salad… and more.
With all the other diets he did he just gained the weight back – and then some.
He’s a carpenter and a part-time cop. He’s an active guy yet he was hardly ever hungry.
He feels extremely happy and healthy. “The manual is super easy. The food is actually GOOD. It has taste to it!”
He says he’s doing the diet again and his wife is too. She has a hard time getting any weight off on a diet and this time she got off over 20# in the same 48 days.
He’s thrilled that he didn’t have to exercise to make it happen. With the weight off his back no longer hurts.
He also says the diet paid for itself. His friends have told him it seems expensive but then he told them about all the money he’s saved doing Plan Z.
He’s a happy guy.
@dum.dad64♬ A-O-K - Tai Verdes
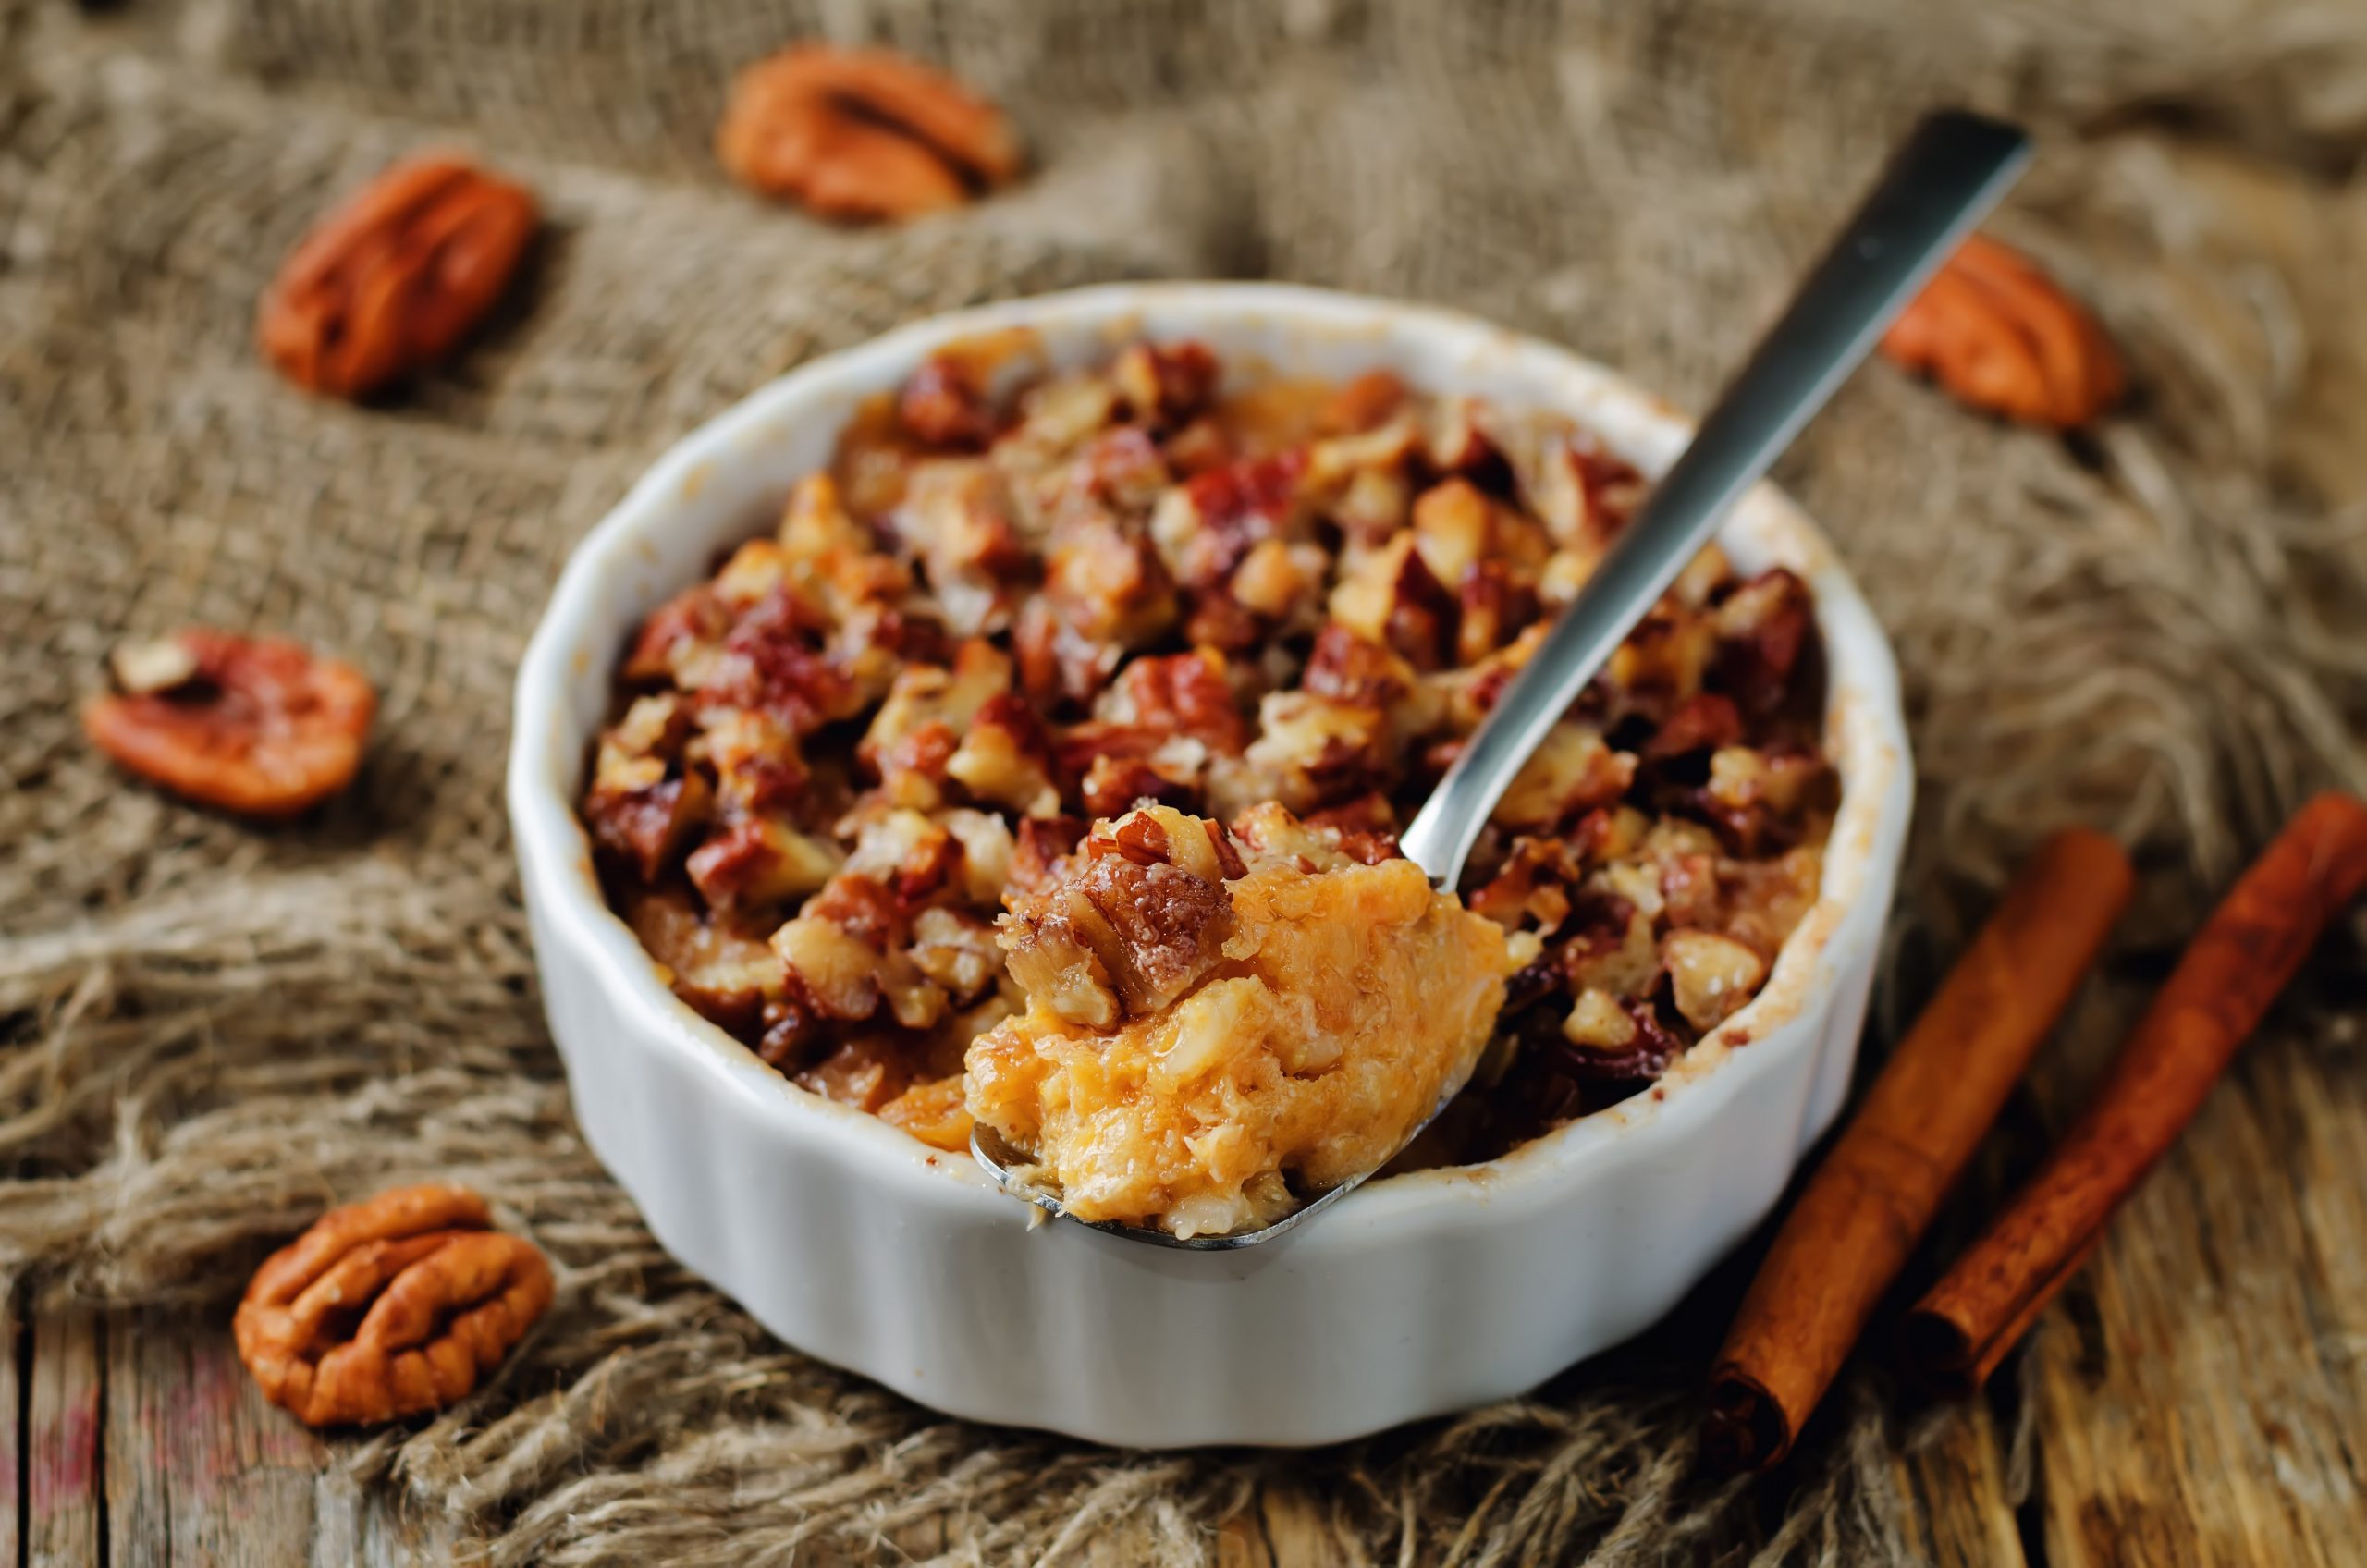
Sweet Potatoes with a Butter Pecan Crust
Plan Z Phase: This is a Z3.5 (ZReboot3.5) recipe.
Servings: Serve 6
If your family is open to going beyond that marshmallow sweet potato concoction this will surely be a HIT!
It’s plenty sweet for YOU. You’ve had your system re-calibrated. It’s also sweet enough for them but while I type the recipe I might add a few hints that would help you sweeten it up a bit more if you think your guests need an extra jolt of sugar. (You and I know they don’t, so be bold and not give it to them if you dare). My husband even asked how much sugar there was in here… he was so shocked how sweet it was. He also loved it and can’t wait to eat the leftovers!
Start this dish the day before to lower the glycemic uptake. If you do, it won’t jack up your blood sugar so much and you’ll be able to have seconds without fear! It’s called carb resistant if you cool the potatoes completely in the fridge and then finalize the dish before baking.
Make this for holidays or anytime!
Ingredients:
For the potatoes
- 3 lb of sweet potatoes (Usually about six. Depends on their size)
- Up to 1/2 cup of sugar (optional) I did NOT add this sugar. It’s really not necessary. Sweet potatoes are sweet enough!
- 6 Tbl of butter
- 1 1/2 tsp of vanilla extract. I use organic. (If your crowd loves sweet, make this 2 tsp)
- 1/2 tsp of grated sea salt (or to taste) This gives the potatoes that little zing
Topping
- 1/4 cup of melted butter
- 1 cup of chopped pecans. Or you can toss in some pecan halves too.
- 1/2 cup of Swerve Brown. You can order this online. It’s amazing. Some stores have it now. Another brand is ZSweet. If you can’t get this and don’t have time to order it… use 1/4 cup of regular brown sugar.
- 1/2 cup of regular white flour
- 1/4 tsp of grated sea salt
Instructions:
Starting the day before… or early in the morning the day you’ll serve it.
Set your oven to 400 degrees. Poke several holes in your sweet potatoes and put them on a cookie sheet. Warning: If you skip the cookie sheet, I promise you’ll have potato ooze all over the bottom of your oven and it will stick and burn.
Bake the potatoes for about an hour until they are fork-tender and very soft. Take them out and let them cool long enough to be able to handle them. Slice them on one side, tip to tail, and scoop out all the goodness in the middle and put that in a large bowl.
Add the butter, vanilla, and salt. Beat with your mixer until the potatoes are smooth and the other elements are all mixed in.
Now you’re going to transfer this to your baking dish. Use a dish that can handle a few minutes under the broiler. It can be Pyrex, some other brand, or you can do what I did and put it in a cast-iron pan. Set that aside and make your topping.
I melt the butter first and leave it in the bottom of the bowl. Add the pecans, sugar sub (or sugar), flour, and salt. Mix this all up with your fork until it’s gooey. Spread this over your sweet potatoes. It can be done with a spoon in blobs and spread slightly. I leave a rim around the middle for showing off the orange potatoes.
Bake at 400 degrees until the topping is browned and the filling is hot and bubbly. This might take about 30 minutes. If it’s not quite browned on top, you can fire up your broiler and it will only take a couple of minutes more. I like my pecans to have a bit of char in places.
Serve hot.
Enjoy!
Cheers,
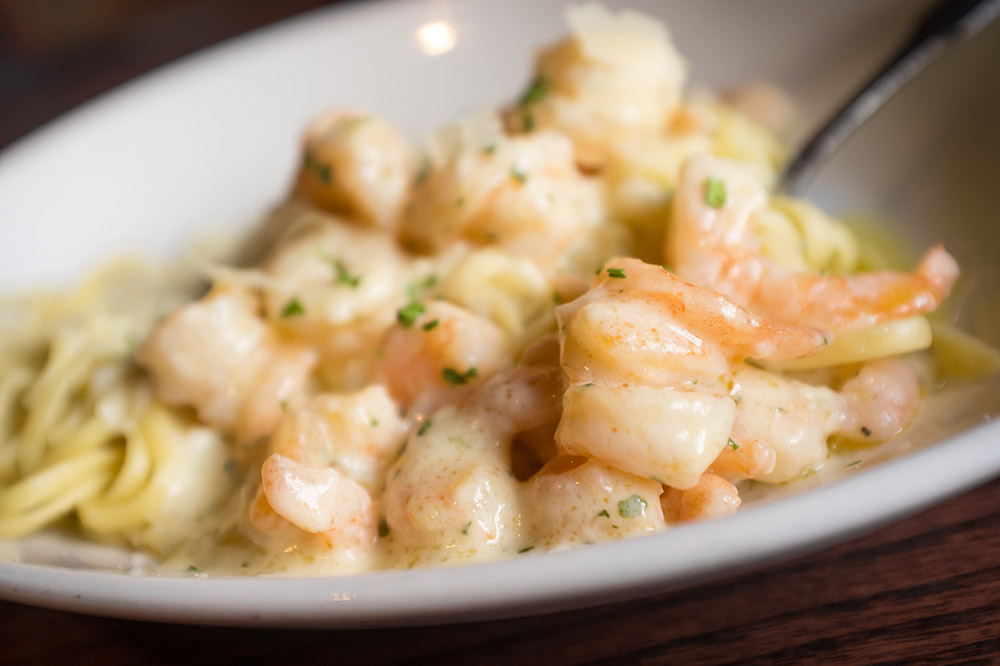
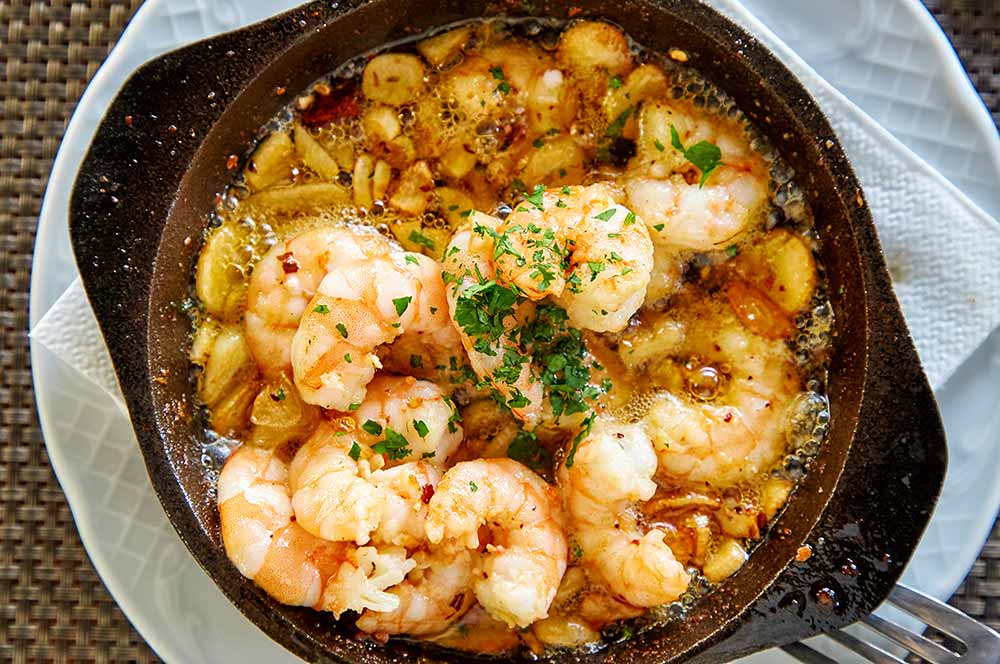
Shrimp Scampi (ZReboot 3.5 Version)
Plan Z Phase: This is a Z3.5 (ZReboot 3.5) recipe.
This is a classic Italian dish. The one you order at Olive Garden will have WAY more pasta than this dish will have. That’s okay. The shrimp are the real star of this dish. Plus, you’ll be better off without all that starch.
Most restaurants serve this as an appetizer with no pasta. This gives you more shrimp and a more lovely sauce.
What will take the longest with this dish is peeling and taking the shells off the shrimp. You want fresh shrimp though and I’ll teach you how to boil down the shells to make it super-tasty. A deeper flavor is the bonus.
Servings: Serves 3 – 4. Can be doubled easily.
Ingredients:
- 4 Tbl of butter (divided)
- 2 Tbl of olive oil
- 4 tsp of minced garlic (jar garlic can work)
- 1 cup of white wine. I use chardonnay. You want a dry wine.
- ½ tsp of grated sea salt
- A light dusting of cracked red pepper flakes (or to taste). In this case, I want the garlic to be the star of the show; not spice.
- Freshly grated black pepper
- 1-1/2 pounds of large, non-frozen shrimp
- juice of one half of a lemon
- Cooked pasta (optional). With this dish, I used thin spaghetti. I always break the pasta in half now before I cook it. That makes you feel like you are getting more. Keep in mind that even the American Pasta Association calls a cup of cooked pasta a portion. I keep mine really low and I don’t miss a big pile of pasta. I might treat myself to a little slice of garlic bread if I keep the pasta low.
Instructions:
If you are making pasta, put the water on to boil. This dish does not take long. Cook the pasta after you are done peeling the shrimp. Then drain it when you’re ready to serve.
To peel the shrimp, the first thing I do is take off the legs. I can usually do this in one pull. Just squish the legs between your thumb and forefinger and yank. Then peel back the shell pieces. Put the legs in the trash but put the shells in a bowl off to the side. I’ll show you what to do with them later.
Once your shrimp are peeled you’ll need to devein them. I used to cut down the back of the shrimp and pull out the grimy gray strip. Now I am finding lately that it’s easier to do the from the underside of the shrimp. That grimy gray thing is their intestinal tract. You don’t want that in your dish, but it usually comes off easily and just rinse. For this dish, I pull off the tails and toss those, too.
In a medium saucepan, add the shrimp shells and a cup of white wine. Start cooking that on medium-high for about 10 minutes. Stir them around. You want to reduce the wine a bit and bring out the flavor with the shrimp shells. It will make a richer tasting dish. If the wine gets too low just add some more.
In a large saute pan add half of the butter and the olive oil. Melt it. Add the garlic and swish it around to bring up the flavor. Don’t cook it too long or too high. You don’t want to brown the garlic. That tastes yucky/harsh.
Now drain your shrimp shells but keep the WINE! Drain it over a bowl or cup so you can use it.
Put that wine in with the garlic and oil. Add the salt, red pepper flakes, and black pepper. Bring to a simmer.
Add the shrimp and saute until they just turn pink. 2 – 4 minutes (depending on their size) will do it. You want them cooked but you don’t want round rubber balls.
Stir in the lemon juice and two more Tbl of butter. Let that melt.
Now you can serve this on a plate with or without pasta. If you do pasta, I usually use a dinner bowl so I can put in my small amount of pasta on the bottom and pile on the shrimp. Stir it around a bit. Good news is as you eat it, you’re likely to be full before you finish the pasta amount.
You can serve with a roasted veggie or a salad to be fancier.
Enjoy!
Cheers,
Shrimp Scampi (ZReboot Version)
Plan Z Phase: This is a Z3 (ZReboot) recipe.
This is a classic Italian dish. Most restaurants serve this as an appetizer with no pasta. This gives you more shrimp and a more lovely sauce.
What will take the longest with this dish is peeling and taking the shells off the shrimp. You want fresh shrimp though and I’ll teach you how to boil down the shells to make it super-tasty. A deeper flavor is the bonus.
Servings: Serves 3 – 4. Can be doubled easily.
Ingredients:
- 4 Tbl of butter (divided)
- 2 Tbl of olive oil
- 4 tsp of minced garlic (jar garlic can work)
- 1 cup of white wine. I use chardonnay. You want a dry wine.
- ½ tsp of grated sea salt
- A light dusting of cracked red pepper flakes (or to taste). In this case, I want the garlic to be the star of the show; not spice.
- Freshly grated black pepper
- 1-1/2 pounds of large, non-frozen shrimp
- juice of one half of a lemon
Instructions:
To peel the shrimp, the first thing I do is take off the legs. I can usually do this in one pull. Just squish the legs between your thumb and forefinger and yank. Then peel back the shell pieces. Put the legs in the trash but put the shells in a bowl off to the side. I’ll show you what to do with them later.
Once your shrimp are peeled you'll need to devein them. I used to cut down the back of the shrimp and pull out the grimy gray strip. Now I am finding lately that it’s easier to do the from the underside of the shrimp. That grimy gray thing is their intestinal tract. You don’t want that in your dish, but it usually comes off easily and just rinse. For this dish, I pull off the tails and toss those, too.
In a medium saucepan, add the shrimp shells and a cup of white wine. Start cooking that on medium-high for about 10 minutes. Stir them around. You want to reduce the wine a bit and bring out the flavor with the shrimp shells. It will make a richer tasting dish. If the wine gets too low just add some more.
In a large saute pan add half of the butter and the olive oil. Melt it. Add the garlic and swish it around to bring up the flavor. Don’t cook it too long or too high. You don’t want to brown the garlic. That tastes yucky/harsh.
Now drain your shrimp shells but keep the WINE! Drain it over a bowl or cup so you can use it.
Put that wine in with the garlic and oil. Add the salt, red pepper flakes, and black pepper. Bring to a simmer.
Add the shrimp and saute until they just turn pink. 2 – 4 minutes (depending on their size) will do it. You want them cooked but you don’t want round rubber balls.
Stir in the lemon juice and two more Tbl of butter. Let that melt.
You can serve with a roasted veggie or a salad to be fancier.
Enjoy!
Cheers,
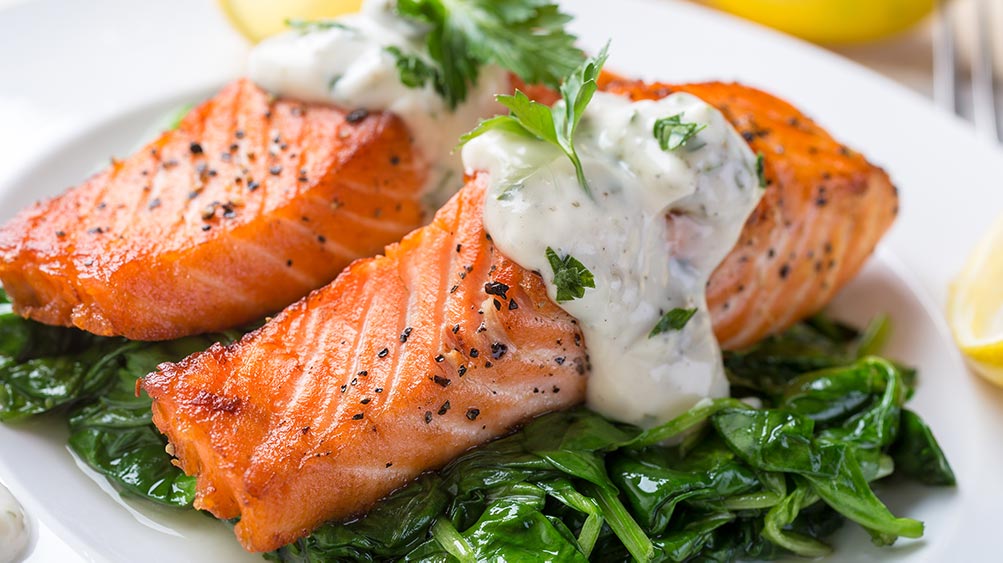
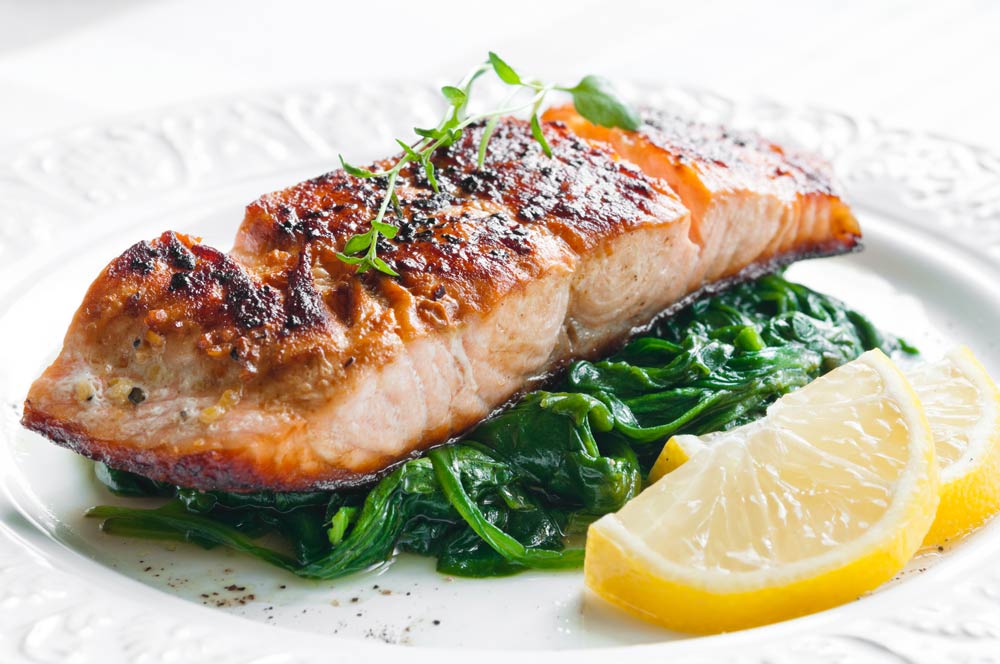
Simple Crusted Salmon
Plan Z Phase: This is a Z2 (ZReduction) recipe.
Servings: Serves 4
This is my favorite, simple way to cook salmon. If you want to jazz it up you can also make my tzatziki sauce. You are limited to 2 Tbl of sauce; same as you would limit yourself with salad dressing.
Ingredients:
- 4 salmon filets 6 – 8 oz each. Try to get skinless salmon. You can ask the fishmonger to take off the skin.
- Olive oil spray
- Sea salt
Instructions:
Heat oven to 375 degrees.
In an ovenproof sauté pan (I use cast iron) spray the bottom of the pan. Put in your salmon (skin side up or use skinless salmon). Spray the top of the salmon with olive oil too.
Heat on medium-high. When the salmon starts to sizzle set a timer for 3 minutes. Leave the salmon alone. No poking at it with your spatula. You want the salmon to form a crust.
After the 3 minutes, you should be able to put a spatula under the salmon and flip it over. The surface should have a nice medium-brown crust.
Grate a light dusting of sea salt over the top.
Now transfer it to the oven on the middle rack. Roast for 8 – 10 minutes depending on how well done you like your salmon. I cook mine for 10 minutes so it’s cooked through but still moist.
Remove from the oven and serve. It’s that simple!
Enjoy!
Cheers,
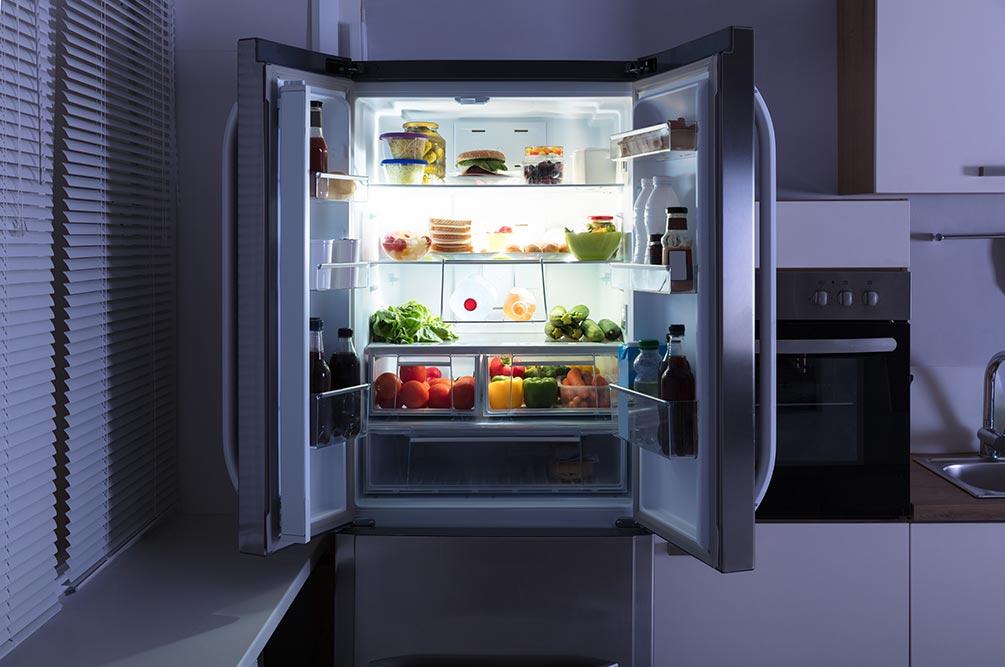
Store These In the Fridge
From the Fine Folks at Southern Living Magazine a feature on things you should refrigerate (but probably aren’t) popped into my inbox. I found it very interesting. Even as a food writer I was failing at some of these.
What I’ll do first up is give you their comments. Then I will make my own for each item.
Avocados
It's no secret that avocados can be a finicky fruit. One day ripe, the next day gone—and not a spoonful of guacamole to show for it. If you're holding onto a few avocados for weekend entertaining that aren't quite ready, pop them into your ‘fresh produce' drawer to slow down their cycle significantly. Conversely, if you're ready to dive into some avocado toast before your little green friend is prepared to cooperate, leaving avocados by the kitchen window (while keeping a watchful eye!) can speed up the ripening process.
One of the things I miss from my 15 years of living in Chicago is the dependable ripe avocado. I could find one any day of the week to make that last-minute guacamole. The Hispanic population in Chicago is impressive so the city goes through a lot of avocados and the grocery store never makes you wait for a ripe one. I hate it when I have to plan what I want to eat 6 days ahead.
As a young cook, I learned that if you want to speed up the ripening of the avocados you put them in a sealed paper bag on your counter.
Bananas
Similarly to the avocado, tossing a bunch of ripe bananas into the fridge will slow down the process to prevent it from over-ripening. The key is not to add them before they're ripe, or you'll run the risk of derailing the ripening process altogether, even once they are removed.
Around our house we don’t even use a whole banana in our smoothie, so the ripe banana has been opened and a chunk removed. I try to remember to put it in the refrigerator after it’s opened. A few weeks ago I forgot and got fruit flies!
Lemons and Limes
While showcasing lemons and limes in a pretty bowl on your counter can be tempting to achieve an air of put-together-ness, citrus fruits will last up to four times longer when stored in the refrigerator. If you absolutely must, simply opt to bring out your citrus centerpieces only when expecting guests.
I definitely have a fruit/vegetable bowl on my counter. Mine is a true piece of art. I have always kept my lemons and limes there. It’s getting harder and harder to find ripe versions of these two fruits too. To make them juicier when I want to squeeze them, I learned to roll them under the palm of my hand on the counter.
Tortillas
While refrigerating loaves of bread can cause the inside to dry out and stale more quickly than you would predict (and present quite a challenge in slicing when it comes to a thick loaf such as sourdough), the opposite is true when it comes to a thinly sliced tortilla. Because of its thin quality, there's less opportunity for cold air to infiltrate empty pockets and dry it out. Because tortillas are prone to molding, tossing them in the refrigerator is always the safest bet—and can help them last up to twice as long.
I always keep tortillas in my refrigerator, but I bet you’ll never guess why. I have a bread-stealing cat. I keep my bread in a cupboard and my tortillas in the fridge in the cheese drawer. If I don’t, he’ll chew open the package and have a field day. I find the results on my living room rug!
Natural Peanut Butter
If you've hopped on the natural peanut butter train for health purposes, you know that the last thing you want is to keep this specialty item from going the distance. Because natural peanut butter is truly peanut butter in its purest form (Think: peanuts and a dash of salt) with no preservatives to bind the two together, it's common for separation to occur with the oils from the peanuts rising to the top. Because it's processed without preservatives, the oil is more susceptible to molding and it's always a safe bet to store it in a cool place.
Peanut butter disappears around our house so fast I’ve never had to think about this. My husband stores his natural peanut butter (always extra chunky) upside down so the oil is at the top of the jar. Stirs more easily that way. I did learn long ago to store it on a shelf that is higher up. If you have under-counter lights you don’t want your peanut butter to be affected by the heat given off by the lights.
I like my peanut butter emulsified. I don’t want that oil but I don’t want sugar in it either. Some big-name companies are starting to figure that out and are making versions I like. Look for them. Just read the ingredients label and look for peanuts, oil, and salt only.
Cheers,