
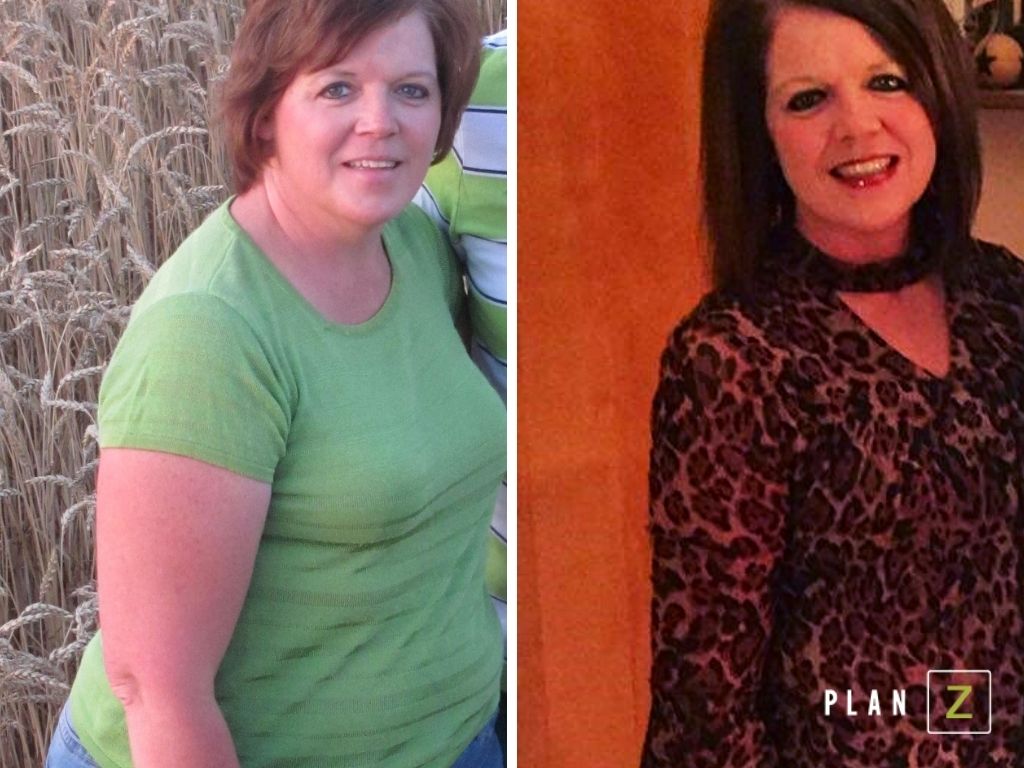
Just What the Doctor Ordered
Dieter Glenda lost 32 pounds with Plan Z and it helped her improve her health after receiving a difficult diagnosis.
This has been the easiest diet plan I have ever done. I have always tried the latest diet and wasted so much money. Two years ago I was diagnosed with MS. That was devastating. [The] first thing a neurologist said was [that I needed] to lose weight. I researched as an MS patient sugar, gluten, cow milk and grains are foods to avoid. When I found Plan Z it broke my need for sugar and bread and ice cream. I feel better. I think I look better even though I may still wobble when I walk. Thank you for Plan Z! It is a lifesaver.
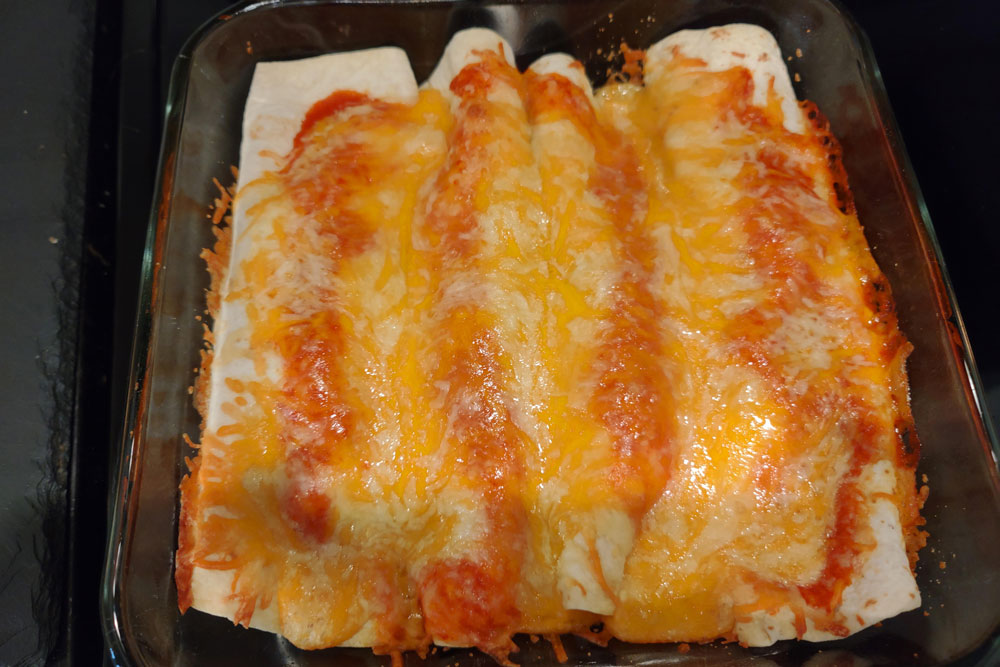
Beef Enchiladas
Plan Z Phase: This is a Z3.5 (ZReboot3.5) recipe.
This version of our enchilada offerings does include a tortilla. It’s not a large one and we over-stuff it so we keep the carbs down. It should fill you up. If you do a few taco chips and salsa and guacamole, one enchilada should be enough for your meal.
Servings: Serves 4
Ingredients:
- 1/2 pound of ground beef
- 1 cup of chopped onion (You can use yellow, white, or even red)
- 1/2 of a 15 oz can of pinto beans (Mild, medium, or hot. Your choice.)
- 4 8” tortillas (Mission brand makes one that’s called Carb Balance. Only 4 grams net of carbs.)
- 3 cups of Mexican cheese blend (Grated)
- 1 small can of red enchilada sauce (You’ll use about half of the can)
Instructions:
Heat the oven to 350 degrees. Spray a nine-by-nine-inch oven-proof pan with cooking spray. Spray a large sauté pan. Put in your beef and begin to cook it on medium-high. Continually break it up so it turns into bite sized pieces or maybe a little smaller. Half way through the cooking time you can add the onion. Continue cooking on medium until there is no pink left in the beef.
Stir in the beans and cook a few minutes more; just until the beans are heated. Add one-quarter cup of the enchilada sauce and take the pan off the heat. Stir it all up.
To assemble the enchiladas, set up a little prep line. Take a tortilla. Set it on your cutting board. Spread two or three teaspoons of the enchilada sauce from the can across the tortilla. Add a quarter of the beef/bean mixture. Keep that spread in the middle. Put a small handful (one-third of a cup) of the grated cheese across the beef mixture. Carefully roll up the tortilla and then place it seam-side down in your prepared oven-proof pan. Repeat the process with the other three tortillas. You might need to squeeze the over-stuffed rolls into the pan.
Drizzle a few more tablespoons of the enchilada sauce across the prepared enchiladas. Sprinkle on the rest of your cheese. Place in your oven and bake for 20 minutes. Take them out and carefully plate them. And serve!
Enjoy!
Cheers,

Defeating the Weight Loss ping-pong
Defeating the Weight Loss ping-pong
Robynn and Bill are long-distance diet buddies. They live in two different states. Plan Z was actually a Christmas gift, from Robynn to Bill. A gift of a healthier and more consistent future. Robynn's goal was to lose the post-surgery weight of 15 pounds. Bill wanted to get his weight below 200 pounds. They both achieved their goals and valued different parts of the program. Bill loved the steady drip of education. Robynn loved the recipes. During their interview, she told us, "There was a simplicity in the recipes and they were absolutely delicious." Now they both have more agency over their health and the tools to maintain control over their weight.
Making healthy lifestyle changes doesn't mean saying goodbye to treats forever. Just take it from Dieter Bill who said, "If you’re an epicurean like I am, there is no need to be deprived on Plan Z at all. You’re going to find stuff that you love and it’s really good."

The Miracle of Collagen
I went to my naturopathic doctor a couple of months back. I have been dealing with an infection in my digestive tract that I contracted after a series of antibiotic prescriptions. It’s been a nightmare. She had some new test results for me. One of the first things she told me was I am not getting enough protein. I squealed at her, “I eat protein and vegetables every day. They are the mainstay of my diet. How could I not be getting enough protein?!”
She just shrugged and said I needed to get more protein. My body was not absorbing the protein I was eating, or I was not eating enough. It was probably both because my digestive issues were making me lose my appetite. I told her I even put protein powder in my morning smoothie. “Have you tried Collagen Protein?" she asked. I had not even heard of it. So off I went to the grocery store looking for collagen protein. The pharmacist helped me find it. I found one that is vanilla flavor but has no sugar. (You have to be careful when buying protein powders. Many of them are chock-full of sugar). I made my first smoothie with it. I was in heaven. I don’t know exactly what it is about it but it gives your smoothie a really nice mouthfeel. And the benefits are GREAT.
This article is about what collagen protein is and how it benefits you. The benefits are SO many it’s easy now to pass by any other kind of protein powder and pick up this kind. I’ve included two links to collagen protein powders. The first one is the one I currently use and the second one is one offered by Dr. Axe. Much of the rest of this article is taken from Dr. Axe’s website so I have to give credit where credit is due.
WHAT IS COLLAGEN?
Collagen is the most abundant protein in our bodies and is vital for the health of our bones, joints and connective tissues, muscles, gut, nails, hair and skin.
From Dr. Axe:
Why collagen could be the most transformational substance in the world
Up to 30% of all the protein in your body is collagen protein. Up to 70% of skin, hair, nails and nearly 100% of connective tissues are collagen. It literally holds you together: from the hairs on your head, to every inch of your skin, to your joint comfort and mobility. It even impacts the overall health of your gut, including gut integrity.
There’s a reason that collagen supplementation, in addition to an overall healthy diet and lifestyle, is being dubbed as the new essential in the wellness and beauty community. Many people’s collagen is breaking down at an accelerated rate… and it’s not being replaced in the standard modern diet.
Is collagen what’s missing in your diet more than Vitamin C, Vitamin D, Omega-3s and Probiotics? Did you even know you probably need to replenish it regularly?
Once you hit 25 Years of Age, Your Body Could Start Losing Collagen
As we age, our bodies’ natural production of collagen slows dramatically. Over 25? Your body is probably not replenishing collagen as quickly as you are losing it, since replenishment slows with age.
As your body slows its collagen production, you’ll typically end up with skin that “looks older” with less skin elasticity, vibrancy and hydration, creaky joints, or even gut disturbances. It could even mean thinner hair and brittle nails.
And none of us are exempt from this natural aging process.
Collagen is going to diminish with age. Period.
The typical woman can expect to lose about 1 to 2 percent of her body’s collagen every year starting in her mid-30s, and this rate generally only increases as she makes her way through her 40s, 50s and beyond.
There’s evidence that collagen production in sun-protected and well-maintained skin of older adults (over the age of 80) is up to 75 percent less than the production in the skin of young adults (under the age of 30).
Yes! You read that right. There’s up to 75% less collagen in elderly adults as compared to those in young adulthood. That’s a staggering number.
Have you ever met someone who was in their 20s, but you could have sworn she was 45? Or seen that rare 70-year old woman with the skin of someone in her 30s? It’s true, something like perceived age is partially due to genetics. But it’s not totally up to fate. It’s also up to a person’s diet, lifestyle and collagen stores.
And age is not the only thing that can slow down production and deplete collagen from your body. If you’re worried about the breakdown of your own collagen, take a look at the list below of 10 lifestyle factors that are considered “collagen killers.”
10 Surprising Collagen Killers
Poor sleep
Too much sugar in the diet
Injuries and joint degeneration
High cortisol from emotional stress
Sun overexposure
Diet low in antioxidants
Sitting all day and lack of activity
Bad gut health
Nutrient shortfalls of vitamin C and zinc
If you were blown away by this information, join the club. I needed to learn this.
I’m at an age where I’m obsessed with my skin but don’t really know how to keep it lively. Turns out you can keep it youthful from within rather than trying to figure out which of the myriad of creams to buy. I’m always stumped by all those commercials pushing hydro-boost this, retinol that. And of course, drink plenty of water.
My gut is starting to feel better too. It’s slow progress but between a new drug I am on that is supposed to be straightening me out and my new smoothies I’m on my way.
I’m giving you my latest, super-simple smoothie recipe so if you decide to try collagen powder you’ll have a recipe ready to go. Just toss this stuff in your blender. The shake/smoothie keeps me full and focused until sometimes after 11AM. Then I’m raring to eat lunch at noon.
Cheers,
![]()
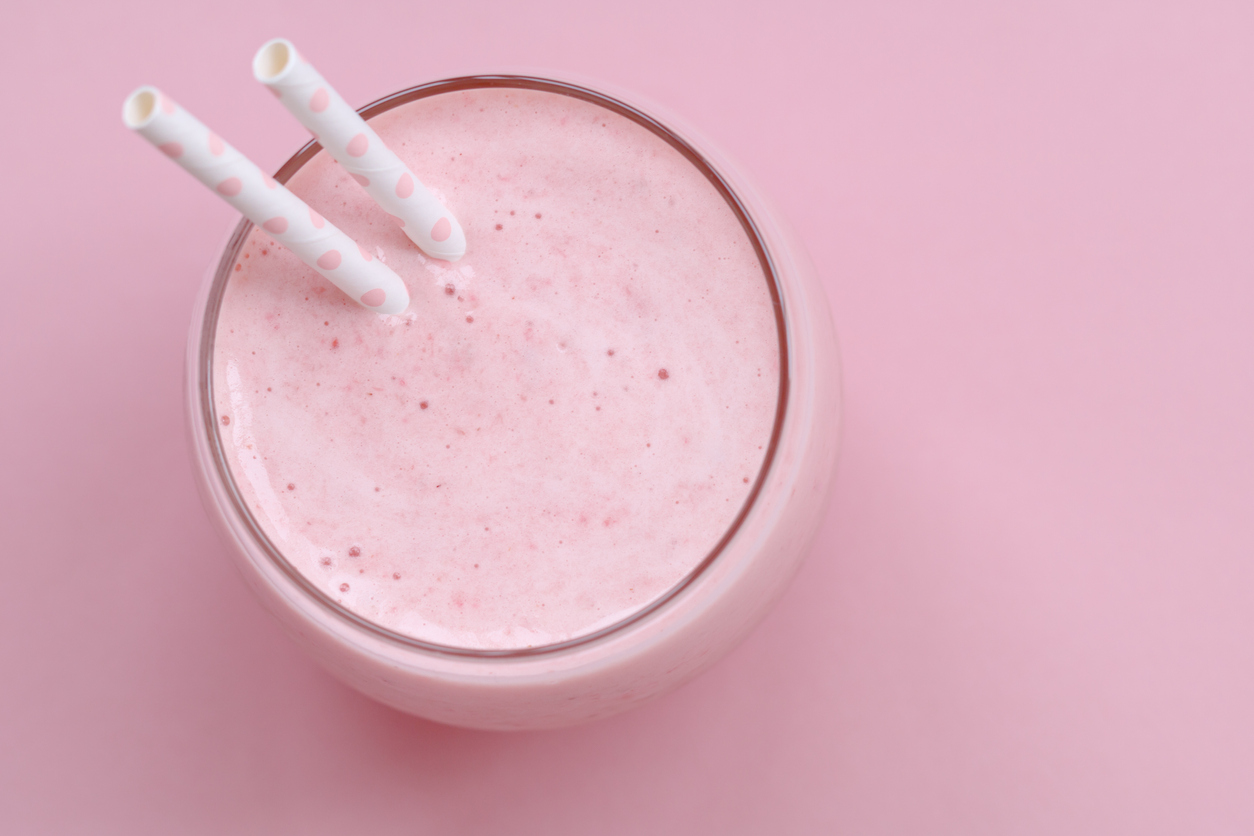
Collagen Fruit Smoothie
One of my favorite breakfasts these days. So easy and quick. Refreshing and filling. Collagen protein powder is not cheap but the health benefits are HUGE.
A New Found Love for Shopping
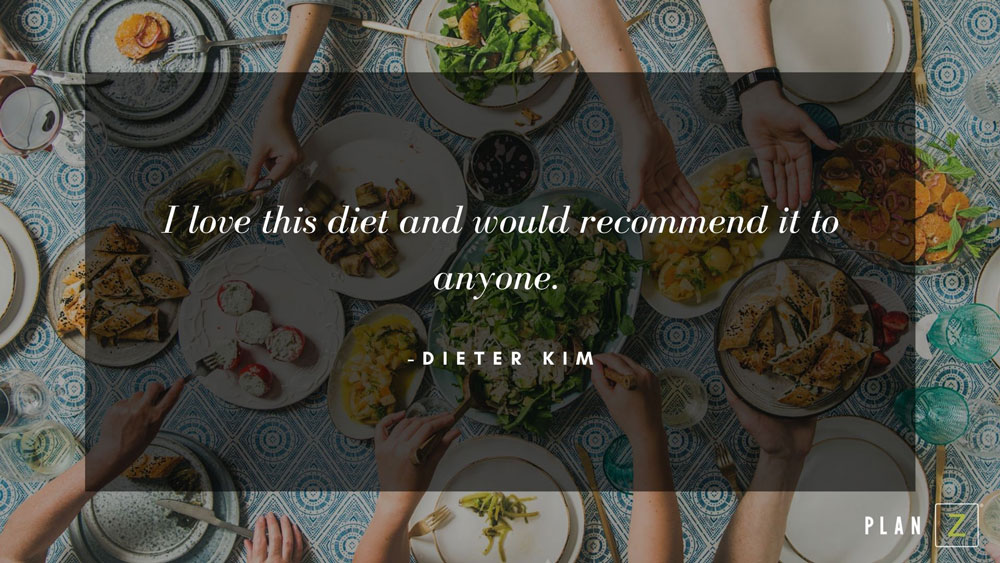
Dieter Kim and her daughter started Plan Z so they could get in picture-perfect form for her wedding. They each lost 61 pounds. Way to go!
Plan Z has been the BEST diet for me and my daughter!! We both started out the same weight and did a great job of losing 61 pounds each!! I found it an easy diet to follow... I had never dieted too much [because] I didn't think I had willpower but the crave drops helped with that. I know our stamina increased each day as the weight went down but WOW! I have always carried my weight in [my] hips and rear area and it is literally GONE!! No more big booty!! I love this diet and would recommend it to anyone. I love shopping for all the new styles I feel great in now...
Thank you, Zola and Plan Z
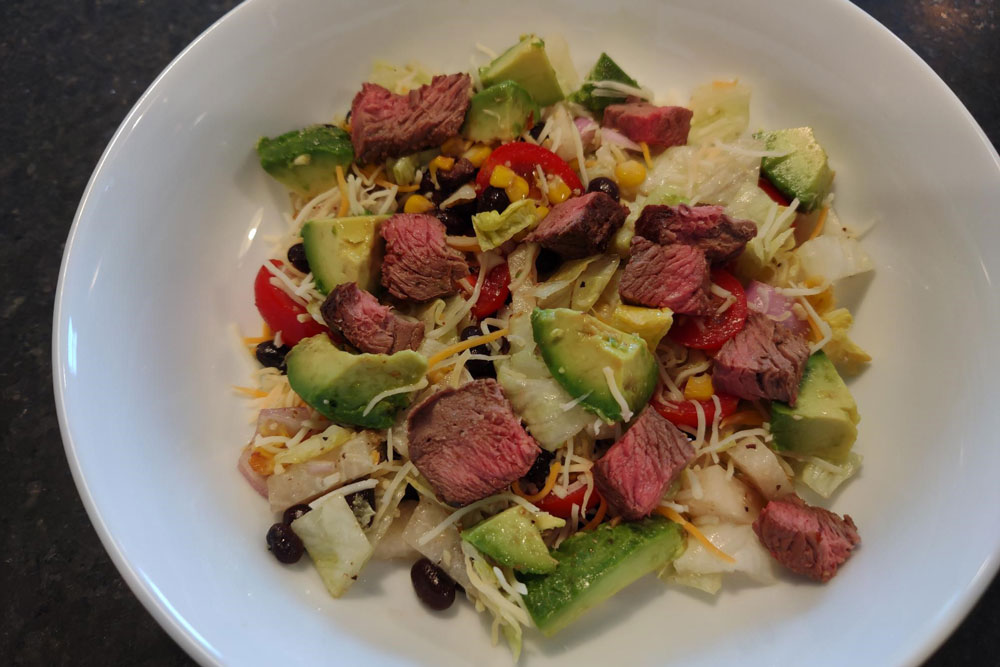
Mexican Dinner Salad
Plan Z Phase: This is a Z3.5(ZReboot3.5) recipe.
On a hot day, this salad is a winner. It comes together quickly. You don’t even have to turn on the oven (if you have a grill). You can vary the protein. I did steak but it could be chicken, fish, seafood, or even vegetarian. You can also vary the veggies to your liking.
Servings: Serves 2 and can be doubled easily
Ingredients:
- 4 cups of greens. I used iceberg lettuce because I wanted extra crunch but you could use any greens that appeal to you.
- 1 cup of jicama cut into slivers. Peel the outside and then just cut into narrow chunks.
- 1 cup of cherry tomatoes cut into halves
- 1 cup of corn. I used fresh corn that had been cooked the day before. Just cut the kernels off the cob.
- 1 cup of onion. Use red, white, yellow, or even shallots.
- 1 small avocado cut into bite-sized chunks. Then I give it a light dusting of sea salt to bring out more flavor.
- 1/2 of a 15 oz can of black beans, rinsed. I just spoon the beans out of the can into the colander then rinse. Save the rest for another application. I rinse the beans because otherwise, you’d have brown lettuce when you toss the salad.
- 8 oz of protein (recommended). You can always add more!
- Grated cheese (optional). This can be any Mexican cheese, a combo, or even just shredded cheddar.
Instructions:
If you are working with a partner who’s operating the grill you can have the prep work done on the salad part while the protein is cooking. Otherwise, I’d get the salad ready first. Cook the protein and then assemble.
Cut up your greens and put them in a large bowl. Add the other veggies except for the avocado. Save that for later assembly. Stir up the veggies to fully distribute.
Make your dressing and pour it on the salad. I'd suggest trying my lime-cumin vinaigrette. Then, toss it all again. Set aside until your protein is ready.
When the protein is ready add the salad mixture to your dinner bowl or plate. Top with the protein. It can be sliced, shredded, or chunked. Scatter on the avocado bites. And add the cheese if you are using any.
Enjoy!
Cheers,
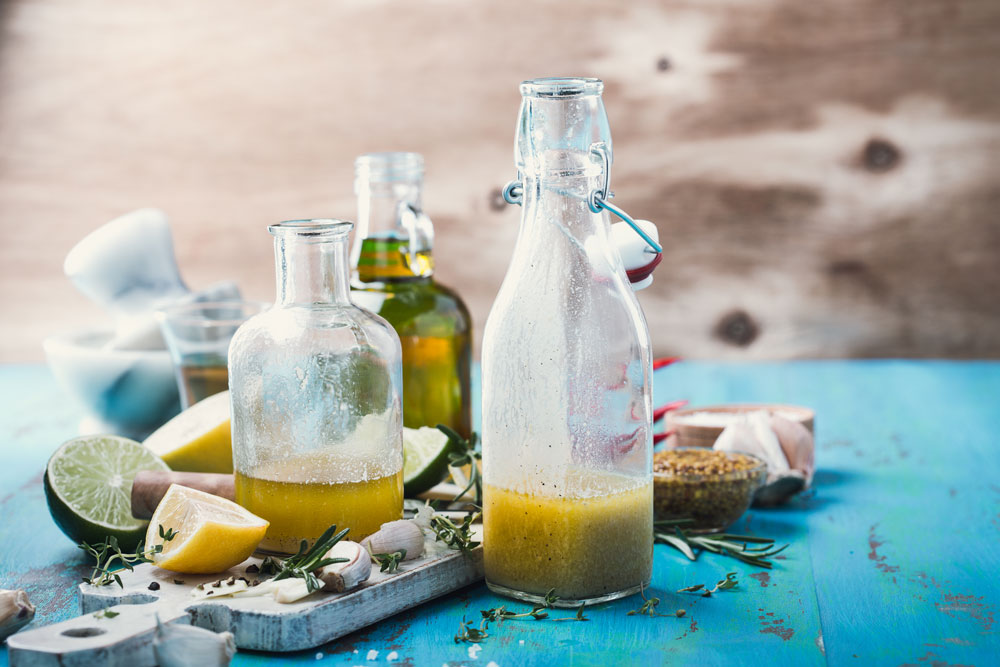
Lime-Cumin Vinaigrette
Plan Z Phase: This is a Z2 (ZReduction) recipe.
This makes a mild but flavorful dressing to accent anything Mexican or Southwestern. If you want it spicy you can add a dusting of cayenne before blending.
Servings: Serves 2. Can be doubled easily.
Ingredients:
- 3 Tbl of oil. I used half olive oil and half grapeseed oil.
- Juice of one lime
- 1/2 tsp of cumin
- A grating of sea salt and a grating of pepper
- 1 tsp of minced garlic
Instructions:
In a small bowl mix with your whisk and you’re ready to go. You can also make this in a small blender.
Note: Serving size in ZReduction is a maximum of two tablespoons.
Enjoy!
Cheers,

Weight loss after 40
Weight Loss After 40

Dieter Claire from Hattiesburg, MS challenged the population notion that there's no chance of losing weight once you become middle-aged. Claire's mother told her, "If you don't get that weight off from the four kids by the time you're 40, you'll never lose it." Claire proved this assumption is false when she lost 50 pounds with Plan Z. She also transformed her relationship with food. She used to think of food as an enemy because she could never lose weight no matter how much she reduced her portions. The Plan Z protocol shifted Claire's focus to macronutrients and wholesome food choices and she was surprised at how satiated she felt. In her interview, she said, "How can I be so full at lunch, be so full at dinner and wake up in the morning and lose weight?" Her mom would call this "Voodoo!"
Claire's 50-pound transformation shocked her friends, her doctor, and even her grandchildren. If you've been thinking about improving your health or shrinking your waist, take Dieter Claire's advice and, "Don't ever let anyone tell you it's too late to try."
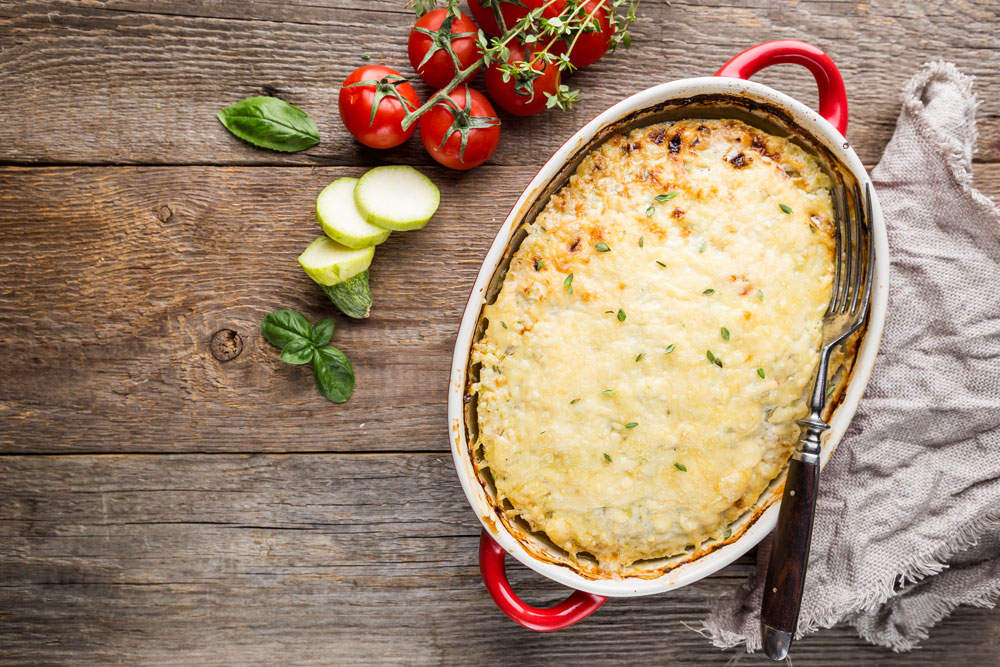
Italian Sausage and Zucchini Bake
Plan Z Phase: This is a Z3(ZReboot) recipe.
This is sort of one of those dump casseroles that come together quickly and doesn’t require a lot of effort or dishes.
Servings: Serves 4 – 6. You can definitely serve six if you have a side Caesar salad.
Ingredients:
- 1 Tbl olive oil
- 3/4 lb of loose Italian sausage. You can use hot or mild.
- 1/4 cup of chopped onion
- 1 tsp of Italian blend spice
- 1/4 tsp of grated sea salt
- 1/4 tsp of grated pepper
- 2 cups of spaghetti sauce. Find a jarred one with no sugar. Rao’s is a good brand.
- 1 large egg, beaten
- 1 cup of ricotta cheese
- 3 cups of zucchini chunks. I cut mine into about 2” long chunks that are about 1/2” wide.
- 1 cup of grated or shredded mozzarella cheese (or more to taste)
Instructions:
Preheat oven to 375 degrees.
In a medium saute pan add the olive oil and heat it. Add the loose Italian sausage and cook on medium-high. Break it up regularly so you get bite-sized pieces or smaller. When it’s half cooked, add the onion and the Italian spice blend. Cook until meat is completely done. Season with salt and pepper. Add the spaghetti sauce and stir.
While the meat is cooking you can combine the beaten egg with the ricotta cheese in a small bowl.
Spray a nine by nine inch ovenproof baking pan with olive oil spray. Cover the bottom of the pan with half of the meat sauce. Scatter on your zucchini chunks and sort of poke them into the sauce. Add your ricotta mixture in blobs with a spoon. Just scatter those over the zucchini and sauce. Top with the other half of the meat sauce and then cover it with mozzarella.
Bake for 30 minutes. Take out of the oven and add extra mozzarella to the top if you want it extra gooey. Wait about five before serving. I just use a large spoon to serve this in dinner bowls.
Enjoy!
Cheers,

OJ in a Magic Bullet
Plan Z Phase: This is a Z2 (ZReduction) recipe.
Traditional orange juice is not allowed on Plan Z because when you remove all the pulp (the fiber) what's left is a whole bunch of sugar. But, if you have a magic bullet or a high-powered blender, you can enjoy a liquefied, blended orange - as long as you blend the whole orange and don't strain the pulp. I started making this for my 1-year-old son as a refreshing treat on hot days. It was so good, my husband started asking him to make it for him, too! Refrigerate your orange before blending and your slushy orange drink will be fresh, frothy, and a little frosty. Yum-yum good. On ZReduction, this is one of your fruit servings for the day.
Servings: Serves 1
Ingredients:
1 seedless orange
Ice
Instructions:
Peel your orange and remove the thick white pith. Then split it into wedges and remove the inner core. Chop your wedges into blendable pieces. Put the orange bits into your Magic Bullet along with a few ice cubes.
Whiz until blended and smooth. It will be bubbly and frothy. Depending on how much ice you use this will yield about a cup of frothy orange liquid pulp. Eat it with a spoon, or chew it as you drink :)
Enjoy!
Jen

Memories of Memorial Day
Memorial Day was always a fun holiday at my house. As a kid, I remember the day to be sunny and not too cold. I’m sure that was not the case every year, but my memory holds that weather report on record anyway.
One of the other things I will always remember about Memorial Day is kittens. Spring brought a fresh batch of furry babies into our world and coincidentally, on Memorial Day they’d always be just old enough to take them out and let them play on the lawn. They were about six or seven weeks old. Once the kittens were able to eat without “mom” and use a litter box they were ready to find a new home.
We used to give away the kittens, in those days, to a good home. That’s not highly recommended these days (or even recommended at all), but it was the tradition back in the ’60s in small-town America. Memorial Day brought lots of folks to our neighborhood, so it was a perfect day to find new homes for the kittens. People would walk by and ooh and aaah. We’d have four or five to give away and invariably they’d find very happy families to go to. That part of Memorial Day made me sort of sad, but mostly I remember how proud we were to show off our adorable bundles to the passersby.
Why were so many people passing by our house? Because we were lucky enough to LIVE on the parade route! Oh, joy of joys! We had ring-side seats, on the curb, right in front of our house. We could “save” our spots by putting a blanket down by the curb and we could play on the lawn until we heard the bands coming down the street. How convenient for my mom, too. She could stay in the kitchen and clean up breakfast, or get some ironing done right until parade time. No having to pack the brood in the car, drive, park, and then walk to the parade. We were in parade central.
My favorite parts of the parade were the military and the bands. I hated most of the floats; especially the cars holding politicians. They were a real waste of time in my eyes. I never knew anyone in those cars anyway. I loved standing up and putting my hand over my heart every time the American flag went by. How many people do that nowadays? Seems like none.
I loved the precision of the military guys as they marched by. Sometimes a couple of army vehicles would roll by. The firetrucks were decent too; just not quite as cool as the men in military uniforms.
The bands were always fun to watch. When I got older, I even marched along with my high school band. I was part of the drill team so we’d carry placards or pompoms as we marched along with the band. Our band always had the coolest songs. We were hot!
Happy Memorial Day to all in America.
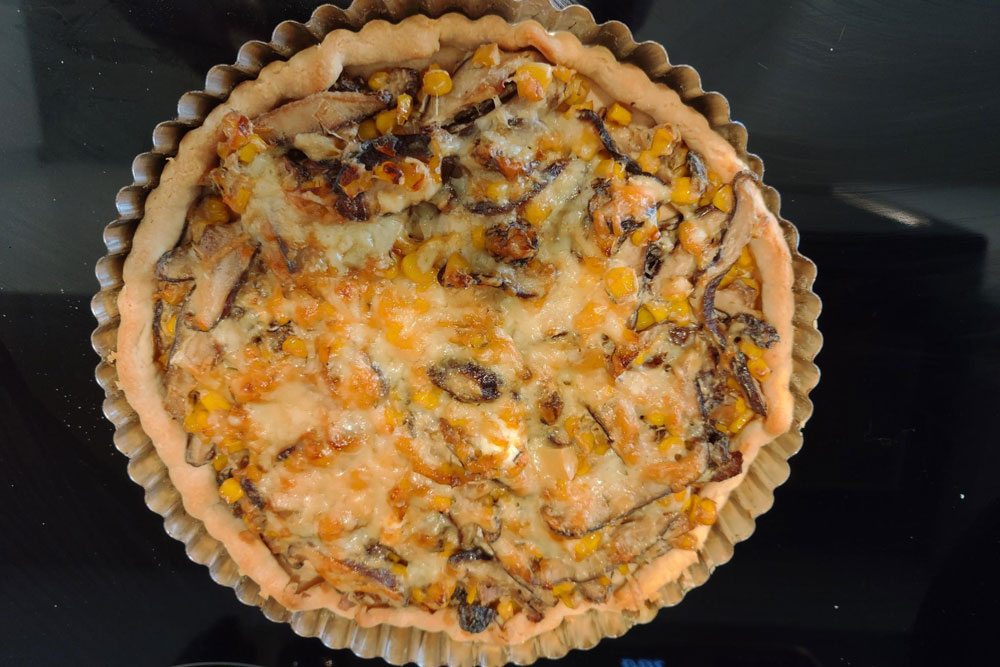
Veggie Tart
Plan Z Phase: This is a Z3.5(ZReboot3.5) recipe.
This makes a lovely lunch or dinner with a salad on the side. Tastes very French or Italian.* And vegetarians who eat dairy will love it. This can also be served as a side dish with grilled meat. It really does stand well on its own though.
Servings: Serves 6 – 8
Ingredients:
- 1 refrigerated pie crust, softened on the counter at room temp for at least 15 – 30 minutes
- 1 Tbl of butter
- 1/2 cup of chopped shallots
- 3 tsp of minced garlic
- 8 oz of sliced mushrooms
- 1 cup of corn kernels (I didn’t have cooked corn so I used canned corn. Be sure to drain it.)
- 1 tsp of Italian seasoning
- 1/2 cup of sour cream
- Grated sea salt and pepper to taste
- 3/4 cup of gruyere cheese, grated on the larger setting on a tower grater
Instructions:
Preheat the oven to 450 degrees. Unroll the pie crust and position it in a tart pan or a pie pan. Make sure some of it runs up the sides. Prick it in about a half dozen places with a fork. Bake the crust for 10 minutes. Remove it from the oven and let it cool. Turn the oven down to 350 degrees.
In a large saute pan add the butter and turn it on to melt. Add the corn, shallots, and garlic. Stir on medium heat until everything softens. Add the mushrooms and the seasoning. Saute for four to five minutes more. Remove from heat, stir the sour cream into the veggie mixture, and let it sit so the mixture will dry out some. This will take another five minutes. Check for flavor and add more seasoning if you think it needs it.
Pour the filling into the crust and spread it edge to edge. Sprinkle the cheese on top. Bake the tart for approx. 40 minutes until the top is lightly browned. Take it out of the oven. Let it sit on a cool surface for 10 – 15 minutes before cutting. This will allow it to firm up some more and cool a bit so you don’t burn your mouth.
Tarts like this can be served hot or even closer to room temperature you want to serve them as part of a buffet. In this case, you can cut it into several wedges.
*You can vary the veggies if you are creative. Options like bell pepper bits, zucchini, and summer squash come to mind.
Enjoy!
Cheers,
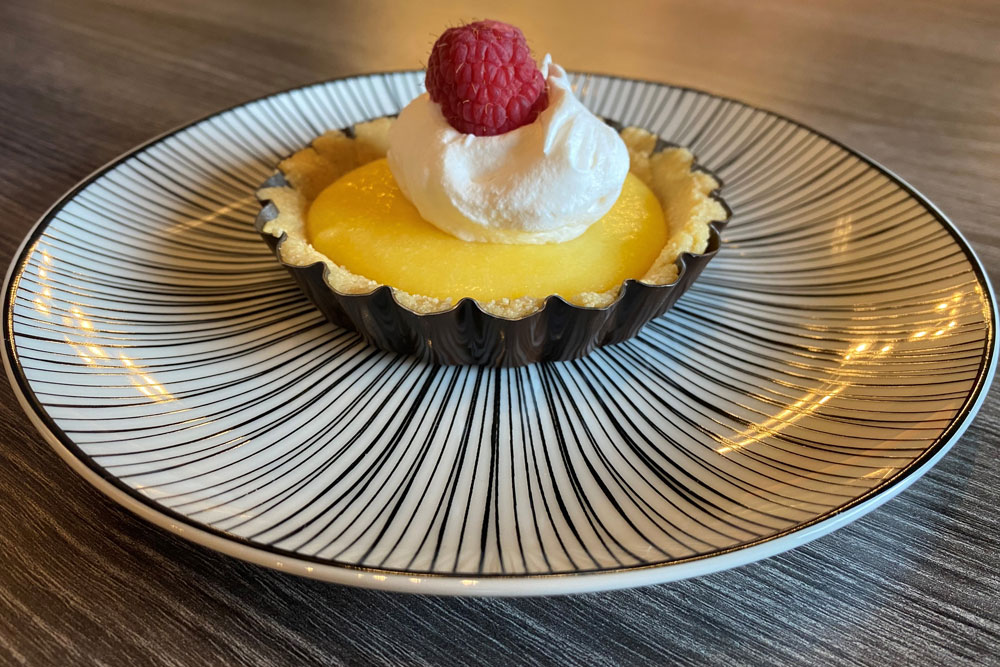
Lemon Curd
Plan Z Phase: This is a Z3.5 (ZReboot 3.5) recipe.
Lemon curd is the perfect spring and summer dessert ingredient. You can serve this very simply by dipping cookies in it or use it like icing dividing layers of a cake. I like to make a tart or even mini-tarts. I have made a lemon dessert for my husband’s birthday for 38 years straight. I bet you can guess that’s his favorite dessert flavor. This one marks the year 2021.
Servings: Serves 6 as small tarts or makes one 9” larger tart (You’ll need a crust but we have a recipe for that too!)
Ingredients:
- 3/4 cup of fresh lemon juice (Depending on the size of the lemons it might take about 4 lemons to get 3/4 of a cup. Use a juicer. Don’t buy lemon juice in a jar)
- 1 tsp of dried lemon peel (Or you can zest one of the lemons.)
- 1/2 cup regular sugar (This is a splurge. This is a TART tart.)
- 1/4 cup of sugar substitute (I use Swerve or ZSweet.)
- 3 eggs
- 1/3 cup of salted butter, cubed
Optional: Whipping cream, Truwhip (tastes just like CoolWhip without the sugar), and/or berries for decoration.
Instructions:
In a medium saucepan add the lemon juice, zest, sugar, sugar sub, eggs, and butter. Heat on medium-low until the curd is thick enough to coat the back of a spoon with a nice thick layer. You’ll know you’re almost done with it begins to lightly bubble. It will be about six minutes. I stir with a whisk often to keep it from forming a crust on the bottom of the pan. If you feel a crust forming, turn the heat down a little.
That’s it! You are done! Now you can decide how you want to serve it: as a tart, several small tarts or simply dip in a cookie or two.
If you want to keep the curd in the refrigerator that’s fine. Definitely chill it. That helps it thicken up even more. You can chill it for up to five days. Just cover it with a layer of plastic wrap after it’s chilled. That keeps it from forming a skin on the top. Stir and serve it or incorporate it into a recipe.
Enjoy!
Cheers,
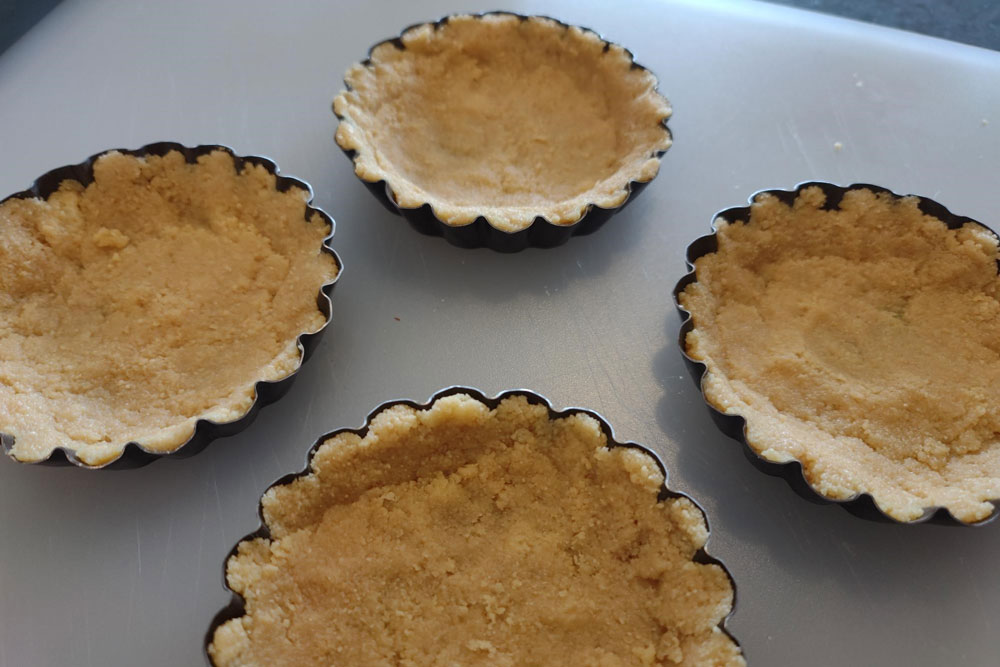
No Bake Shortbread Cookie Crust
Plan Z Phase: This is a Z3.5 (ZReboot 3.5) recipe.
For use in making little or large dessert tarts. We are offering this recipe in conjunction with our lemon curd recipe to make lemon tarts.
I am a huge fan of English shortbread. When I traveled a lot in England on business, the hotel usually left a package or two by the coffee maker. I used to make that my little breakfast while I worked at the desk. Walker’s Shortbread beats all the others for buttery flavor and crunch.
Servings: Makes one crust in a nine-inch pan or six mini tart crusts.
Ingredients:
- 10.6 oz of Walker Shortbread Cookies (about 2+ cups crushed)
- 1 Tbl of sugar (small splurge)
- 6 Tbl of butter, melted
Instructions:
If you have a food processor this is time to get it out. Put the cookies in the processor and pulse until you have crumbs. If you don’t have a processor, you can put the cookies in a ziplock baggie and crush them with a rolling pin or even the bottom of a canned item from your pantry.
Put the cookies, sugar, and butter in a medium bowl. Stir with a fork until it looks like wet sand. Crush any larger chunks of cookies you find and mix again.
Get out a nine-inch tart pan with a removable bottom, or even a pie plate or cheesecake pan if you want. For mini-tarts, you want six tart pans with removable bottoms.
Fill your tart pan(s) of choice with the cookie mix. Now, take your clean fingers and move the bits around so you can form it into an even tart crust. Have some going up the sides. You can press it down as you go along. You want it firmly pressed. Chill the tart(s) in your refrigerator for at least an hour before you fill them.
Before serving, you can fill the tart(s) and keep it in the fridge for an hour or more. If longer, loosely drape it with plastic wrap to keep a skin from forming on the top. Remove the tart(s) from the pan and put on a serving platter or plates.
You can either decorate your tarts before you serve or let your guests decorate them as they choose. A dollop of TruWhip or sweetened whipping cream goes well with the tart and you can garnish with one berry or more. Sometimes I put a rim of berries all along the outside.
These crusts lend themselves to all kinds of flavored creams. Think of things like chocolate cream pie or other cream pies.
Enjoy!
Cheers,
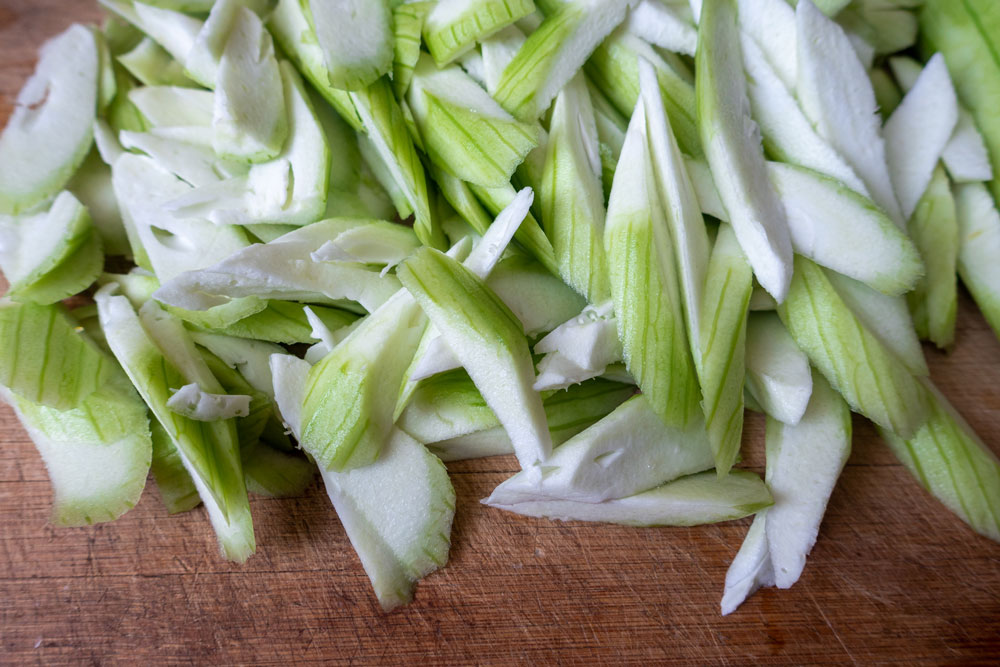
Celery Apple Salad
Plan Z Phase: This is a Z2(ZReduction) recipe.
The inspiration for this recipe came from a new one offered up by Bon Appetit. I must give them some of the credit. I changed it enough to make it my own, but the original is in a cookbook by Molly Baz called Cook this Book. As a side dish, this is your veggie for that meal and a quarter of your fruit for that meal. If you do this as an entrée, consider up to eight oz of protein (half of your daily allotment of protein) and the rest stays the same. You can even add unlimited lettuce if you want to make this bigger.
Servings: Serves four as a side dish. With the addition of a protein, this could easily serve two as an entrée. Consider things like cold, cooked shrimp, shredded cooked chicken, or even cold sliced steak. Perfect for a warm day.
Ingredients:
- 4 cups of celery bits. Wash and trim the celery. Slice it on a diagonal so you get elongated pieces. You can even include the delicate celery leaves. BIG YUM!
- 1 Granny Smith apple cored and cut into thin slices.
- 1 small shallot peeled and cut into thin slices.
- 2 Tbl of minced fresh mint
Dressing:
- 3 Tbl of rice vinegar
- 1 tsp of granular Truvia or 5 drops of liquid stevia
- 1/8 tsp of cracked red pepper. This will give it zing without heat. You can always add more to meet your firey taste.
- 3 Tbl of olive oil
- Grated sea salt to taste
Instructions:
Make the dressing. I use my Bullet Blender but if you don’t have one you can just use a whisk and a medium bowl. Put in all of the ingredients and run the blender for five to ten seconds or whip with your whisk. Taste and season with grated sea salt. Set aside.
Put all the other ingredients in a medium bowl. Mix them up so they are evenly distributed. Pour on the dressing and toss so everything gets covered. Let the salad set for about 15 minutes to meld the flavors. If you don’t have time, it’s okay to just dig in!
If you are making this as an entrée, the protein can be scattered on top or tossed in. Your choice. Season with grated sea salt and pepper to taste to give a bit more oomph to the protein.
Enjoy!
Cheers,

Counting Calories
We were all taught the same thing. Calories in. Calories out. It’s all about the calories.
When I was a young teenager, I bought one of those pocket-sized calorie counting books they sold at the grocery store. They were prominently displayed by the check-out. I took it home and it didn’t take me long to memorize it. I was obsessed with wanting to lose weight and look like a waif. Twiggy was the “model of the moment” in those days. She was the most famous waif on the planet. I wasn’t really fat. I just thought I was. And the way to lose weight was to cut back on calories consumed. Everyone knew that.
Well, what everyone knew to be true was wrong.
You will be shocked at how flawed counting calories really is when you watch this video clip put out by Adam Ruins Everything. Absorb this and your whole view of calorie counting will change.
https://www.youtube.com/watch?v=Uv6J5jxi84o&feature=youtu.be
So there you have it.
Counting calories is a useless exercise.
Cheers,
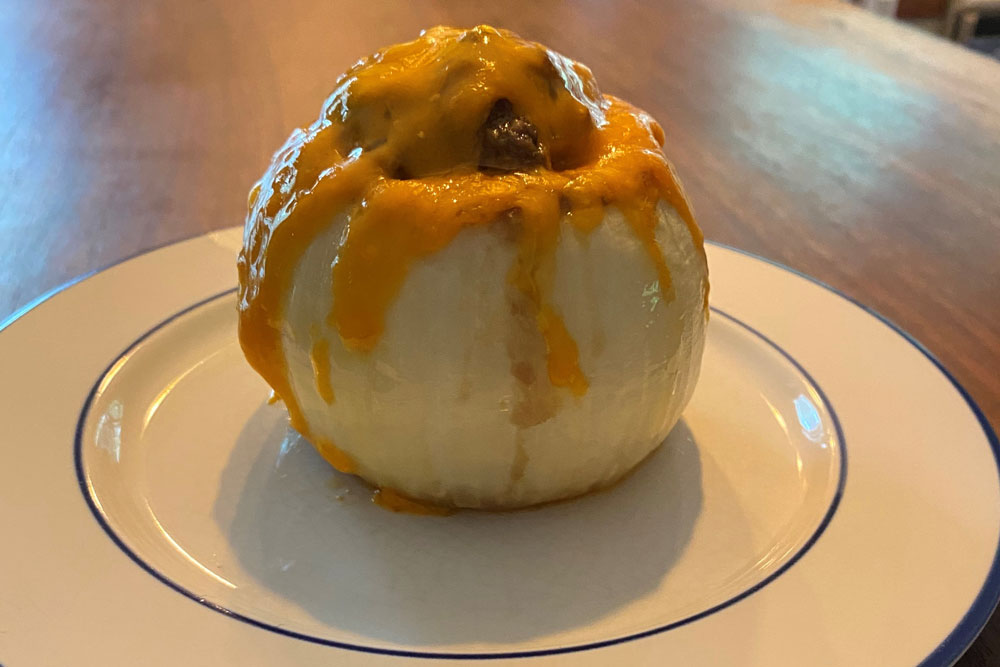
Burger Stuffed Onions
Plan Z Phase: This is a Z3(ZReboot) recipe.
Truth be told I made this dish for my husband. He LOVES roasted onions. I had a craving for a burger, so this fit the bill. How much burger will fit in your onion depends on how big the onion is and how well you scoop it out.
Servings: Serves 2 and can be multiplied easily.
Ingredients:
- 2 medium yellow onions
- Olive oil spray
- 1/2 lb of ground beef
- Grated sea salt and ground pepper to taste
- 1 large egg
- 1/2 tsp of Italian seasoning
- 1 – 2 oz of grated cheddar
Instructions:
Spray your oven-proof pan with olive oil spray. Set your oven to 350 degrees.
Cut off about a quarter-inch off the top and bottom of the onions then peel them. Take a paring knife or a melon ball scooper and carve out the middle. Leave a half-inch around the sides so the onion holds together (Keep the onion bits to use in another dish).
In a small bowl combine the beef, salt, pepper, egg, and Italian seasoning. Mix it up. I use my hands. It’s very sloppy.
Put your onions in the ovenproof pan.
Fill the onions halfway with the ground beef mixture and add in half of the cheese. Then fill the onion the rest of the way with the remaining beef mixture.
Put the stuffed onions into roast for about 40-45 minutes. Check them halfway through. If they are starting to look too brown on top just lay a piece of aluminum foil over the top and continue baking. When they are done, add the rest of the cheese on top and pop it back in the oven just until the cheese melts. Then you are ready to serve with your preferred sauce(s) and sides.
Optional sides/toppings: I served mine with sandwich sauce. It’s sort of like Thousand Island dressing. You can buy it in the deli. My husband had his with mustard. You just dip your bites in your sauce of choice. A nice slice of ripe tomato on the side is good too. Or even a tomato salad.
Enjoy!
Cheers,
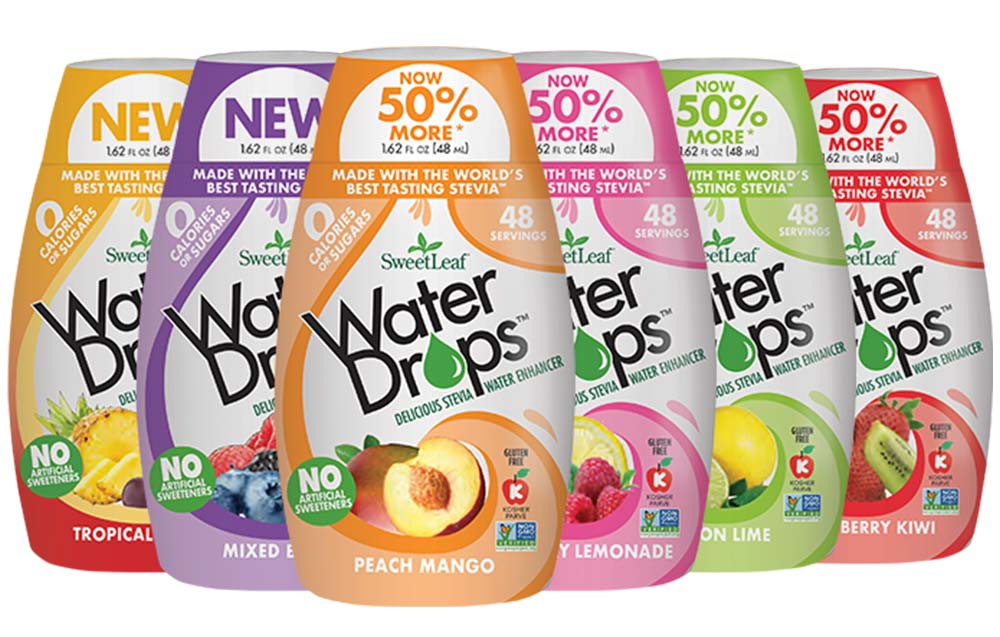
Sweetleaf Water Drops
Hydrate deliciously, without artificial sweeteners. SweetLeaf® Water Drops™ are a convenient, sugar-free, and gluten-free hydration enhancer available in six fruit-flavored blends. Add to still or sparkling water to take it from boring to WOW!
Have you ever wondered if you or your family are drinking enough water? Hydration is a major problem today. Most people have no idea they are dehydrated.
Our body has an unquenchable thirst for water. For many, it is a real challenge to keep up with our near constant need for water. Nearly 75% of American adults and children are chronically dehydrated. An amazing and scary statistic!
Dehydration can cause fatigue, difficulty thinking, and even kidney stones. Water is necessary for the body to digest and absorb vitamins and nutrients. It’s also key to proper digestion and it detoxifies the liver and kidneys. Adequate hydration is vital and improves body and brain health while promoting healthy skin.
The problem is most people don’t like the taste of plain water and find it boring. That is why we created our delicious Water Drops®. The water enhancers on the market today are full of chemicals. We wanted to offer a better-for-you water enhancer in six delicious flavors with zero calories, zero sugars, and no artificial sweeteners.
Transform your still or sparkling water from boring to WOW and help your body, brain, and skin get their needed nourishment to function at their best!

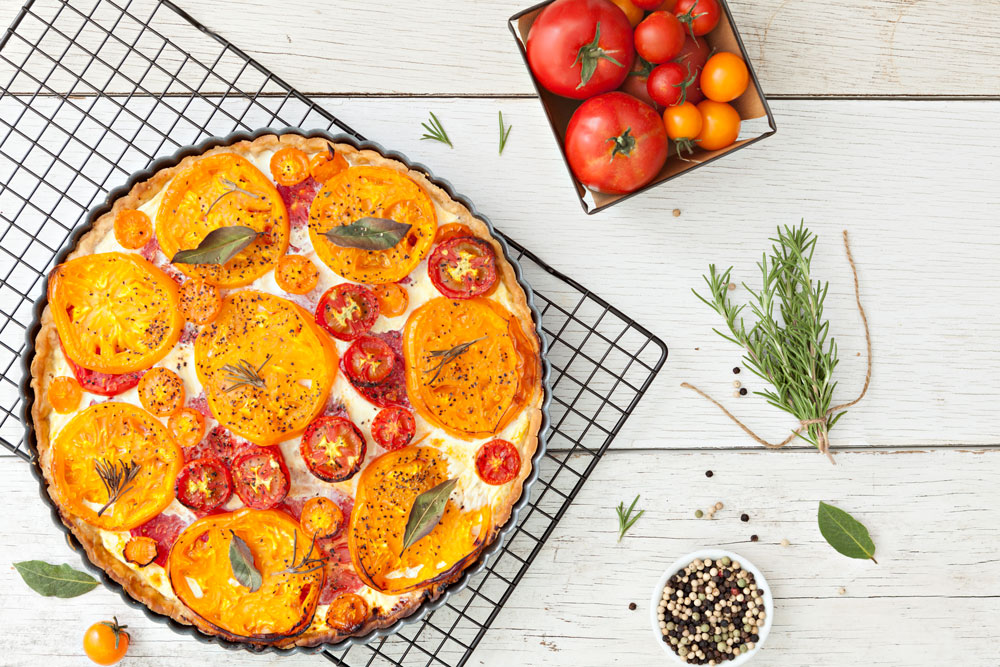
Juicy Tomato Pesto Tart
Plan Z Phase: This is a Z3.5(ZReboot3.5) recipe.
I used big, ruby red and ripe tomatoes to make this. I cut the slices fairly thick too. That contributes to the juiciness. This is a perfect light dinner or lunch. I also added oven-cooked bacon as a protein side dish. A bit of extra bacon was also kept to be diced into bacon bits for the leftovers. Those we sprinkled on top. All magic!
Servings: Serves 6.
Ingredients:
- Dough for a 9” tart pan or pie pan (be sure to take it out to soften up about 30 minutes ahead of baking so it unrolls easily)
- 2 large ripe tomatoes or 4 small ones
- 1/4 cup of pesto
- 1 1/2 cups of shredded mozzarella cheese
- 1 tsp of dried Italian seasoning
- 3 large eggs
- 1/3 cup of heavy cream
- 1/4 tsp of grated sea salt or to taste
- 1/4 tsp of grated pepper or to taste
Instructions:
Heat your oven to 350 degrees. Take your unrolled dough and put it in your tart pan. Let some of the dough spread up the sides of the dish. Prick the dough with a fork in a few places and bake at 350 for 12 – 15 minutes. (I don’t usually bother with pie weights anymore. If the dough has a few puffy parts when it comes out of the oven just slit them with a knife.) When you remove the crust from the oven, let it cool while you make the filling.
While the crust is baking, slice your tomatoes and place them on paper towels to drain.
If you purchased a pre-made pesto you'll want to drain off the oil from the top. Spread the crust with the pesto and store the remainder for another use. Spread the cheese over the pesto. Sprinkle on the Italian herb mix.
In a bowl or a small blender prepare the custard. I use my Bullet Blender. Put in the eggs and cream along with the salt and pepper. Blend just a few seconds to whip it up so it’s mixed and light.
Place the tomato slices in whatever fashion looks good to you over the cheese mix. Then drizzle the custard over the top. I try to make sure some of the tomato slices are still above the custard so the nice redness of the tomatoes shows. If necessary swirl the dish a bit to make sure you get the custard evenly distributed.
Bake until the filling doesn’t wiggle. 35 minutes should do it. Then let it cool for a few minutes so it firms up before you slice it. This will also keep you from burning your mouth. Hot tomato is Hot tomato!
You are ready to serve. This can also be served at room temp on a buffet. Leftovers reheat well and safely travel to work in a container.
Enjoy!
Cheers,
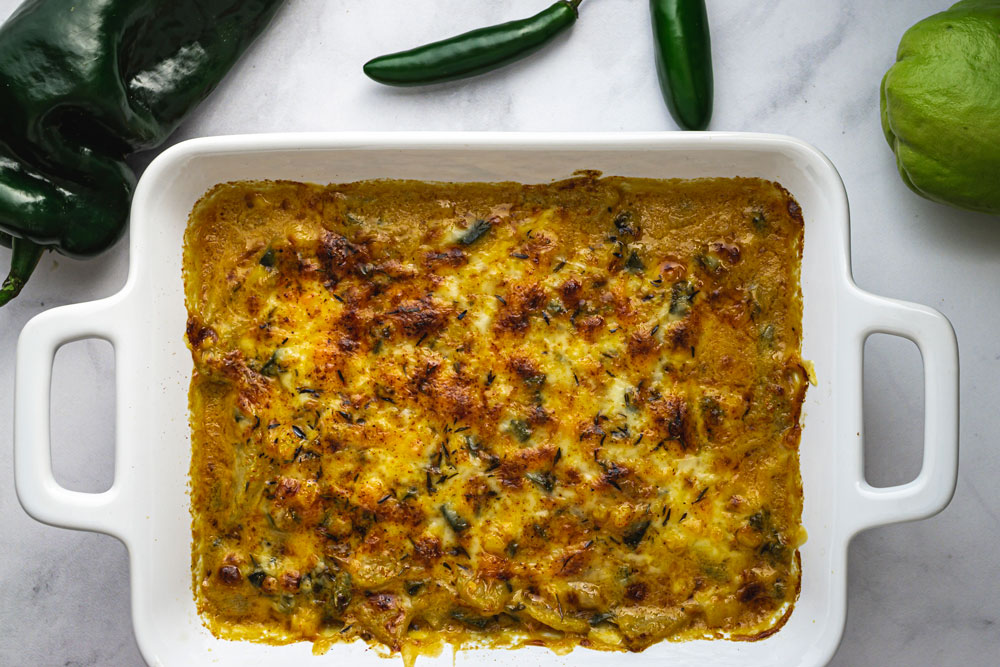
Chicken and Green Chiles Casserole
Plan Z Phase: This is a Z3(ZReboot) recipe.
This chicken casserole will remind you of chiles Rellenos. If you like those you’ll be a big fan of this low-carb dish. Simple to put together and toss in the oven. And Voila! Dinner. I serve with slices of avocado on the side dusted with a bit of grated sea salt.
Servings: Serves 4-6
Ingredients:
- 2 cups of diced or shredded cooked chicken (I just baked chicken tenders at 375 degrees for 15 – 20 minutes. Then chop up.)
- 3 cups of shredded Monterey Jack Cheese
- 1 1/2 cups of grated cheddar cheese
- 2 cans of diced green chiles (4 oz each)
- 2 large eggs
- 2 Tbl of whipping cream
- 1 Tbl of all-purpose flour
Instructions:
Preheat oven to 375 degrees. Grease a nine-inch casserole dish with olive oil spray. Sprinkle in half of the two kinds of cheese. Layer on one can of the chiles. Now scatter your cooked chicken on top. Top that with the other can of chiles. Top all of that with the remaining cheese.
In a bowl, whisk together the eggs, cream, and flour. Drizzle that over the cheese surface. Try to cover as much as you can but if you miss a few spots it won’t matter.
Bake for 25 – 30 minutes until set. Cool for10 minutes before you serve it.
Enjoy!
Cheers,