
The most hopeful and helpful thing I’ve read so far…
The most hopeful and helpful thing I’ve read so far on the virus came from my naturopathic doctor in Chicago, Dr. Terese. I miss her. She’s a brilliant woman. Good thing I am still on her mailing list.
My feeling is the most important thing we can do is not get COVID-19. Do everything you can to not contract the virus.
Yes, do all the things the experts are saying. Wash hands regularly. Social distancing. And all the rest. But there are other things you can do that will help strengthen your immune system and (hopefully) make you less likely to get it.
Here’s what my doctor sent with my comments thrown in.
From Dr. T:
Recommendations for staying healthy and overall flu/viral prevention strategies.
Diet/Lifestyle Recommendations for good health and a strong immune system:
- (From Dr. T.) Diet - Remove all added sugars, white flours and pastas and foods that are higher glycemic foods. High levels of glucose in your bloodstream can decrease the effectiveness of your immune system in fighting off illness. Focus on eating a clean diet with lots of vegetables, lower sugar fruits (like berries) and grass-fed meat, eggs and wild-caught fish or legumes. Adding raw garlic to your diet can boost your immune system's natural killer cells.
From Zola: This looks like Plan Z in one paragraph! If you’re currently on the Plan Z diet, this list will look familiar. If you are not yet a Plan Z client this can give you extra motivation to get started. Of course there are lots more details as part of Plan Z and you need the all-important ZR50 Crave Control spray to keep you comfortable.
- (From Dr. T.) Sleep - Sleep deprivation can suppress your immune system. Be sure to get sufficient sleep every night, at least 7 hours/night.
From Zola: There is an element in the ZR50 Crave Control spray that helps you relax so you sleep better. You’re taking magnesium citrate while you do Plan Z too…which helps with sleep.
- (From Dr. T.) Stress - In spite of the never-ending news cycle, try to keep stress levels to a minimum as stress hormones can suppress your immune system. Try implementing stress reducers - exercise, meditation, yoga, laughter - into your daily routine.
From Zola: I have to work on this one. I am currently a little too dependent on getting updates on the virus, the spread and the economic news.
- (From Dr. T.) Hydration - Hydrated cells function more optimally. Water helps to flush out metabolic waste and flushing out this waste will help our immune system function more optimally. Rule of thumb to determine how many ounces of water you need to drink is to divide your weight, in lbs, by half. That number is the number of ounces you should be drinking, at minimum, in water per day.
From Zola: With Plan Z we recommend you get at least 100 oz of water per day. For some it takes time to get used to it but then your body will crave it.
- (From Dr. T.) Exercise - exercise gets your lymphatic system flowing, which helps your immune system work more efficiently at fighting infections. Exercise improves circulation, including circulation of antibodies and white blood cells which fight off infections. Even walking can give you these benefits. Moderate exercise is the key as there is evidence that over-training can suppress your immune system.
From Zola: My husband and I have implemented a new walking schedule. Since we are working from home we are going out and walking around our neighborhood complex three times. That takes 30 minutes. We are also continuing our exercise and my yoga although we have had to adapt since our gym is closed. Lifting weights is important and if necessary, just lifting the weight of your body parts in new ways is helpful for strength building. Don’t sit around waiting for this to end.
- (From Dr. T.) Hand washing/hand shaking, etc. - wash your hands!! This is one of the most useful strategies we can all employ to prevent the transmission of viruses. Even hand sanitizer is not as effective, although that is an alternative if soap and water is not available. Do not shake hands, use an elbow bump or jazz hands for a greeting. Avoid touching your face - eyes, nose and mouth!
From Zola: Interestingly, my pharmacist told me that hand sanitizer is not useful. It kills bacteria – not viruses. I have found a cleaning product that kills viruses and am using that to wash my hands. Lately some doctors have been saying that hand sanitizer can work but that it has to have a minimum of 60% alcohol. So, label reading is in order.
- (From Dr. T.) Sinus rinse/Neti pot - cleaning your nasal tissue may decrease a virus's ability to take hold. This is theoretical and there is no evidence on this with the COVID-19 virus. Xlear is a nasal spray with xylitol and grapefruit seed extract, which have antimicrobial properties.
From Zola: I’m not a fan of neti pots but I’m glad people are trying to get creative to get us all the help we can get.
Consider applying these ideas to your daily life. Most of them are helpful ideas for overall health/immunity and not just a plan to try to keep from getting COVID-19.
Stay well.
Hang in.

Ideas for Eating…Now
Up until now I have been hunkering down. For me that means I’m practicing social distancing. I limit my trips to the grocery store and the gas station. I wash my hands like a mad woman.
Now I am in the final stages of locking down. Hunkering down is not easy. Locking down is going to be HARD. But we have to do it.
In my case I am planning for a 3 week stretch of working in isolation; keeping my inner circle to just a few people I work with and my husband of course.
I am taking one more trip to the grocery store to stock up on provisions. Then I am going to spend a chunk of my days channeling my inner Julia Child. I plan to make large batches of a few dishes and plan to rotate them. I am making things that will taste wonderful right from the freezer. Thaw and heat.
I am going to share some of those recipes with you today…in case you want to join me in stocking up on good food that will make the next few weeks more pleasurable than gnawing on beef jerky. I am here to give you inspiration.
I am going to let you know my plans for breakfasts, lunches and dinners.
I will do my best to include both ZReduction meals and ZReboot (maintenance) meal variations.
Breakfast
I will be concentrating on smoothies for my breakfasts. I do that often anyway. I can always switch out to scrambled eggs, a frittata or hard boiled eggs. The good thing is eggs last quite well in the refrigerator.
I want to make sure I get fruit, so my smoothies consist of a protein powder or plain full fat yogurt, Stevia if I feel I need it, a milk (pea milk is my favorite but I also use coconut milk or almond milk – no cow. Cow's milk spoils. The others are shelf stable and can last.) Whiz that up and I'll stay full and focused until lunch time. Here’s a smoothie recipe you can try, and an article on the miracle of collagen protein.
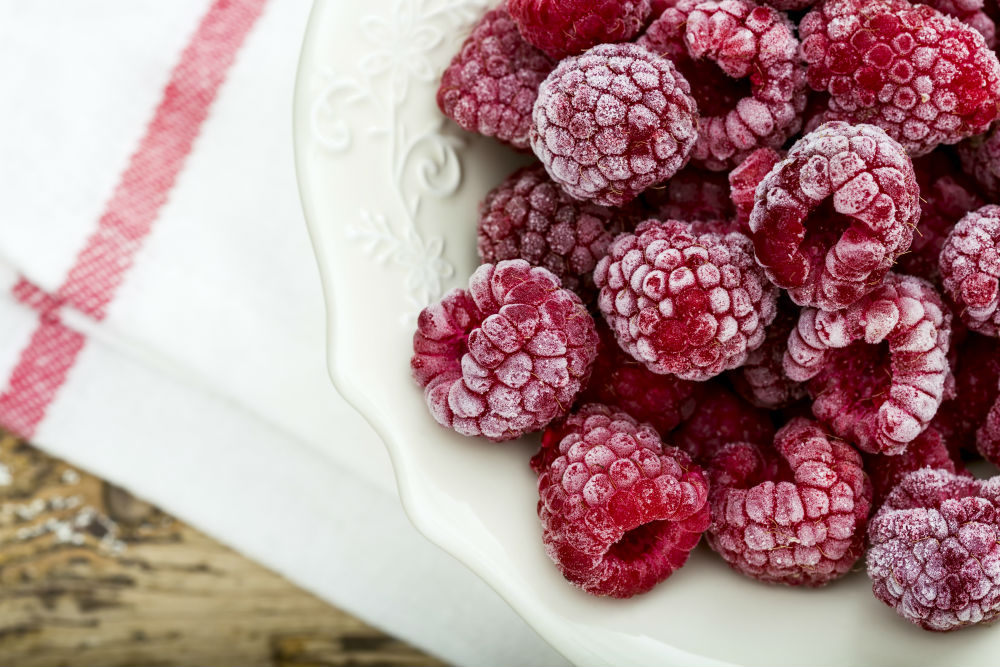
For fruit, I rotate strawberry, raspberry, mixed berry, peach slices or mango chunks. You can find them all in the freezer section. You don’t need fresh.
If you want granola, make this one and serve it with a drizzle of pea milk. Pea milk has a wonderful mouth feel.
Let’s skip lunch for a minute and talk dinner. Most of my lunches will be leftovers from a dinner anyway.
Dinner
I want to give you recipes and direction that do not require going to the store and getting fresh veggies every few days. A recipe might call for fresh veggies but I am going to give you hints on how to use frozen or canned items as substitutes. When the craziness we are going through lessens we can get back to enjoying fresh food again. It will taste SO GOOD!
I am going to make a lot of soups and stews. I can divide them into containers that can be removed from the freezer, thawed and heated. That way I don’t have to eat the same thing for days on end. I’ll get to change it up.
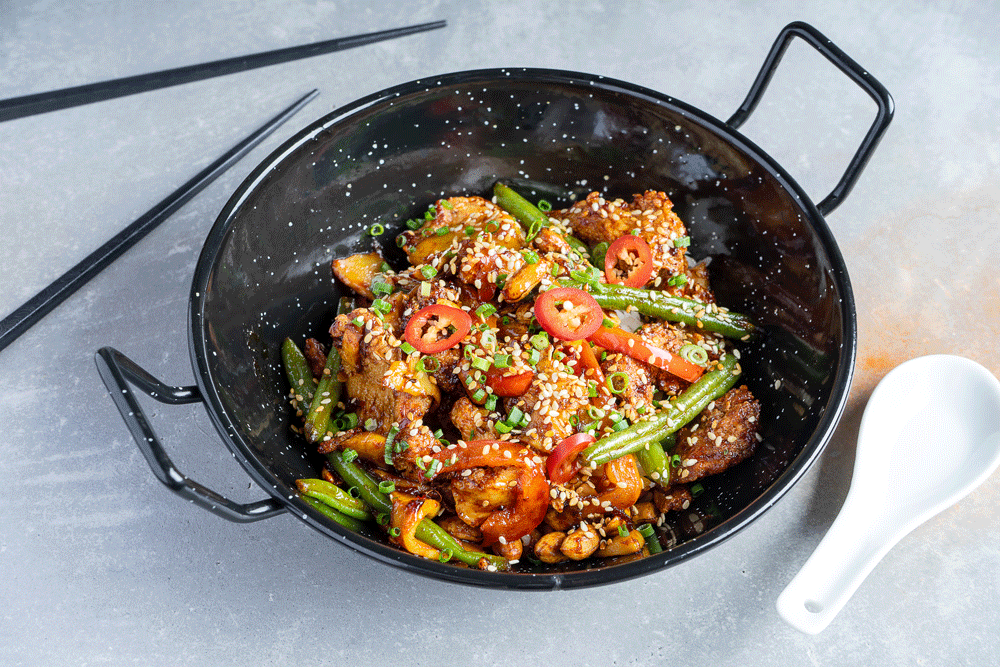
I picked this roasted red pepper chili because you can pull the meat out of the freezer and everything else can be stored in the cupboard until you are ready to make it. It uses roasted red pepper strips from a jar. It’s good too. Serve it with Frito's. If you're on ZReduction, don't go crazy with the Frito's. If you are on ZReboot (maintenance) feel free to add a can of pinto beans. I use Bush’s Chili Hot beans. They have a lovely gravy/sauce.
Meatballs and marinara up next. You can buy the frozen Italian meatballs (cocktail size) and bake them in your oven. Put them in a 9" x 13" pan and pour marinara sauce from the jar all over them. I get a spaghetti sauce with no sugar. Rao’s brand is one that I like, but there are more now, too. If you're no longer dieting, a small piece of naan that you store in the freezer makes a nice garlic bread. You can sprinkle mozzarella or Parmesan on the meatballs, too. Good thing is cheese lasts -- and you can freeze it!
Mushroom soup. Make this one early on while your fresh mushrooms are still good. You can use dry thyme and any regular onion. Then freeze it in batches. It’s super quick and also tastes great with a piece of garlic bread made from thawed naan.
My mom’s beef stew recipe is going to give me great comfort. If you are making this later in the lock-down process consider buying frozen veggies up front for the onions, celery etc. Even one of the pepper onion mixtures will work. You can use fresh potatoes (they last) or even canned ones. Add a can of green beans, too if you want.
For lunch you can have leftovers. If you are really on the run and need to eat processed food from a box get low carb. Atkins is one brand but there are more now.
For other fruits pick up oranges, grapefruit, and apples. They all last quite some time and will be special.
Dessert
I wrote a whole article on frozen desserts. My rule of thumb is keep your dessert carbs to 15 grams or less a day. Besides the frozen options many cookies work, too. You just need to do the math and be disciplined. So, here’s the article AND a bonus recipe for “raspberry ice cream” made from frozen raspberries. The cream should last in your fridge for a couple of weeks. My husband eats this several times a week and adds a few chunks of dark chocolate. Use 72% cacao chocolate and limit yourself to one square and you’ll have a BIG YUM.
More soon.
Spend time this weekend like I will be…preparing to lock down. Get out the games, watch movies, surf the net…Do whatever you do that makes you happy but stay indoors.
Hang in.
Cheers,
![]()
Raspberry "Ice Cream"
I scream. You scream. We all scream for ice cream – and we are on a diet! BONUS!
Raspberry “Ice Cream”
Plan Z Phase: This is a Z2 (ZReduction) recipe. Dieter Margaret offered up a GREAT Idea the other day. I had given her the berries and sweet cream idea. She took it one step further and accidentally made "Ice cream" I scream. You scream. We all scream for ice cream – and we are on a diet! BONUS!
Servings: Serves 2
Ingredients:
- 1 – 2 cups of frozen raspberries
- 2 – 3 Tbl of heavy cream
- ½ tsp of Truvia
- a teeny drizzle of organic vanilla
Instructions:
In a small container, put in your cream, Truvia and vanilla. Stir and let the flavors meld for a few minutes. Secret Told: I do this when I am starting dish clean up and it’s ready when I am finished filling the dishwasher.
Put your raspberries in a small bowl while frozen. Immediately drizzle on half of the cream mixture per bowl. Stir into the berries and eat slowly so you savor it.
Close your eyes and you just might think you are eating a rich, raspberry-filled ice cream. HUGE YUM!
Note: I put the portion at 1 – 2 cups because I find I am fully satisfied with just ½ cup of raspberries and my cream on top. This gives me a creamier texture.
Just factor in too, that this takes away from some of your cream allotment for the day.
Second Note: I also tried this with frozen strawberry bits. They worked well but not quite as well as raspberries. I love cantaloupe and ice cream. I bet if you freeze diced cantaloupe this will be amazing. My guess is blackberries would be a bit big and maybe too frozen but they are worth a try.
Enjoy!
Cheers,
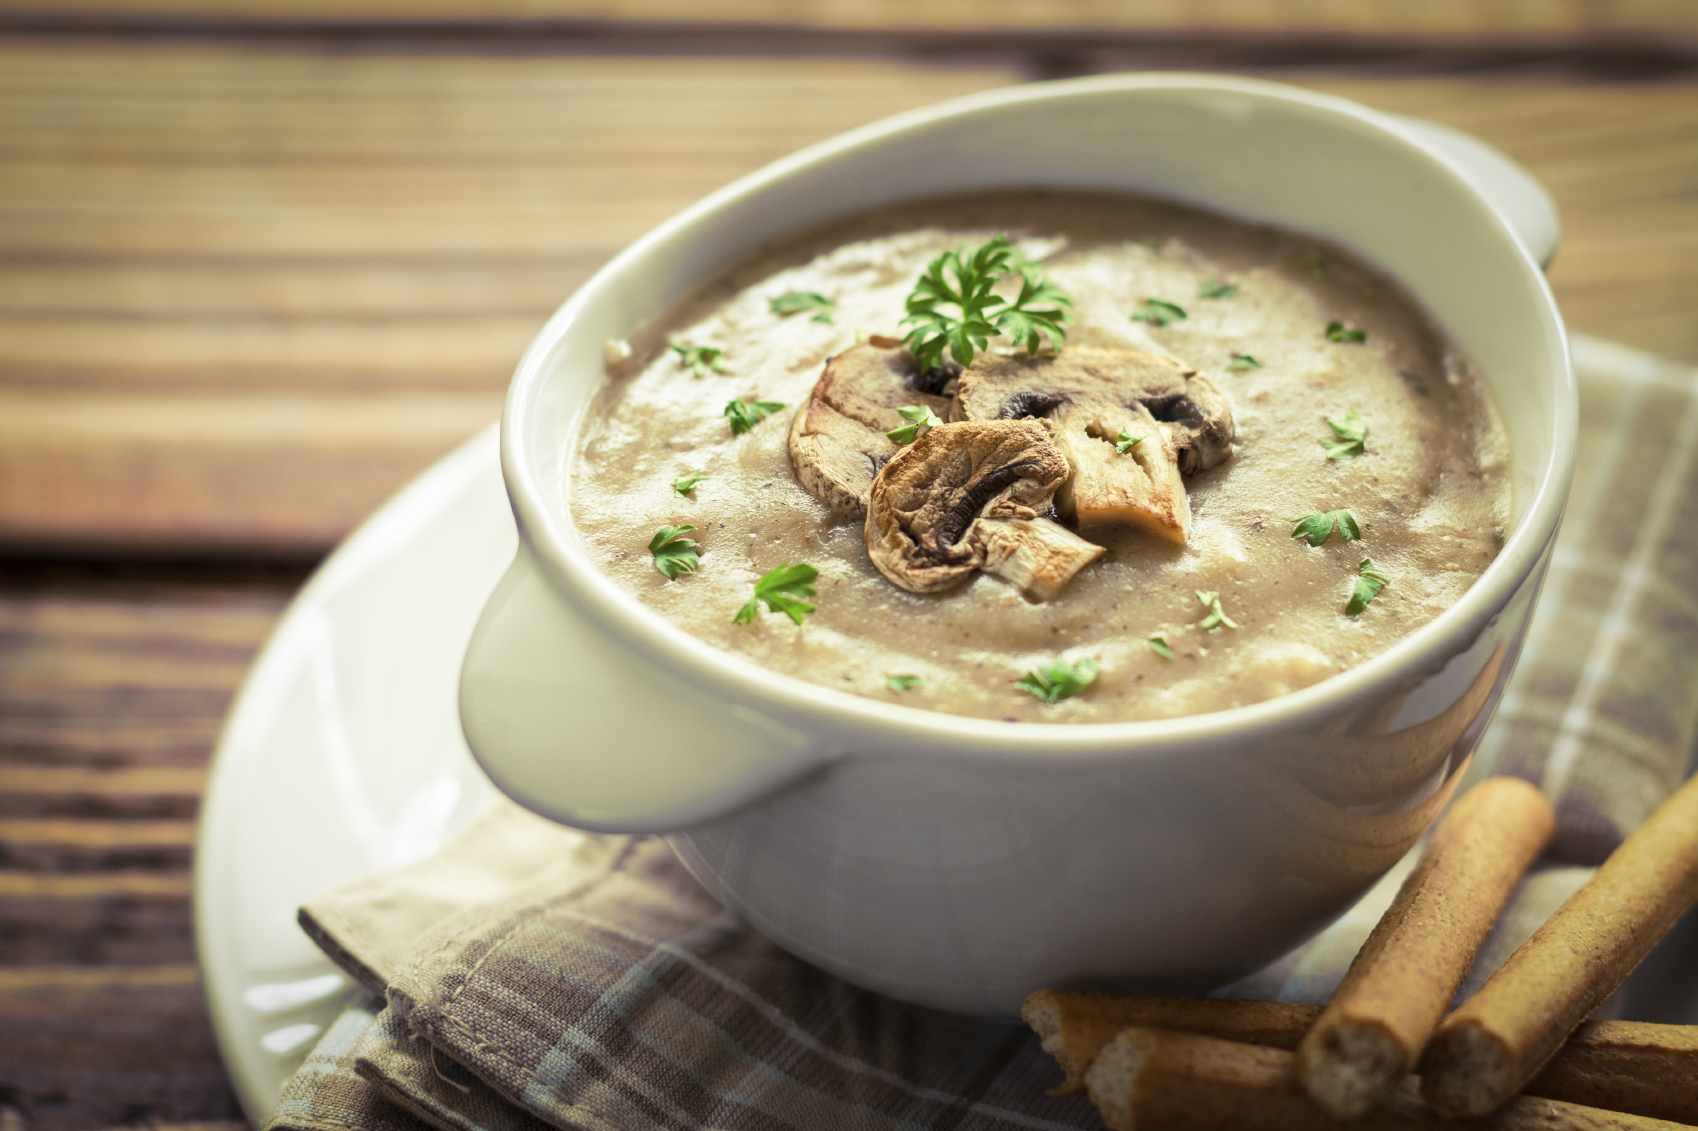
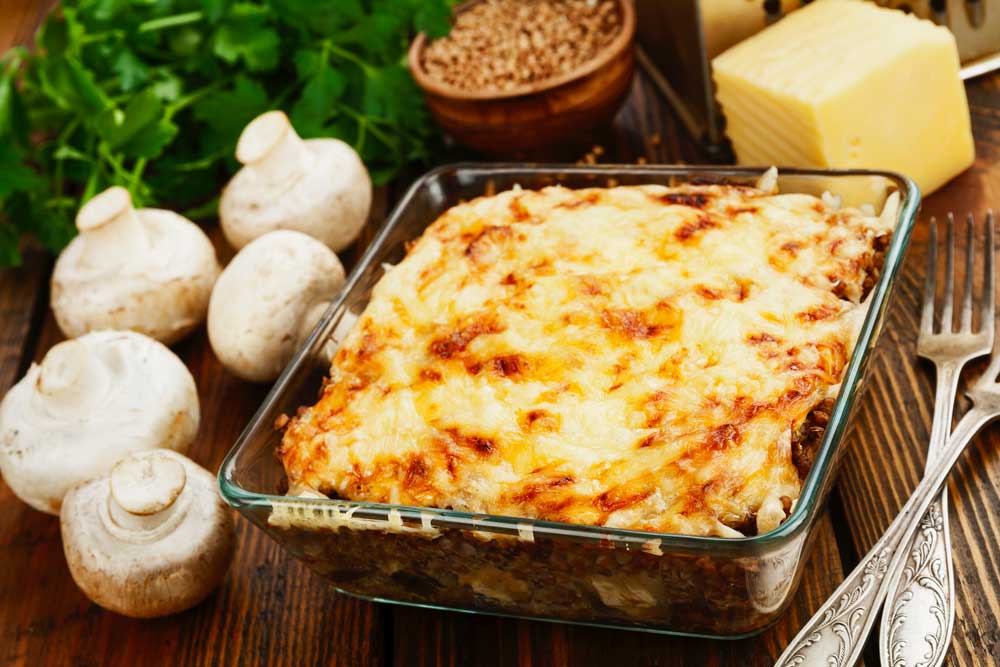
Cream of Mushroom Soup
Plan Z Phase: This is a Z3 (ZReboot) recipe.
Servings: Makes 4 cups or 2 bowls. Can be easily doubled or tripled.
Ingredients:
- 1 pound of sliced mushrooms. I used wild mushrooms, but you can use any you like best.
- 1 large leek, cleaned and sliced. White part only. Or you can use regular onion or shallot. You want about a cup.
- 1-1/2 cups of chicken or vegetable broth
- 1 cup of heavy cream
- 2 Tbl of butter
- 1 Tbl of flour
- ¼ tsp of fresh thyme leaves
- Grated sea salt and pepper to taste
- 2 Tbl of bourbon (optional)
- parsley for garnish
Instructions:
In a medium saute pan, add the butter, mushrooms and leeks. Saute on medium high until the mushrooms just begin to brown on the edges. This gives the soup a richer flavor. Add the flour and stir until the flour disappears.
Add the salt and pepper and thyme. Immediately add the broth. Let bubble a few minutes. Then add the cream. Let the cream gently bubble for a few minutes while it thickens the soup. Stir often. Get it to your liking and stop the cooking. If it gets too thick, you can always add more chicken broth.
If you are adding the bourbon, add it now.
Let the soup cool down. Then use your blender to puree half of it. I like my mushroom soup to still have some slices of mushrooms in it. You decide. If you want, you can puree the whole batch.
Be careful not to puree it when it’s really hot. That can blow the top off the blender and be very dangerous. Let it cool down pretty well and use a towel on top of the blender top. Hold the top down with your hand and begin with the blender on slow to blend it up. Then you can turn it up when you feel it’s safe. If you let it cool completely, you won’t have this issue. I’m just adding this extra advice to keep you safe.
You can store this in the refrigerator overnight if you want and then just reheat before serving. When you reheat it, keep it on low so it doesn’t boil again.
Enjoy!
Cheers,

Roasted Red Pepper and Beef Chili
Plan Z Phase: This is a Z2 (ZReduction) recipe. Okay, so I opened my pantry and saw a jar of roasted red pepper strips. I thought… I could make a new chili with these! So here you have it. This is chili #7 for Plan Z. Very popular!
Servings: Serves 5-7. One serving on ZReduction is 1-1/2 cups.
Ingredients:
- 2 lbs of ground sirloin
- 1 bell pepper, diced (you can use your choice of yellow, orange, red or green)
- 1 large onion, diced – approx. 2 cups
- 2 Tbl of chili powder – your choice. There are hot chili powders and mild ones.
- 1 tsp of garlic powder
- 2 tsp of ground cumin
- 2 – 15 oz cans of diced tomatoes (undrained). You choose if you want them with chilies, oregano and garlic, or even fire roasted.
- 1 – 16 oz jar of roasted red pepper strips packed in water (in jar). Rinse them in a colander and drain. If you buy whole roasted peppers just cut them into strips or chunks.
- ¼ - ½ tsp of cracked red pepper flakes (The kind people use on pizza. If you want your chili really mild, leave these out)
- 3 cups of water
- ½ tsp of grated sea salt (or to taste)
- 1 lime (optional garnish)
Instructions:
Spray a soup pot with olive oil spray. Put in the ground sirloin and begin to break it up. Cook on medium-high, stirring often and breaking it up, until it’s half done. Then add the onions and bell pepper. Cook until the beef is completely done and the veggies are moistened. (The beef won’t be pink in the middle anymore).
Add everything else except the lime.
Turn to a simmer and let bubble for a minimum of 15 minutes. The longer it simmers (up to an hour) the more melded the flavors will become but it will also cook off some of the liquid. That’s why the servings number is a variable.
Garnish with a lime wedge- optional. Some like to squeeze the lime over their chili.
Enjoy!
Cheers,
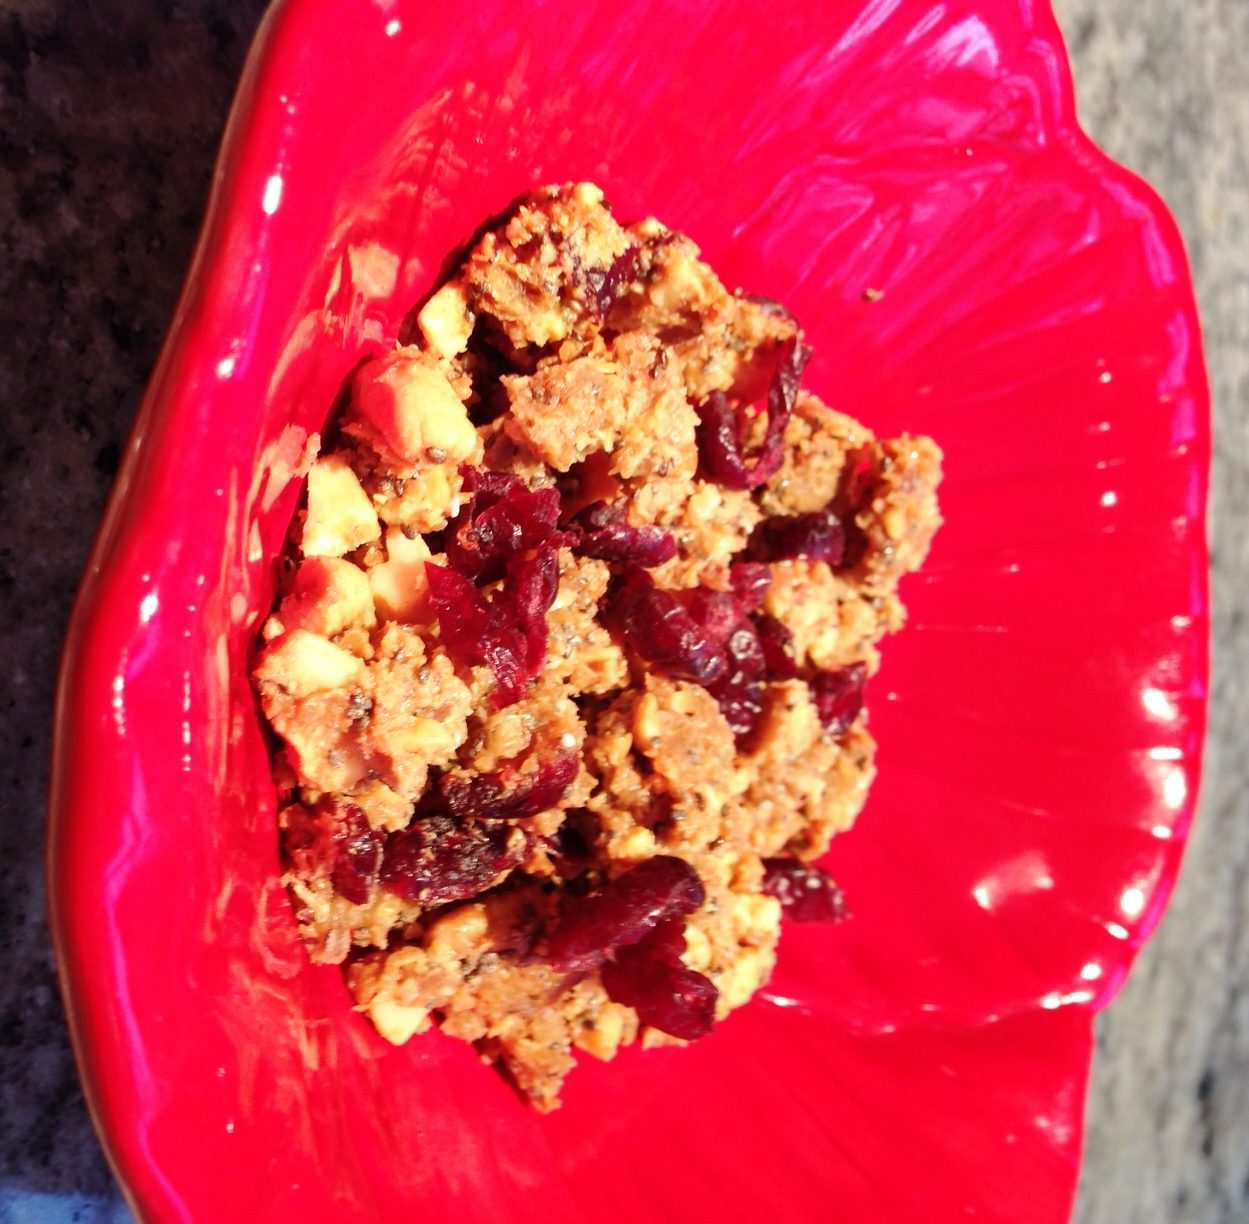
Peanut Butter Craisin Granola
Plan Z Phase: This is a Z3.5 (ZReboot 3.5) recipe. Craving breakfast cereal? Try this instead! Have it with unsweetened coconut milk.
Also makes a YUMMY parfait. To do that...put a ½ cup of unsweetened yogurt in a bowl or large glass. Stir in one teaspoon of Truvia to sweeten it. Then mix in or layer the granola.
Servings: Notice this is 10 servings; a half cup each. (about nine grams per serving of carbs). That’s not bad. Just take it easy and don’t eat it too often. This batch should last a good week if kept tightly sealed. You can freeze it in little batches too so it will last longer.
Ingredients
- 1-1/2 cups cashews
- 1-1/2 cups pecans
- 1 cup flax seed meal (you can get this in the grocery store. Look for Bob’s Mill brand)
- 1/4 cup chia seeds (these are really good for preventing cancer. Order on line or get in health food stores)
- 1/3 cup vanilla whey protein powder (we order this online and use it in smoothies too. Keeps you full all morning)
- 1/3 cup peanut butter
- 1/4 cup butter
- 1/4 cup granulated erythritol (I use ZSweet. You can order this online too or it is in some stores)
- 5 – 8 drops of liquid stevia (most stores have this now)
- ¾ cup of craisins
- 1/4 cup water
Instructions:
Preheat oven to 300 degrees Fahrenheit and line a large rimmed baking sheet with parchment paper.
In a food processor, process cashews and pecans until they resemble coarse crumbs with some larger pieces. Transfer to a large bowl and stir in flax seed meal, chia seeds and vanilla protein powder.
In a small saucepan over low heat, melt peanut butter, butter and erythritol together until smooth. Remove from heat and stir in stevia extract.
Pour peanut butter mixture over nut mixture and stir well, tossing lightly. Stir in water. Mixture will clump together.
Spread mixture evenly on prepared baking sheet. Sprinkle craisins over the peanut butter mixture. Bake 20 minutes, until golden and beginning to crisp. Turn off oven and let sit for another 20 minutes and then break up. Store in a container with a tight lid.
Enjoy!
Cheers,
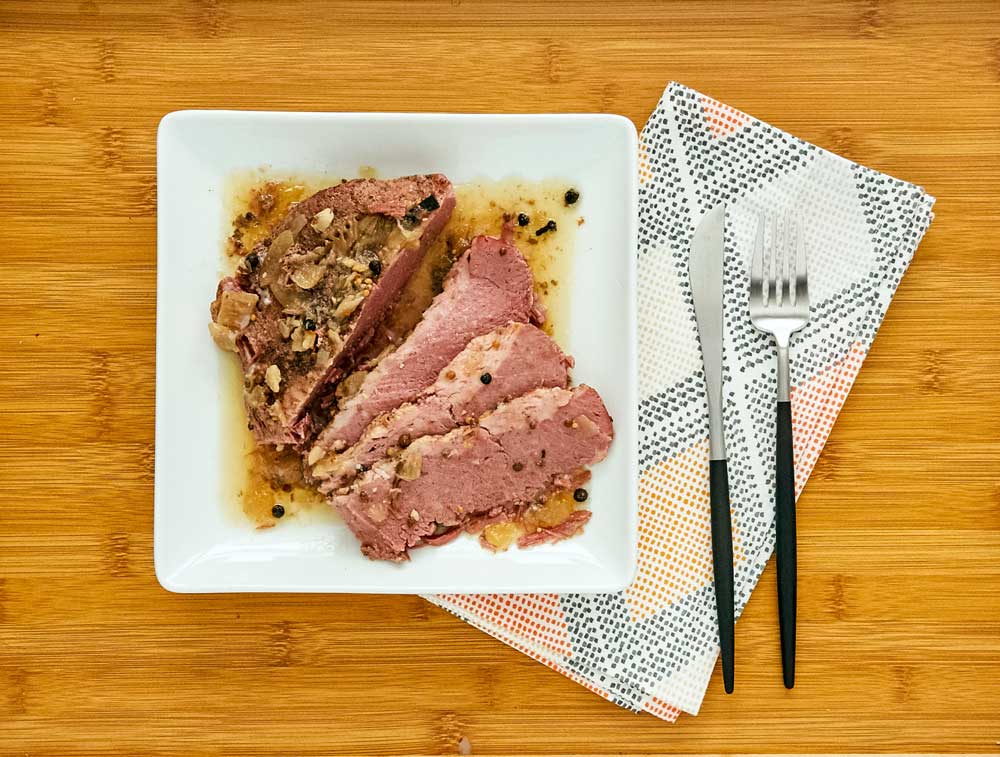
Instant Pot Corned Beef
Plan Z Phase: This is a Z3 (ZReboot) recipe.
I love corned beef, but always felt it tasted better when I ordered it at a restaurant than when I made it at home. Not anymore. I love cooking with my Instant Pot, and after trail and error, I developed a very flavorful corned beef recipe with a lot of oomph. When you buy corned beef, there is a little packet of corned beef spices that accompanies the brisket. The secret is to use that and ADD your own corned beef spices to the mix -- after you toast them. Mmmmm.
For those folks who are looking for a traditional corned beef recipe, don't use the extra toasted spices. Just use the spice packet that comes with the corned beef. This recipe is still a keeper!
Servings: Serves 6 technically, but in my house this serves 4 because everyone had seconds
Ingredients:
For the corned beef:
- 3 lb corned beef brisket (rinsed) with spice packet. Corned beef briskets come packed in a salt brine, so if you don't rinse your corned beef before cooking, it will be salty. Now, if you like salty food, you technically don't have to rinse it. I do rinse mine, but I don't go overboard. One good rinse is enough.
- 1 yellow onion, sliced thick
- 6 cloves garlic, peeled and smashed with the back of a knife
- 2.5 cups beef broth
- 12 ounces beer (lager style, nothing bitter)
- 1 cabbage, cut into 8 wedges (optional)
For the oomph:
- 2 tsp black peppercorns
- 2 tsp coriander seeds
- 1/2 tsp yellow mustard seeds
- 1/2 tsp whole allspice
- little bit of a cinnamon stick (like 1/2 inch)
- 4 cloves
- 3 bay leaves, broken up
- red pepper flakes (optional)
Instructions:
Place onions and garlic into your Instant Pot, then add your corned beef brisket, fatty side up. Sprinkle the spice packet over the brisket.
In a small saute pan over a low heat, add peppercorns, coriander seeds, mustard seeds, allspice, cinnamon, cloves and bay leaves. Don't add any cooking oil to your pan. You're going to toast the spices so they are more aromatic. Be sure to keep moving them around in the pan so they don't stick or burn. The goal is not to cook them. You just heat them long enough for them to brown slightly and start to smell REALLY good. If you're using red pepper flakes, I recommend adding them straight into the Instant Pot without toasting. Once they've gotten nice and toasty (and your kitchen smells really good), add them to your Instant Pot on top of your brisket.
Pour the beef broth on the brisket and add the beer. Cook on high for 90 minutes, then manually release steam. Take the brisket out, with bits of the onion and garlic and place it in a dish. Pour a little bit of the broth on top to keep it juicy (you'll still have a lot of it left in the Instant Pot).
For the cabbage:
You're going to cook your cabbage in the remaining broth that's left in your Instant Pot. Yes, there will still be bits of onion in there, and there will be spices in there, too, but that adds to the flavor. You can strain it if you want, but I didn't. The spices sink to the bottom and the cabbage tasted great. Add your cabbage wedges (make sure they are all partially submerged in the broth). Close the lid, seal the vent and pressure cook on high for 3-6 minutes, then manually release steam.
Note on cabbage cooking: Cook for 3 minutes if you want some crisp in your cabbage, and 6 minutes if you want them to be tender. Your cooking time for cabbage will also depend on how large your head of cabbage is. If you finish cooking your cabbage and decide you want it more tender, put it back in the Instant Pot on the saute function. Don't cover it. The saute function will heat your pot quickly, causing your liquid to boil. This way, you can cook your cabbage until it's as tender as you want.
Once the cabbage is done, use tongs to lift out a wedge of cabbage and place it in a bowl. Using tongs keeps the whole spices in the bottom of the pot. Then ladle broth from the Instant Pot into your bowl. Slice your brisket against the grain and place on top of the cabbage.
Wowza! Sooooo good!
Jen
Operations Manager
Plan Z Diet
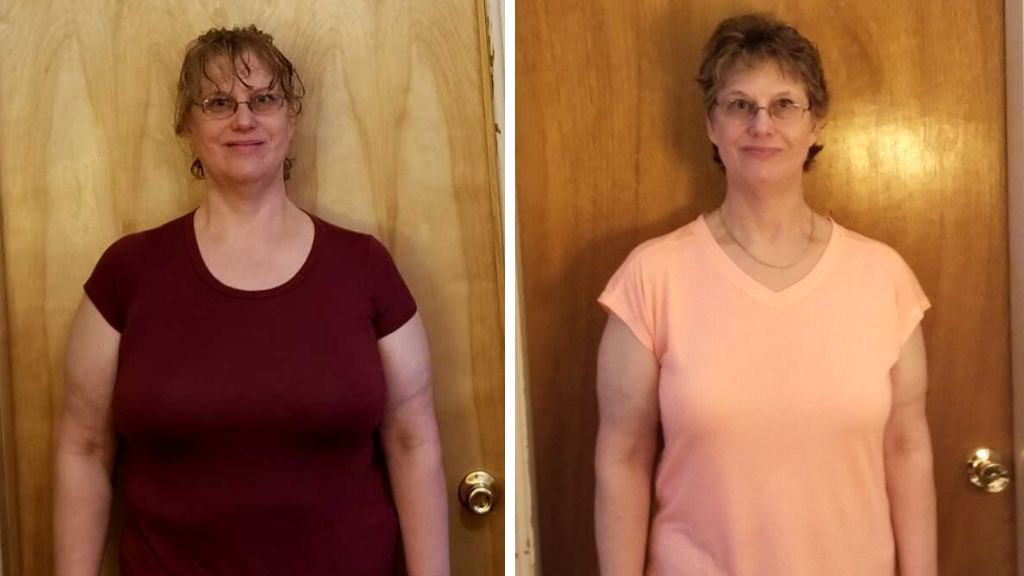
She Said Goodbye to 40 Pounds

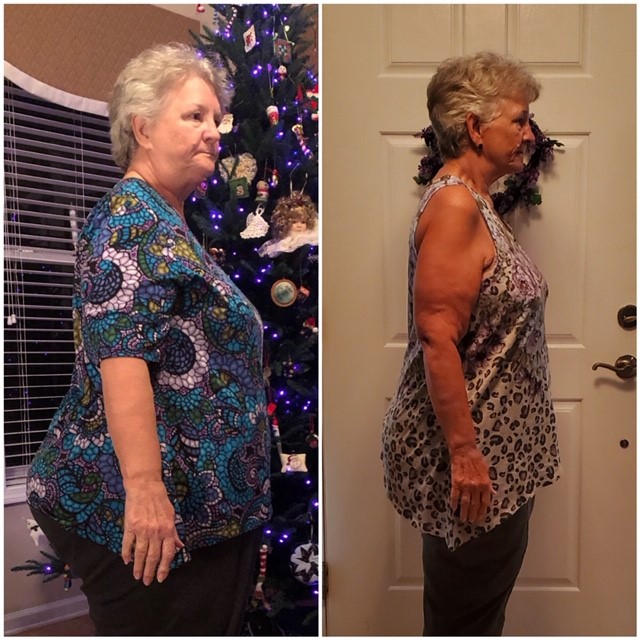
Dieter Betty heard about Plan Z on her local radio station in Central Illinois. She waited 6 months before she decided to give it a try. What inspired her to quit researching and get with the Plan? It was her daughter’s impending wedding. She wanted to lose weight so she could look back on those wedding photos with pride.
Betty has suffered with osteoarthritis in her hands, hip and knee and would need to ice and heat these joints every day before she lost weight on Plan Z.
“There’s hardly any pain at all from my arthritis after losing the weight.” She says now.
Betty lost 18 inches and 40lbs in two rounds of Plan Z. Her husband, Fred, lost 32lbs in just 35 days.
Betty told us, “When you lose that amount of weight you feel more self-confident about yourself…and I think clearly more.”
You can listen to their interview here:
Having her husband join her on the diet for the second round made it much easier. As diet buddies, they could eat all the same food together and support each other through the process. Now, they’re celebrating their success.
We call it the Buddy System and we offer a discount for those who diet together. Call the office for more information! 800-255-9853.

Sweet and Spicy Acorn Squash
Plan Z Phase: This is a Z3 (ZReboot) recipe.
Servings: Serves 4. Can be doubled easily.
I love my acorn squash roasted with just butter in the center and a sprinkle of sea salt and pepper. But I know tons of people want brown sugar in the middle and more. So this version can satisfy the sweet tooth and add an optional spice/heat factor.
Ingredients:
- 2 acorn squash, cut in half and seeded. Use a sharp knife to cut it and a spoon to scrape out the seeds.
- 4 Tbl of butter
- 1/2 tsp of grated sea salt
- 1/2 tsp of chili powder (I use smoked)
- 1/2 tsp of garlic powder
- 1/4 tsp of cinnamon
- 1/4 tsp of cayenne (optional. I wanted an extra kick)
- 1 tsp of stevia
Instructions:
Preheat the oven to 375 degrees. Prep the squash and stand them up on their “backs” so you can fill the middle. I usually put them in 2 bread-baking pans to hold them securely, but a 9" X 13” pan can work too.
Put the pats of butter in each squash piece. Mix the rest of the ingredients in a small bowl and then sprinkle evenly on the squash pieces.
I like my squash thoroughly roasted the old-fashioned way so depending on the size of your squash this might take 1 hour or more. I also like my squash cooked to the point of browning on the edges.
Carefully remove the pan from the oven when they are cooked to your liking. Then carefully remove each squash piece from the pan with a tong.
Enjoy!
Cheers
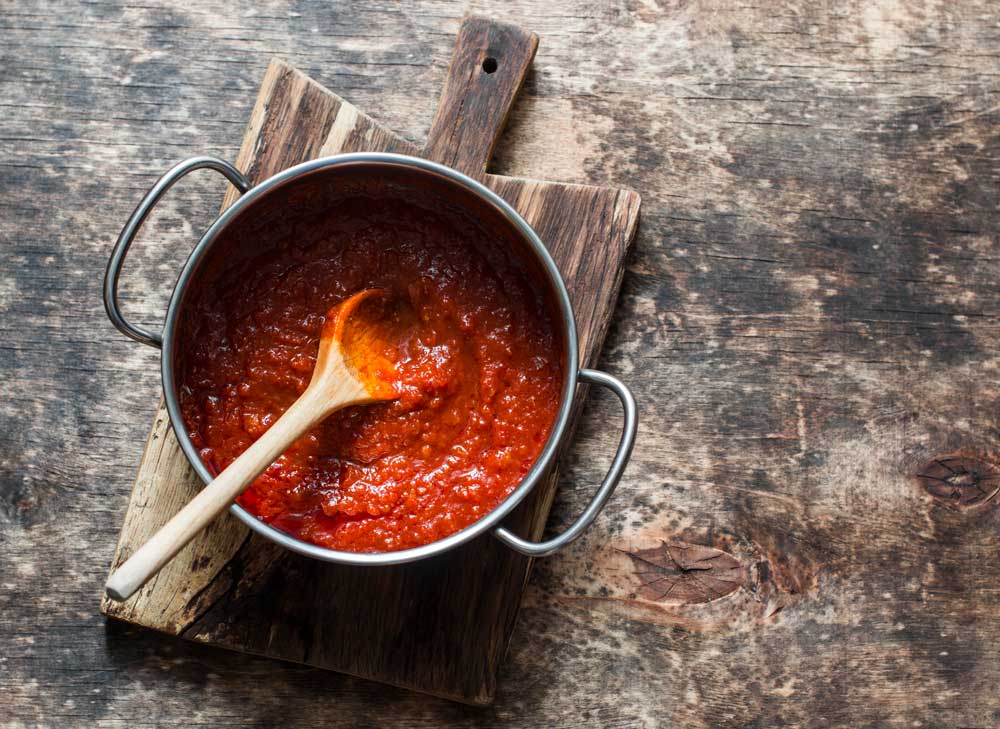
Tomato Cream Sauce
Plan Z Phase: this is a Z2 (ZReduction) recipe and a Z3 (ZReboot) recipe.
Servings: Serves approximately 6 with leftovers.
This sauce is so versatile. Serve over cooked chicken breast (or tenderloins) or fish of any kind. Even use it as a pool of sauce with broiled scallops on top. This can be comfort food or fancy dinner party food depending on how you serve it or what you serve with it.
Ingredients:
- 1/2 cup of onion, diced
- Spray of olive oil
- 3 tsp of minced garlic (jar garlic will do)
- 1 15 oz can of diced tomatoes. I used Hunts fire roasted with garlic. You choose.
- 1/3 cup of tomato sauce
- 1/3 cup of chopped, fresh basil. (Remove stems. Chop leaves only)
- Grated sea salt to taste
- 1/2 tsp of pepper
- 1 cup of heavy cream
For Z3
- You can optionally add 1/3 cup of grated Parmesan to the sauce at the end and even sprinkle more on the finished dish before serving.
Instructions:
Cook your protein to your liking. I suggest chicken, fish or seafood. You will need 6 portions.
While the protein cooks you can work on your sauce. It’s easy and quick.
In a medium saucepan, spray olive oil and cook onion on medium until wilted; just a few minutes. Add garlic, tomatoes, tomato sauce, basil, salt and pepper. Cook on medium for approximately 10 minutes on medium. You want it to bubble down and reduce a bit. Stir every few minutes.
Then add the cream and turn off the heat. Stir. You don’t want to boil the sauce with the cream in it. Just leave it for 5 – 10 minutes so the cream gets good and warm.
Place your protein on the plate and cover with sauce.
Portion for Z2 is two heaping tablespoons of sauce. When you are scooping it out of the saucepan with a tablespoon, try to get an assortment of the ingredients in each scoop. This is half of your cream allotment for the day. You will have very few tomatoes so you almost have your entire allotment of vegetables still available. Consider a side of veggies to go with this and, of course, you can have a plain salad.
Enjoy!
Cheers,

White Chocolate Crème Brulee (custard) with Strawberry Coulis (sauce)
Plan Z Phase: This is a Z3 (ZReboot) recipe. I adapted this recipe from the Ghiradelli white chocolate package. Most crème brulee recipes call for caramelizing sugar on top of the custard. I love that, but the sugar is too much. So, in this case, I made up a simple strawberry sauce to go on the top instead. With Plan Z we work to reduce the carbohydrate count on a recipe but still keep the flavor. This recipe has about 10 grams of carbohydrates per serving. For a dessert, that’s pretty darn good. And for one this pretty and satisfying, it’s GREAT.
You can also use raspberries or blackberries for your sauce if you prefer.
Servings: Serves 8
Ingredients:
For the Custard
- 4 egg yolks (save the whites for something else or toss them)
- 4 tsp of Truvia
- 4 oz of high-quality white chocolate. Ghiradelli is good. Don’t use the white block stuff.
- 2 cups of heavy whipping cream
- 2 tsp of vanilla extract
For the Coulis
- 1 quart of fresh strawberries
- ¼ cup of Grand Marnier or sparkling water
- 1 tsp of Truvia
- mint (optional)
*You'll also need 8 small ramekins (1/2 cup size)
Instructions:
Preheat oven to 300 degrees.
Put your egg yolks and the Truvia in a medium bowl. Whip with a whisk until the Truvia dissolves.
Chop the white chocolate into very small bits.
Heat the whipping cream on medium high. You want to keep an eye on it and watch for little bubbles to form on the sides of the pan. Don’t let it boil. When the bubbles form the cream is hot. Add the chocolate and take it off heat. Mix with a whisk until the chocolate melts and the mixture smooths out. Add the vanilla and stir again.
Now, carefully and SLOWLY add the chocolate to the egg mixture. DO NOT do this fast or the eggs will scramble and you’ll have a lumpy mess. It’s not difficult. Just go very slowly at first and then add in a slow stream while you keep stirring.
When the mixtures are combined in the bowl you are ready to fill your ramekins. You’ll need 8 ramekins in the half-cup size. Fill all 8 ramekins equally. I use a measuring cup to make this easy. It’s sort of like filling cupcake tins. Make sure you don’t fill them all the way. You’ll have about a ½” open at the top. You’ll fill that with sauce later.
Next step is to put the ramekins in an oven proof pan. I used a 9" x 13" for six of them and a 9" x 9" for the other two. Set the filled ramekins in the pan and then add water so it comes up halfway to the top of the ramekins. It’s about a ½” of water.
Carefully put the containers in the oven. Bake for 45 minutes or until set. They might jiggle a bit but not much.
Remove from oven and set on the counter. I use a hot pad and a spatula to carefully remove the ramekins from the water bath and then I set them on a cookie sheet. Put them in the refrigerator to cool. 2 hours minimum would be good.
While they are cooling you can make your coulis (sauce).
Clean and slice the strawberries. Put them in a medium saucepan and add the Grand Marnier. If you don’t cook with liquor just add sparkling water instead. Add the Truvia and cook until the strawberries are softened. You can cook them until just softened or even down to almost a jam consistency.
You have two choices. You can either serve the sauce cold/room temperature on the crème brulee or you can heat it just before serving and have hot sauce on the cold custard. Both options taste lovely.
You can garnish with a mint sprig if you have one handy.
Enjoy!
Cheers,
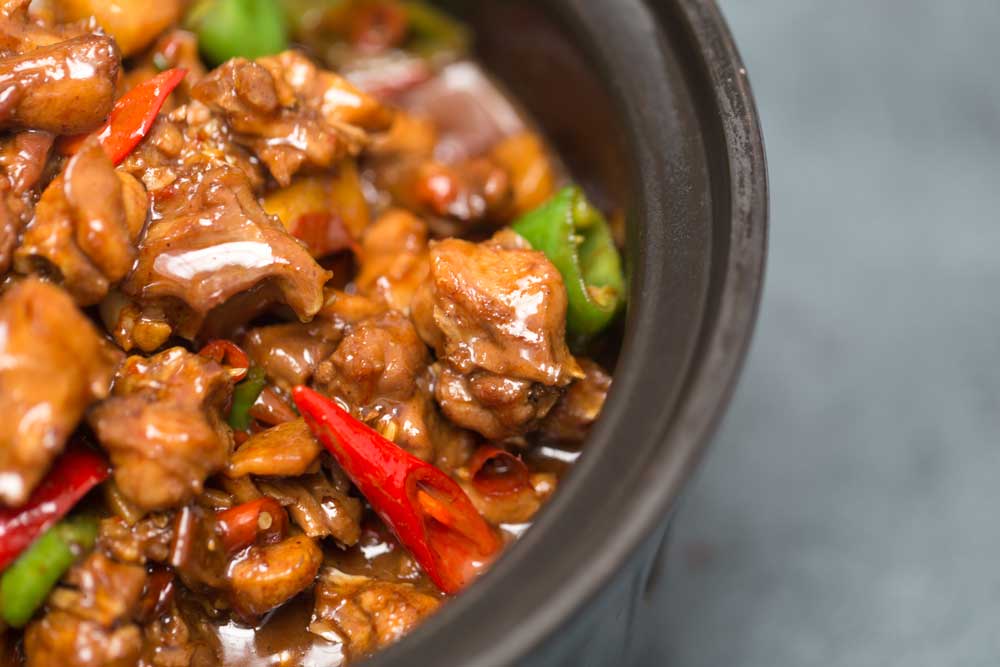
Mongolian Beef
Plan Z Phase: This is a Z3.5 (ZReboot 3.5) recipe.
Servings: Serves 3 – 4. Doubles easily.
There's no need to order out! This tastes better than any take out I’ve had!
Ingredients:
- 1 1/2 lbs steak, cut across the grain into 1/4 inch strips. You can choose anything from flank steak to NY Strip or even rib eye; just depends on how tender you want it and how much money you want to spend.
- 2 Tbl cornstarch
- 2 Tbl peanut oil
For the sauce:
- 1 Tbl of olive oil
- 3 cloves minced garlic (jar garlic will do)
- 1/4 tsp fresh grated ginger root (or paste); I use the squeeze bottle version.
- 1/2 C water
- 1/3 C hoisin sauce. I have also used mango chutney.
- 1/3 C tamari (healthier than soy sauce- less salt) or use soy sauce
- 2 Tbl rice wine vinegar
- 1/4 tsp chili flakes. This amount will give it a zing. More makes it hotter but you can also keep out the chili flakes and people can add more to their dish at the table.
For the vegetables:
- 1/2 C sliced water chestnuts
- 1 C chopped bell peppers. You choose what color you want. I used red.
- 2 C of broccoli spears. I just use the tops of the broccoli for this dish. You could buy frozen and thaw them if you want.
- 3 green onions cut into 1-inch pieces. White and light green parts only. Make sure they are clean.
Instructions:
Toss the strips of beef in the corn starch in a zip lock bag and let them sit on the cutting board for 15 minutes.
Meanwhile, prepare the sauce. Heat the oil in a small sauce pan over medium heat. When the oil is hot, lightly sauté the garlic for a minute, then add the ginger and cook for 30 seconds. Pour the remaining sauce ingredients in the pan and simmer for 5 minutes or until the sauce begins to reduce and thicken. Keep warm while preparing the rest of the ingredients.
In a large saute pan set over medium-high heat, add the 2 tablespoons of peanut oil. When the oil is hot, quickly stir-fry the beef in 2-3 batches. You want it to be nice and crisp on the outsides, but not cooked throughout. Transfer cooked beef to a plate. If the pan has a lot of oil in it, remove all but 1 tablespoon of oil.
Add the vegetables and sauté for 2-3 minutes before returning the beef to the skillet. Add the sauce, stir, and allow everything to cook for an additional 2 minutes before removing from the heat. Serve immediately. This does not need rice or noodles. It’s divine without.
Enjoy!
Cheers,
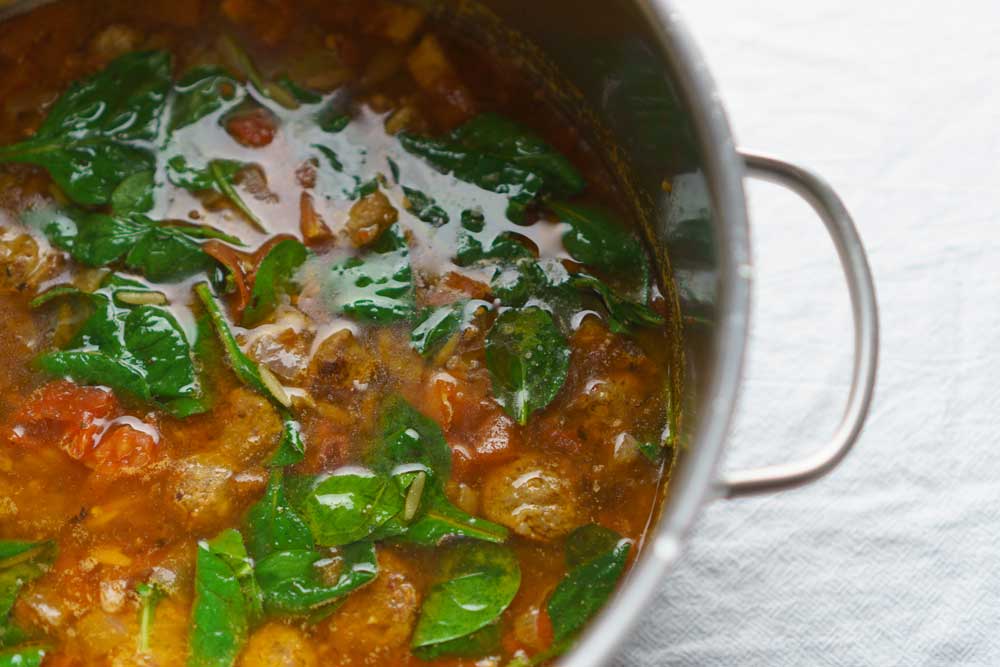
Italian Sausage Soup (ZReduction Version)
Plan Z Phase: This is a Z2 (ZReduction) recipe.
Servings: Serves 2 with a cup of leftovers. One serving is 1-1/2 cups.
This simple Italian Soup is packed with flavor and convenience. It travels well and heats in the microwave too. Leftovers are a BIG YUM.
Ingredients:
- 2 Aidell’s Italian Sausages (from the 4 pack. Save the other two or double the recipe. In Z2 use only the before mentioned brand. These are cleared as lean enough.)
- 1 cup of chopped onion (I use Vidalia)
- 1 red bell pepper, chopped (or your choice of bell pepper)
- 1 clove of minced garlic (Jar garlic will work)
- 1 15 oz can of beef broth or two cups from a carton
- 1 14.5 oz can of diced tomatoes (you can choose the ones with Italian seasoning)
- 2 cups of washed baby spinach (I get mine from the salad bar to save on leftovers)
- Grated sea salt and pepper to taste
Instructions:
Spray a small soup pot or Dutch oven with olive oil spray. Cut your sausages into coin-sized pieces and then add them and the onion to the pot. Cook on medium until onions wilt and sausages begin to brown. Add the chopped bell pepper and garlic along with beef broth and diced tomatoes. Cook on medium for about 15 minutes to blend flavors. Stir regularly. Season with grated sea salt and pepper. Now add the spinach and cook for 1 minute. Stir often to incorporate.
Enjoy!
Cheers,
Cheesy Hash Browns with Sour Cream
Plan Z Phase: This is a Z3.5 (ZReboot 3.5) recipe.
When I first started making this recipe I thought the cheese and the sour cream were the “bad” part. Now I know it was the potatoes. The cheese and sour cream and the yummy butter all combine forces to decrease the glycemic uptake of this potato dish.
Just keep in mind that potatoes are as special as dessert. I only eat them about 4x a year. For me, this casserole will serve at least 8 people. In some households where there is no self-restraint it might serve 4! So be careful!
This is perfect for a buffet table. Everyone will rave about your contribution. If you want to keep the portions lower, consider serving this with a smaller spoon. That way people won’t take as much without having to notice that they are dipping into it several times. Just a little trick I use.
Servings: Serves 8
Ingredients:
- 1 package (1 lb, 4 oz) of plain pre-prepared hash browns (Simply Potatoes is one brand). It would be healthier to shred your own but in this case I splurge a bit on a processed food.
- 2-1/2 cups grated cheddar cheese
- 1/4 cup butter
- 1 cup sour cream
- 1/2 cup minced onion
- sea salt, pepper and paprika
Instructions:
Melt butter and 2 cups of the cheese in a heavy sauce pan, stirring constantly for about 1 minute. Remove from heat. In a large bowl, pour in the potatoes, onions, and sour cream. Now mix in the cheese mixture and season with salt and pepper. Pour all into a 9-inch square baking pan sprayed with oil. Sprinkle the remaining cheese on top along with the paprika. Bake 30 minutes at 350 degrees until bubbly.
These are really HOT when you take them out of the oven so be prepared to let them sit for a spell before you serve them. They are even good at room temperature on a buffet if they’ve been sitting for a while.
Enjoy!
Cheers,
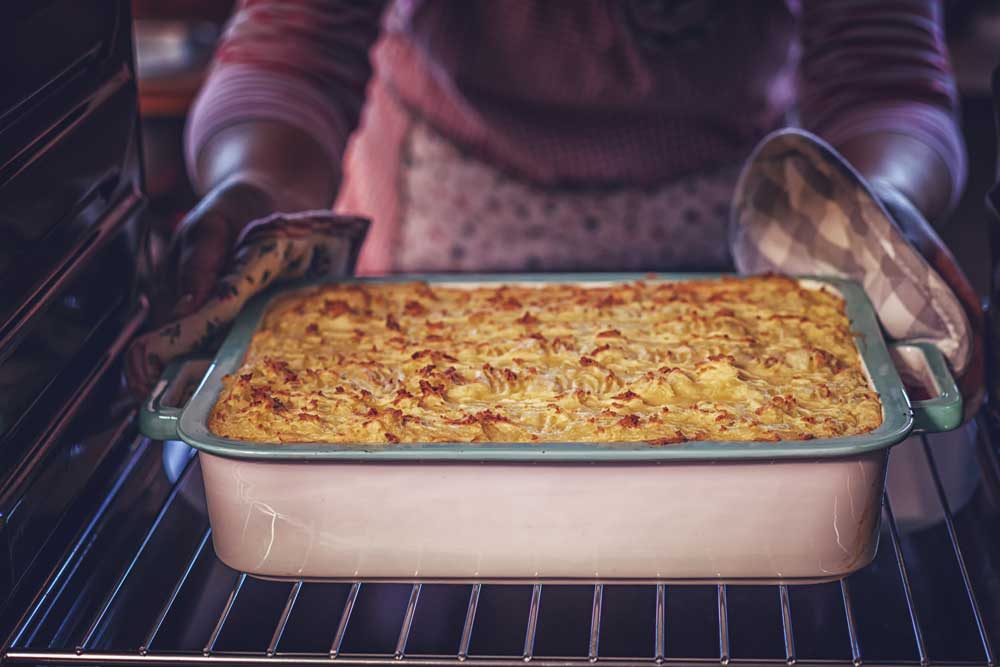
Italian Sausage, Mushroom and Cheese Brunch Casserole
Plan Z Phase: This is a Z3 (ZReboot) recipe.
As far as brunch casseroles go, this one is very easy to make and pleases the crowd. It can be made ahead and heated day of the party.
Servings: Serves 12 as part of a brunch menu. Serves 6 very hungry people with no other items on the side.
Ingredients:
- 1 1/2 lb of loose Italian sausage. Hot or Mild. Your choice
- 2 Tbl of olive oil, divided
- 1 cup of diced onion
- 1 lb of sliced mushrooms or whole mushrooms cut into quarters. Make sure they are clean.
- 2 cup of grated mozzarella cheese or Italian cheese blend
- 1/4 cup of sliced green onion. White and light green parts only
- 1 cup of cottage cheese, rinsed and drained
- 10 eggs
- 1 tsp of Italian seasoning blend
- 1/2 cup of grated Parmesan cheese, divided
Instructions:
Preheat oven to 375 degrees. Spray your 9" X 13” casserole with olive oil spray.
In a large fry pan add 1 Tbl of olive oil. Add the sausage and break it up into bite-sized pieces. Cook over medium high heat to brown the sausage and cook it through. I continually break up the sausage as it cooks so I get small, bite-sized pieces. When it is half cooked, add the diced onion and cook until loosened. When meat mixture is cooked, spread it into the bottom of the casserole dish.
Return your fry pan to the stove and add another Tbl of olive oil. Heat that and add the mushrooms. Cook until all liquid is released, and the mushrooms are beginning to brown on the edges. Layer the mushrooms over the meat mixture.
Sprinkle 1 cup of the cheese and half of the green onions over the casserole ingredients.
The cottage cheese can now be drained and rinsed in a colander.
Take out your blender. Add all of the eggs, the drained cottage cheese and the Italian seasoning blend along with 1/4 cup of Parmesan cheese. Whiz the eggs until the whole mixture is combined. This will only take a few seconds. I just have you do this in a blender so it’s thoroughly combined.
Pour the egg mixture over the casserole ingredients. Gently take a fork and spread open spots in the casserole so the egg mixture will penetrate. You want all ingredients gently coated.
Sprinkle the rest of the cheese over the top.
Bake 30 – 35 minutes or until the center is completely set. You can do the jiggle test to make sure the middle is firming up and the top is beginning to brown.
The casserole can be served after you take it out of the oven. Let it sit 10 minutes first, so it sets up and no one burns their mouth. Garnish the top with the rest of the green onions.
This can sit on a buffet table for service. It’s still good at room temperature. It can also be made ahead and stored in the fridge for up to a few days.
Enjoy!
Cheers,
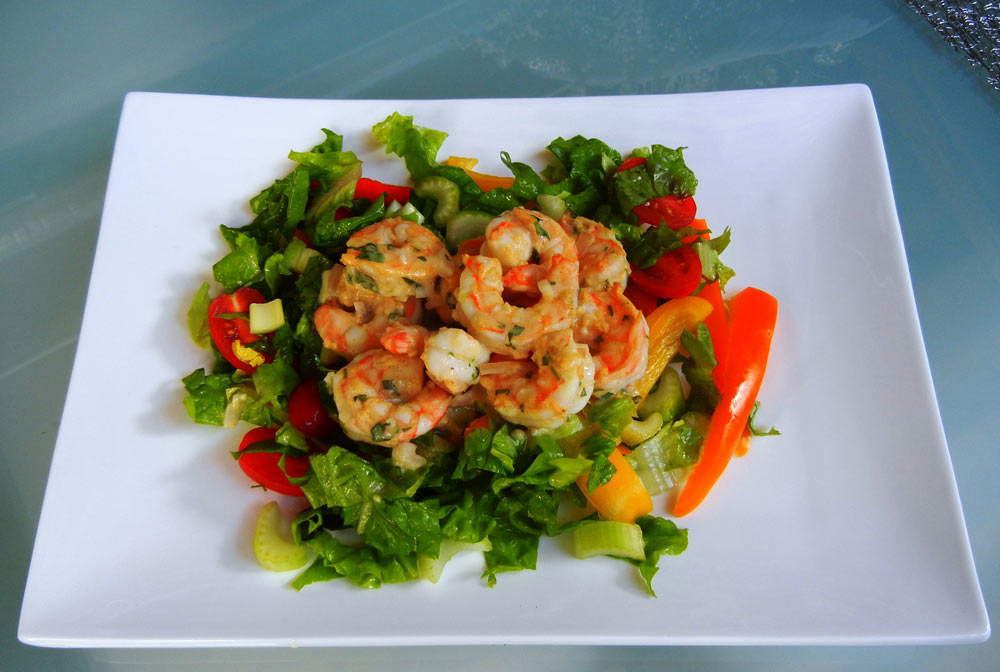
Tarragon Mustard Shrimp
Plan Z Phase: This is a Z2 (ZReduction) and Zola To Go! recipe. This dish made a wonderful lunch salad entrée in our Plan Z kitchen. I think it would be GREAT as an appetizer at a cocktail party, too. If you are on ZReduction you can take this with you and you’ll have what you need to eat. As an appetizer it can be served, hot, room temp or cold. The other guests at the cocktail party will NEVER know you are eating diet food. They will love it, too.
Servings: Serves 6. Can easily be doubled for a party.
Ingredients:
For the Shrimp:
- 1/3 cup of Dijon mustard
- 1 large shallot or 3 green onions, minced
- 2 tsp of minced garlic, jar garlic can work
- 3 Tbl of minced, fresh tarragon. (You need the fresh stuff for this dish)
- 2-1/4 pounds of medium-large shrimp, (3” long) thawed, shelled and deveined.
- sea salt and pepper to taste
- a sprinkle of cayenne
For the optional salad:
- 3 small heads of leaf lettuce cut up into bite-sized pieces. Remember, salad greens are unlimited so have at it.
- 1 large red pepper cut into strips
- 1 large yellow pepper cut into strips
- 1 large orange pepper cut into strips
- 2 cups of celery bits
- 1 pint of cherry tomatoes cut in half
Instructions:
In a large bowl add the mustard, shallot bits, garlic and tarragon. Rinse and drain your shrimp. Add them to the big bowl with the other ingredients and stir. Add a grating of salt and either cayenne or black pepper. This is not a spicy dish. Let it marinate in the refrigerator for an hour or up to 3 hours. Don’t go longer than that without cooking them or the vinegar in the mustard will start to cook the shrimp like ceviche.
Preheat your broiler.
Spray a large cookie sheet with sides. You’ll use olive oil spray. Then add the marinated shrimp. Spread them around so they are in one layer. Spray the top of them with a bit more olive oil spray. Place on the rack below your broiler about 4” below the element. Broil for 2 minutes. Take them out of the oven and turn them over; just sort of stir them up. Put back in the broiler and broil for another two minutes.
Remove from oven and serve. Be sure to get the ‘sauce’ from the bottom of the cookie sheet.
If you are serving this on top of salad, your sauce becomes your dressing. It’s amazing how buttery this dish tastes with no butter added. Just don’t overcook the shrimp and the natural oils of the shrimp will come out and make the sauce taste buttery.
For a cocktail party you can just put these in a bowl and pass out toothpicks to grab them. Don’t ever leave shrimp on a cocktail party table for more than an hour; even if they are cooked. Encourage your guests to eat them and they will be gone in a flash.
For the salad:
Throw all the veggies in a bowl and mix. Take a handful or two, watch your veggie portion so you keep it to one cup with the lettuce as extra and toss it on the plate. Then arrange your shrimp however you wish, I centered mine.
Enjoy!
Cheers,
Quit Worrying
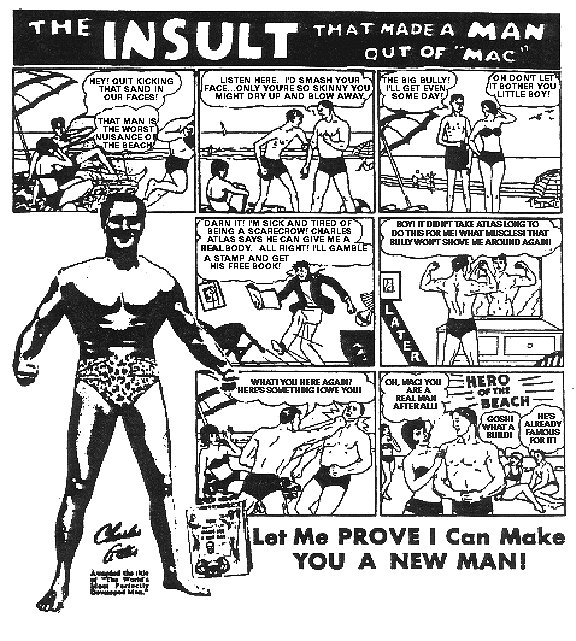
As the VP of Anger Management, I see RED when I think how young I was (11 or 12) when I first saw this ad in a comic book:
Looking at that ad as an adult–47 or 48 years later–makes me realize how Charles Atlas played on adolescent fears and preyed on adolescent wallets. I know I ordered the free booklet and read it several times. But, of course, the real information came in a course that cost more money than I could afford on my allowance and lawn-mowing earnings. In the meantime, my father had purchased a set of barbells that came with an instruction book. I started doing some sporadic weight lifting in the basement.
In Newark, Ohio the schools didn’t have weight rooms. There were some barbells in the high school gym, but mainly for football players and the shot putter. But there were a few guys in school who had obviously been lifting weights in their basements or at the YMCA. They had bigger biceps or wider chests than a lot of us. It was obvious that lifting weights could build stronger bigger muscles.
In college I was in the weight rooms a lot more. There were indoor and outdoor track and field season to train for. But between 1968 and 1972 at Baldwin-Wallace College, there was no weight coach. Most of the weight lifting I did was putting in time and going around the Universal Gym equipment and doing all of the exercises. Records were not kept. I did start noticing some guys like our shot putter (Vince Maglio) was lifting more scientifically needed a couple of spotters when he bench pressed. He had a huge chest and the biggest arms I had seen to that point.
I never saw a steroid in college, but heard a few discussions about them.
In any event, I lifted a lot, but never developed a physique like Charles Atlas or Steve Reeves. Reeves earned the Mr. America title in 1947 and later starred in a string of B movies like Hercules and Hercules Unchained. His workouts were legendary.
I was having lunch with Zola today and asked her about the kinds of women she noticed when she was a girl. "I never missed a Miss America Pageant," she said. "I loved the evening gown competition and wanted to look like that."
It starts early. An online article, Beauty and Body Image in the Media, offers some research on how widespread body image issues are. And a UK article The Diet Industry: Banking on Failure might make you very, very angry. Especially revelations like, "No industry actually benefits from us actually eating healthily for a sustained period of time."
If you are going to get out of diet jail and maintain a healthy weight you are going to have to quit comparing yourself to everyone else. And stay away from "the diet industry" that only makes money when you fail at one diet and try another.
In this trailer from the documentary Bigger Faster Stronger you can get a sense of what lengths men and women will go to because they are never satisfied with their bodies. I want you to watch all 2-minutes and 26-seconds and see if you get as mad as I did. Charles Atlas was a rookie compared today’s marketers. This will give you a sense of how the media manipulates you.
https://youtu.be/3KzGfuFFSxA
Zola and I watched the whole film recently and it got me thinking about how impossible the dream of having a "perfect body" really is. I immediately felt better about myself. Because I instantly understood how and why I have been programmed by the media to feel bad about myself. It all started with Charles Atlas putting something in a little boy’s mind when he was too young to defend against it. Maybe the same thing happened to you when you were little and defenseless. With the right information, you can get rid of your impossible dreams and focus on being your own perfectly wonderful self.
That’s how you get out of diet jail and get on with your real life, not someone else’s fantasy.
I also hope the clip makes you angry enough to never buy a supplement advertised in the back of a magazine showing amazing before and after photography. I hope you are angry that the media has been selling us an unattainable standard of masculine and feminine good looks.
Nobody looks beautiful and perfect 24/7.
It’s madness.
And you have to be mad enough not to get caught up in body image or striving for perfection. There, I feel better. I hope getting mad at the bad role models and ridiculous misinformation flooding the marketplace makes you feel better, too.
I really do.

Quick Coquilles St. Jacques (Scallops in a Creamy Mushroom-Parmesan Sauce)
Plan Z Phase: This is a Z3 (ZReboot) recipe. I had my first Coquille St. Jacques in a restaurant in Chicago when I was 20 years old. I remember that day like it was yesterday. I had never had scallops and was a bit timid. I took my first bite and swooned. I gazed out the window of the restaurant and just let the cream sauce settle in my mouth like a fine red wine. Then I swallowed.
This was the first occasion when I asked the waiter if I might step into the kitchen and lick the pan it was cooked in. I was kidding, of course, but it was an appetizer course I shall never forget.
Serves: Serves 2 as an entrée or smaller portions can be served as an appetizer.
Ingredients:
- 1 Tbl of butter
- 1 shallot minced
- 1 tsp of minced garlic
- 8 oz of mushrooms, sliced
- 8 to 12 oz of scallops, rinsed and drained. If you use bay scallops you leave them alone. If you use sea scallops cut each one into 3 or 4 pieces.
- 1 cup of heavy cream
- 1 tsp of lemon juice
- 1/3 cup of grated parmesan cheese
- 1 tsp of minced parsley
- 1 tsp of minced thyme (for either of these you can use dry herbs. Just lessen the amount)
- salt and pepper to taste
Instructions:
Begin by preheating your broiler.
Put the butter in a large sauté pan. I use a cast iron pan so I can just transfer it into the oven when I need to broil it later. Add the shallot and minced garlic. Heat until beginning to bubble. Add the mushrooms and cook them until just before they begin to brown. Then add the scallops and continue to cook on medium high until the scallops are no longer translucent.
Add the cream and lemon juice.
Cook on medium high until the sauce thickens. This should not take more than about five minutes. The cream will be bubbling.
While this is going on, in a small bowl, add the parmesan cheese, the herbs and a good grind of salt and pepper. Stir.
When the sauce on the scallops is nice and creamy take it off the heat. Pour the parmesan cheese mixture all over the top. Put the pan in the oven under your broiler and cook it until the parmesan is browning and the edges you'll see the cream bubbling along.
IMPORTANT: If you don't use a cast iron pan you will need to use a pan that can handle the heat of the broiler. Transfer your scallop mixture before you put on the grated cheese mixture and then proceed.
When the broiling is complete carefully remove the pan from the heat and set it on a safe surface. Let it cool down for a few minutes before serving. If you serve it too soon you may burn your mouth so give it a rest first.
Enjoy!
Cheers,
Thai Chicken with Peanut Sauce
Plan Z Phase: This is a Z3 (ZReboot) recipe.
This is Thai food and that usually means spicy/hot. Not with this dish unless you WANT it spicy. You can add red pepper flakes either during cooking or after to make this as spicy as you like. Just a sprinkle will usually do. As it is, without the red pepper flakes, this is a yummy dish with creamy peanut butter sauce, tamari and ginger.
Servings: Serves 3 - 4
Ingredients:
- 2 Tbl extra-virgin olive oil
- 1lb package of chicken tenders cut into bite-sized chunks
- Grated sea salt to taste
- Freshly ground black pepper to taste
- 2 bell peppers, thinly sliced. You choose the color. I suggest you choose red as one color to give it some visual interest.
- 1 cup of pea pods
- 1 Tbl minced ginger (jar will work)
- 2 tsp of minced garlic (jar will work)
- 3/4 cup of peanut butter Find one with no sugar or low sugar. I use Skippy Natural in a pinch. Whole Foods carries one that is called 365 that is emulsified (whizzed so it doesn’t separate).
- 1/4 cup tamari or Braggs Liquid Aminos
- Juice of 1 lime
- 1 cup of chicken broth
- 3 green onions, diced
- 1/2 cup of roasted peanuts
- Sprinkle sesame seeds as garnish (optional)
Instructions:
In a large skillet over medium heat, heat oil. Season chicken with salt and pepper and cook until golden and no longer pink, 4 minutes per side. Transfer to a plate. Add peppers and pea pods to the pan and cook until soft, 5 minutes. Add ginger and garlic and cook until fragrant, 1 minute more.
In a small bowl whisk together peanut butter, tamari, and lime juice.
Add peanut sauce and chicken broth to skillet and bring to simmer. Return chicken to skillet. Let chicken simmer in sauce 5 minutes.
You are ready to serve. Spoon the chicken mixture onto your plate and top with green onion bits, peanuts and sesame seeds.
Other Serving Suggestions:
You can serve this dish with zoodles (zucchini noodles)
Enjoy!
Cheers,
Her Doctors Were Blown Away
Dieter Cyndi's journey to a new, healthier life started with a scary event: she was hospitalized from blood pressure complications that were brought on by her weight. Cyndi weighed 335 lbs and decided she needed to make some changes. She tried Nutrisystem first because pre-packaged foods worked well for her 12 hour work day. In the five months she was on Nutrisystem, she lost 18 lbs but found herself socially isolated. It was difficult to entertain company or eat out.
“On Nutrisystem, If I had company, I was kind of restricted to what I was eating but I had to fix this whole other meal for everybody else. And if you wanted to go out, it was a real challenge. It kinda isolated me socially.”
After hearing about Plan Z on the radio, Cyndi decided to give it a try because it sounded a lot more exciting than another month of Nutrisystem. She lost 12.5lbs in the first week!
“I found that the Z diet was very easy. I never felt hungry. It was easy to follow, it tasted good and I was losing weight.”
Cyndi saw other numbers changing too. After a recent doctor’s visit, she noticed huge improvements in her lab results:
- BMI was down 3.9%
- A1C went from 6.7% to 5.5%
- Cholesterol from 260 mg/dL to 164 mg/dL
- Triglycerides went from 239 mg/dL to 147 mg/dL
- LDL (low density lipoprotein) went from 141 mg/dL to 85 mg/dL.
Her doctors were blown away. Listen to her experience below after losing 75 pounds on Plan Z:
Some of Cyndi’s favorite recipes from ZReduction include: cooked cabbage salad, mustard crusted pork chops, chicken scallopini, roasted onion strings, and sweet onion casserole.
“The most important thing I learned: that fact that everything I knew is bogus, all my concepts of dieting and what’s good to eat and what’s not good to eat is just blown out of the water. It’s a whole new re-learning process. It’s working and it’s easy to do. I don’t feel deprived at all.”
Thank you for sharing your story, Cyndi.